Use Azure Automation for creating Resource Groups despite having limited permissions only
In Azure-related engagements I often observe that Azure users are only assigned Contributor-role at one single Azure Resource Group. In general, motivation for this is…
- Users can provision resources within this Resource Group
- Users are protected from accidentally deleting resources in other Resource Groups (e.g. settings of a Virtual Network, security settings, …)
On the other hand, this approach leads to a few issues:
- With only having Contributor role on one Resource Group, you cannot create additional Resource Groups (which would be nice to structure your Azure resources).
- Some Azure Marketplace solutions require to be installed in empty Resource Groups. So, if a user already provisioned resources in “his” Resource Group, he just can’t provision these solutions.
Solution
Azure Automation lets you – among other features – configure PowerShell skripts (called Runbooks) that can run under elevated privileges allowing Contributors to call these Runbooks and perform actions they normally wouldn’t have sufficient permissions for. Such a Runbook can perform following actions (under Subscription Owner role):
- Create a new Resource Group (name specified by a parameter)
- Assign an AD Group (name specified by a parameter) as Contributor to this Resource Group
Necessary steps for implementing the solution
For implementing this, following steps must be taken:
- Step 1: Create an Azure Automation Account
- Step 2: Create a Run As Account with sufficient access permissions
- Step 3: Create and test a new Automation Runbook that creates Resource Groups
- Step 4: Publish the Runbook
Description of the Solution
Step 1: Create an Azure Automation Account
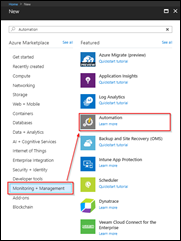
In Azure Portal click on New / Monitoring + Management / Automation
Fill in the required parameters and make sure you create a Run As account
Confirm with Create.
For more information about creating Azure Automation Accounts see:
https://docs.microsoft.com/en-us/azure/automation/automation-quickstart-create-account
Step 2: Create a Run As Account with sufficient access permissions
If you haven’t created the Run As Account during the creation of the Azure Automation Account, create one following this description: https://docs.microsoft.com/en-us/azure/automation/automation-create-runas-account
Go to your Azure Automation Account
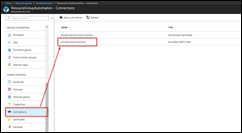
Navigate to Connections / AzureRunAsConnection
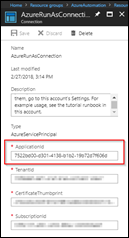
Now you see all the information of the service principal that the Runbook is later running under. Copy the Application ID to the clipboard.
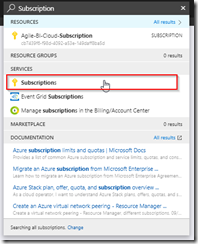
Navigate to the Subscription. Type “Subscriptions” into the search field of the portal.
Click on Subscriptions.
Select your Subscription. On the Subscription overview page click Access Control (IAM) / Add.
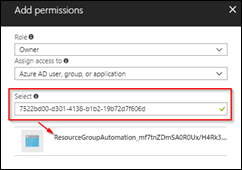
Choose the “Owner”-Role. Enter the Application ID from the clipboard to the Select field and click on the User that gets displayed. That is the service principal from your Azure AD.
Confirm with Save.
You have now successfully assigned Subscription Owner rights to the Service Principal created for the Azure Automation RunAs-Account the Runbook will run under.
Step 3: Create and test a new Automation Runbook that creates Resource Groups
Go back to your Automation Account.
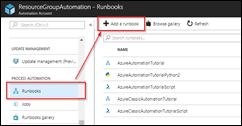
Select Runbooks and click on Add a Runbook.
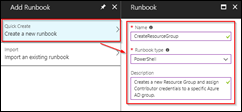
Select Create a new runbook.
Fill in the requested fields:
Name: <a name for your runbook>
Runbook type: PowerShell
Description: <some description for the runbook>Confirm with Create
In the editor add the following lines of code
 Param(
 [string]$ResourceGroupName,
 [string]$RGGroupID
)

$connectionName = "AzureRunAsConnection"

try
{
    # Get the connection "AzureRunAsConnection "
    $servicePrincipalConnection=Get-AutomationConnection -Name $connectionName

    $tenantID = $servicePrincipalConnection.TenantId
    $applicationId = $servicePrincipalConnection.ApplicationId
    $certificateThumbprint = $servicePrincipalConnection.CertificateThumbprint

    "Logging in to Azure..."
    Login-AzureRmAccount `
        -ServicePrincipal `
        -TenantId $tenantID `
        -ApplicationId $applicationId `
        -CertificateThumbprint $certificateThumbprint

    New-AzureRmResourceGroup -Name $ResourceGroupName -Location 'West Europe'

    # Set the scope to the Resource Group created above
    $scope = (Get-AzureRmResourceGroup -Name $ResourceGroupName).ResourceId

    # Assign Contributor role to the group
    New-AzureRmRoleAssignment -ObjectId $RGGroupID -Scope $scope -RoleDefinitionName "Contributor"
}
catch {
   if (!$servicePrincipalConnection)
   {
      $ErrorMessage = "Connection $connectionName not found."
      throw $ErrorMessage
  } else{
      Write-Error -Message $_.Exception
      throw $_.Exception
  }
}
Save the Runbook and click on Test Pane.
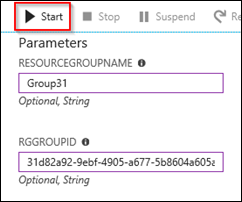
Fill in the two parameter fields (Resource Group Name and Group ID) and click on Start.
This creates the Resource Group and assigns Contributor role to the Azure AD group specified. You might get an error message “Authentication_Unauthorized” because of a bug that occurs when working with a service principal. Ignore this message as the script (according to my tests) does the job.
Step 4: Publish the Runbook
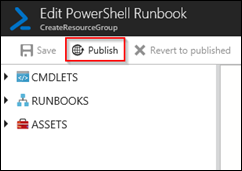
Close the test pane and click on Publish.
Confirm with Yes.
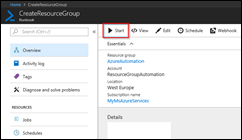
That’s it. Users can now go to the Automation Account, select the Runbook and click on Start.
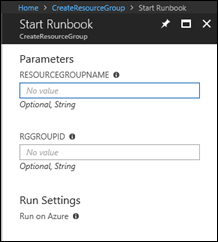
This opens the form for entering the parameters. After clicking OK, the Resource Group will be created and the group assignment will be done.
Final Words
One extension to this (runbook) could be to allow the user to enter a group name instead of the group id. This would require one additional step: an AD lookup. See the code here:
 $groupID = (Get-AzureRmADGroup -SearchString $RGGroup).Id
New-AzureRmRoleAssignment -ObjectId $groupID -Scope $scope -RoleDefinitionName "Contributor"
This, however, would require giving the service principal (Run As account) access permissions to the Azure AD. That’s something I wanted to avoid here.
