Intelligently Routing Cases by Product with Cognitive Services Custom Vision
Microsoft’s Cognitive Services team recently made available a number of new services at the Build 2017 conference, to further augment the tools available to developers to enhance applications with natural methods of communication. One of these new services is the Custom Vision Service, currently in public preview, which “is an easy-to-use, customizable web service that learns to recognize specific content in imagery, powered by state-of-the-art machine learning neural networks that become smarter with training.” Domain-specific customizable image recognition has significant applicability to customer service scenarios, allowing us to intelligently automate the identification of products or parts, and to initiate product-specific actions.
There are a number of ways we can apply this product or part recognition capability, including:
- Auto-routing cases based on the product or part shown in an attached picture, in instances where the customer is not able to identify the product themselves (as we will show in this post)
- Enabling field technicians to identify a part or product while in the field
- Enabling customers to easily identify a product by simply taking a photo while engaging with a service-centric bot
In this post, we will see how the Custom Vision Service can be leveraged to automatically identify a product based on a photo that the customer uploads while submitting an issue via a self-service portal, then automatically and intelligently routed to the appropriate team with product expertise. We will create a Custom Workflow Activity that calls the Custom Vision Service to identify the product contained within an image attached to a Case Note. We will then use that activity within a Workflow process to automatically route the case to a product-specific queue.
This 50 second video shows the functionality in action:
[video width="800" height="450" mp4="https://msdnshared.blob.core.windows.net/media/2017/05/RouteCaseCustomVision.mp4"][/video]
We will build on the sample code available in these two resources:
- Create a custom workflow activity on MSDN, and the associated code samples in the Dynamics 365 SDK
- The Custom Vision Service quickstart guide in the Cognitive Services documentation
Pre-requisites
The pre-requisites for building and deploying our custom workflow activity include:
- An instance of Dynamics 365 for Customer Service (Online)
- You can request a trial of Dynamics 365 for Customer Service here
- In our Dynamics 365 organization, we need to have configured:
- Products in our Products Catalog
- Queues that align with our individual products
- A Dynamics 365 portal installed and enabled for case creation
- A case creation Entity Form that enables the attaching of a single file of the appropriate image MIME type / file extensions
- The Dynamics 365 Software Development Kit (SDK)
- A Microsoft Account, for signing into the Custom Vision Service (https://customvision.ai)
- Visual Studio 2015 or higher
- Microsoft .NET Framework 4.5.2
Setting Up our Custom Vision Service Project
The first thing we will do is to set up our own Custom Vision Service project. The Custom Vision Service allows us to go beyond the broader image recognition capabilities of the Computer Vision API, and to create our own custom computer vision model, specific to the products or parts that we want it to be able to classify.
The broad steps involved in preparing the Custom Vision Service are:
- Signing into https://customvision.ai with your Microsoft Account
- Building a Custom Vision Service project (Classifier)
- Refining or Improving the Classifier
- Testing the Classifier
The Custom Vision Service documentation provides an in-depth, step-by-step guide to this process, so rather than recreate it in this post, it is recommended that you follow the steps outlined here. We will hit on some of the key aspects as it relates to our product identification scenario.
Following the instructions, we log into the Custom Vision Service, and create a new project. When creating a new project, we can choose a specific domain, or choose General. If your products are those typically found in a shopping catalog or shopping website, you may wish to select Retail. Otherwise, General may be more suitable:

For each product or part that we wish to be able to identify, we will upload a variety of images, and assign a Tag to the images. While it is possible to assign multiple tags, we will assign a single tag to each image. We will use tags that match the names of the products as contained in the Dynamics 365 product catalog:

After we have repeated the process of uploading and tagging photos for each of the products or parts that we will include in our classifier, we can proceed to train, evaluate, and improve our classifier as outlined in the quickstart guide. We also set our desired iteration as the ‘Default’ iteration.
After training our classifier, we can also run a quick test with a local image file, or with an image URL:
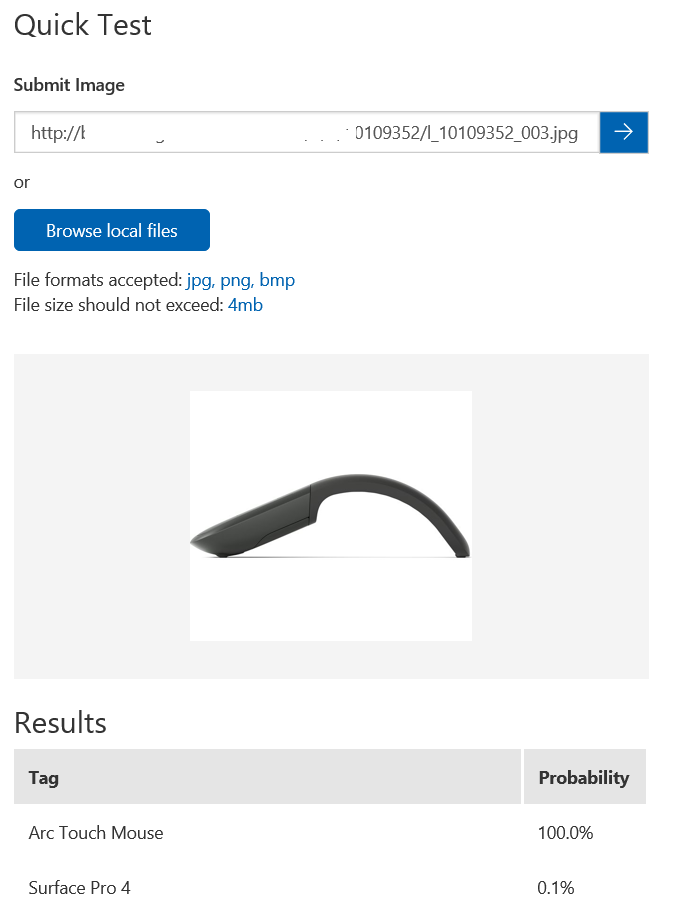
Assuming our results are satisfactory, we can proceed to creating a Custom Workflow Activity that will call the Prediction API to classify images attached to Notes.
We can obtain the necessary credentials from the Custom Vision site to call the Prediction API by selecting the Performance tab, and clicking Prediction URL:
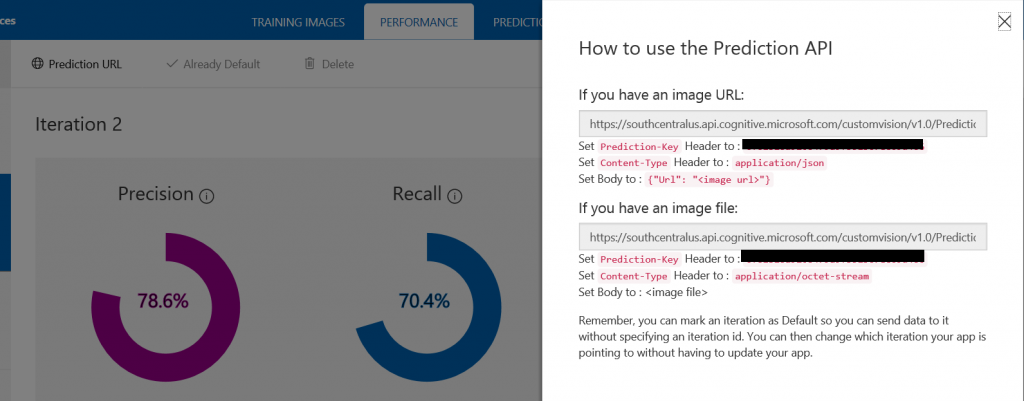
We can extract our Project GUID from the URL, and our Prediction Key from the Prediction-Key header value.
To use the Prediction API, we will build on the sample C# code provided in the quickstart guide.
Building our Custom Workflow Activity
In Visual Studio, we will first create a new project by selecting Workflow under Visual C# in the Installed Templates pane, and then select Activity Library. We will name our project DetermineProduct:
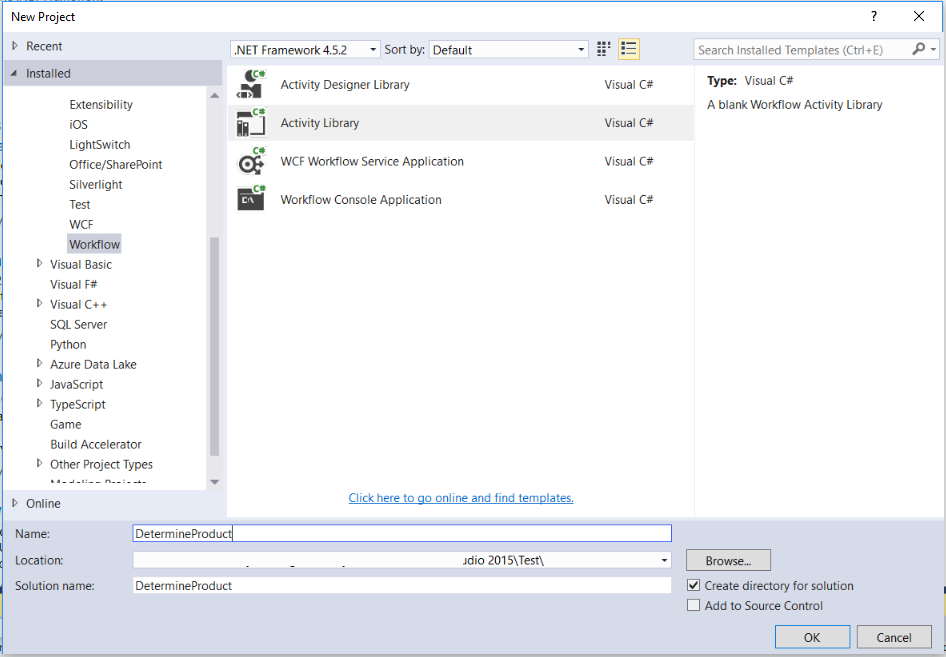
In our Project Properties, on the Application tab, we specify .NET Framework 4.5.2 as the target framework.
Adding References
We add references to our project by right-clicking the DetermineProduct project in the Solution Explorer, and adding the following:
- Microsoft.Xrm.Sdk
- Microsoft.Xrm.Sdk.Workflow
- System.Net
- System.Net.Http
- System.Runtime.Serialization
Note that the Microsoft.Xrm.Sdk and Microsoft.Xrm.Sdk.Workflow assemblies are found within the Dynamics 365 SDK.
Adding a Data Contract for the Custom Vision Service
To facilitate interacting with the Custom Vision Service, we add a new item to our project: a Visual C# class which we will name CustomVision.JSON.cs. We will populate this file with JSON data contracts for the data that comes back in the response from the sample code provided for the Prediction API.
[snippet slug=customvision_datacontract lang=c-sharp]
Adding Our C# Code
Following the instructions outlined in the Dynamics 365 documentation, we delete the Activity1.xaml file in the project, and Add a new Class to the project, which we name DetermineProduct.cs.
The full code for our class is shown further below, but first we will walk through the building of the class.
To our new class, we:
- add some using statements
- make the class inherit from the CodeActivity class and give it a public access modifier
- add functionality to the class by adding an Execute method
[snippet slug=customvision_usingstatements lang=c-sharp]
We define our input and output parameters for our custom activity:
- note_input as an input parameter
- this is the Note that has just been created to initiate our workflow
- predictionKey as an input parameter
- this is the Prediction Key that we obtained earlier
- projectGuid as an input parameter
- this is the identifier for our classifier project that we obtained earlier
- product as an output parameter
- this is a Dynamics 365 EntityReference to the identified product from our catalog
- probability as an output parameter
- this is an indicator of the confidence of the product identification
[snippet slug=customvision_parameters lang=c-sharp]
In our Execute method, we create our Tracing Service and our Context for our custom workflow activity, then set our default return values:
[snippet slug=customvision_tracingcontext lang=c-sharp]
Next, we retrieve the note entity and required attributes based on the inbound note EntityReference:
[snippet slug=customvision_getnote lang=c-sharp]
We then confirm that we have an attachment filename, and if so, we convert the document body into a Byte array, for use with the Prediction API:
[snippet slug=customvision_bytearray lang=c-sharp]
Next, we create our HttpClient, prepare our request to the Prediction API with the appropriate headers, credentials, and URL structure, and retrieve our response:
[snippet slug=customvision_createclient lang=c-sharp]
We now:
- serialize our response with our data contract
- confirm that we have some Predictions of what the product is
- use our top-ranking Prediction to build and execute a query to confirm that we have a matching product name in our catalog
- set the matching product from the catalog as our output Product EntityReference, and output our prediction Probability as well
[snippet slug=customvision_callpredictions lang=c-sharp]
The full code for our class is shown below:
[snippet slug=customvision_fullsnippet lang=c-sharp]
Before compiling our assembly, we sign it. In the project properties, under the Signing tab, we select Sign the assembly and provide a key file name.
We are now ready to compile the assembly by Building the solution.
Registering our Assembly
We now need to register our custom workflow activity assembly on our Dynamics 365 instance. To do that, we will use the Plug-in Registration Tool. This tool is available in the Dynamics 365 SDK.
Following the instructions in the documentation, we launch the tool, and authenticate using our administrator credentials for Dynamics. We then select Register New Assembly from the Register menu.
In the resulting dialog box, we choose the location of our compiled assembly (which should be in the DetermineProduct\bin\Debug folder). We select our assembly and our workflow activity for registration. We specify Sandbox as the isolation mode, and Database as the storage location. Finally, we click Register Selected Plugins:
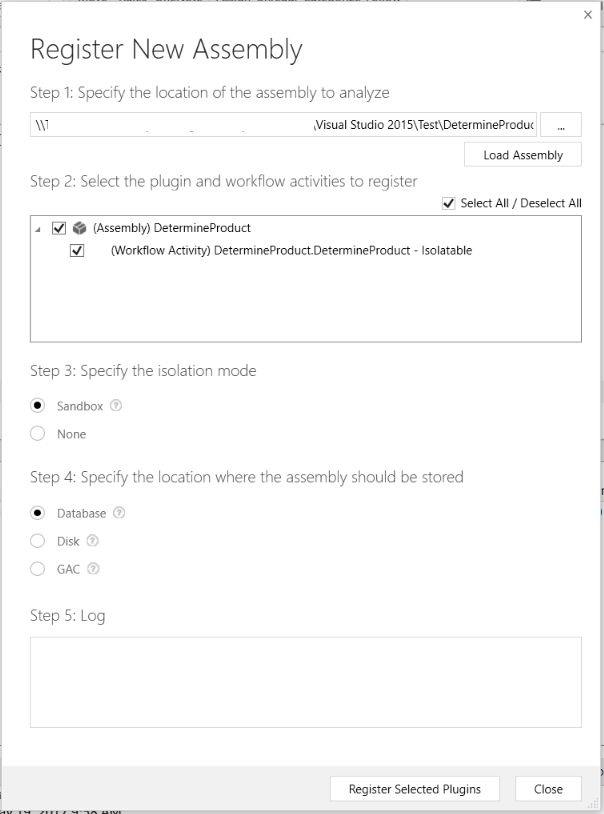
We now have a custom workflow activity that will allow us to determine whether Note attachment images match a product in our catalog, and can use that as a part of our business processes.
Routing Cases based on Product Identified in Image
In our example, we will use our custom workflow activity to create a new workflow process that will attempt to find a product match for any cases created from the portal with an image attachment.
Logged in to the Dynamics 365 web client with our administrator credentials, we navigate to Settings > Customizations > Customize the System. We choose Processes from the left navigation, and choose New.
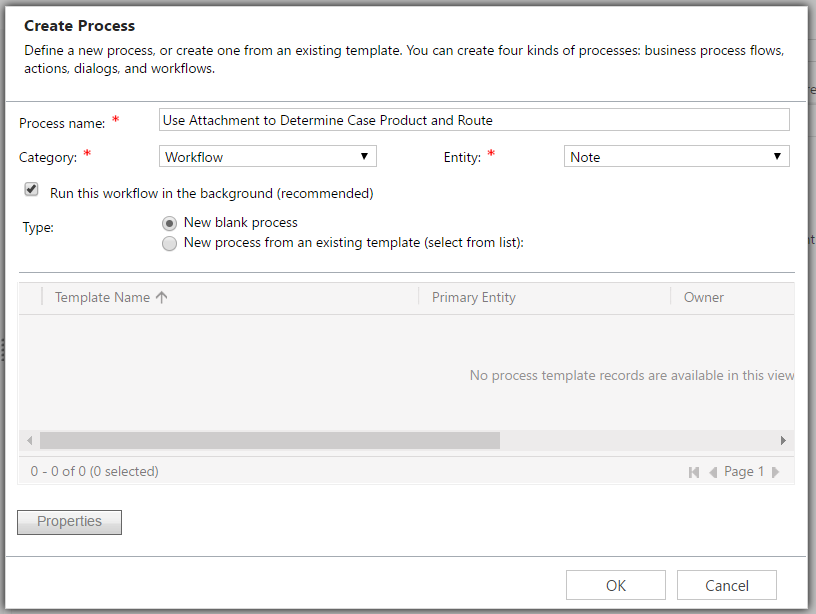
We specify that we are creating a Workflow type of process that is applicable to the Note entity, running in the background:
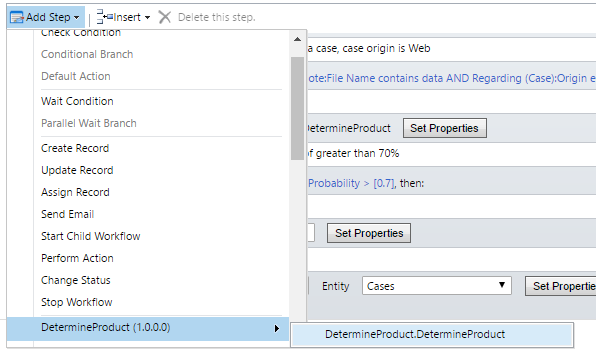
When defining our process logic, we can now access our Determine Product action from the Add Step menu:
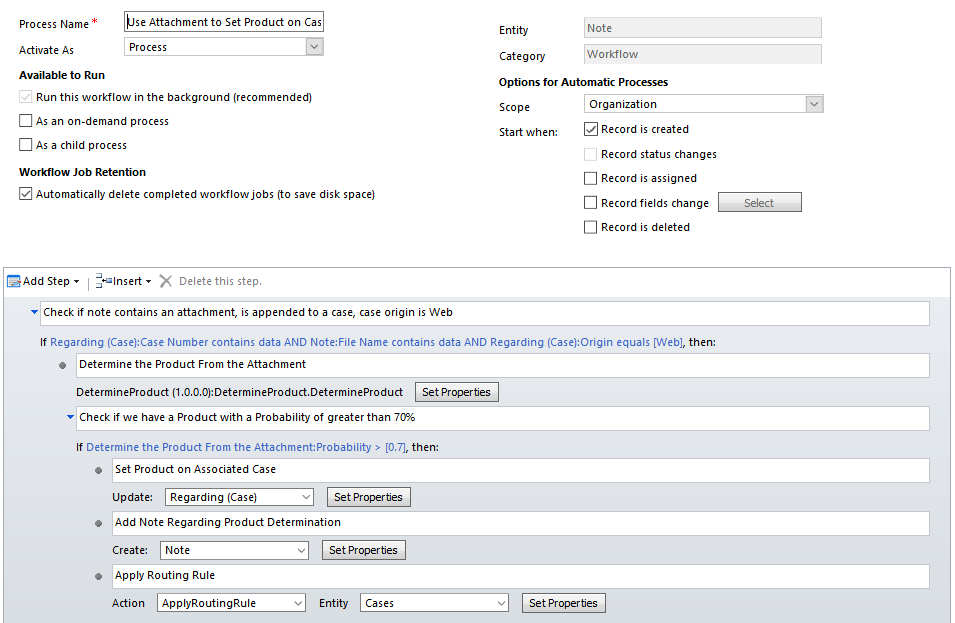
We continue to design our process such that it is activated when a record is created, and we define our complete logic as described below:
- we check to ensure our Note contains an attachment, is associated with a Case, and was submitted from the portal
- if our check passes, we use our custom action to determine the product found in the attachment image
- note that we can restrict the MIME types that will be accepted in Case Creation attachments in our Entity Form settings of the portal
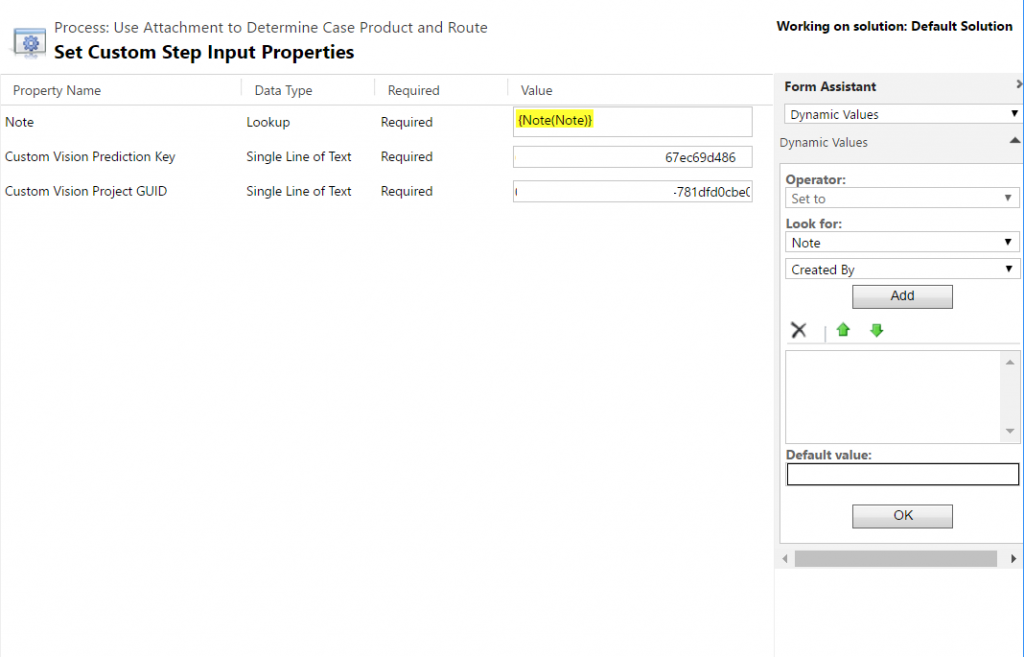
- we pass in our Note Entity Reference, and our Project and Prediction API credentials, as shown in the detail below
- we check to see whether our first returned prediction has a probability of greater than the nominal value of 0.7; if so, we:
- set the appropriate product lookup value on our case
- add another note associated with our case to indicate that the product was auto-determined, and what the calculated probability was
- apply our routing rules; these routing rules can be configured to route to specific queues based on the product associated with the case
Detail on Custom Action Step Properties
After we Save and Activate our process, we are now ready to test it.
As shown in the video at the start of the post, we can create a case from our portal, attach a product image as we submit the case, and after a brief time, our case should be added to the appropriate product queue.
With this functionality, we have been able to streamline the process of routing customer issues directly to subject matter experts in our organization, while enabling our customers to intelligently engage with us without requiring them to have extensive product knowledge.