Automating Agent Actions with Cognitive Services Speech Recognition in USD
Microsoft’s Cognitive Services offer an array of intelligent APIs that allow developers to build new apps, and enhance existing ones, with the power of machine-based AI. These services enable users to interact with applications and tools in a natural and contextual manner. These types of intelligent application interactions have significant applicability in the realm of Service, to augment the experiences of both customers and agents.
In this post, we will focus on the Bing Speech API, and how it can be leveraged within the agent's experience, to transcribe the spoken conversation with customers, and automate agent activities within the Unified Service Desk. We will build a custom Unified Service Desk hosted control that will allow us to capture real-time spoken text, and automatically trigger a search for authoritative knowledge based on the captured text.
Concept and Value
As agents interact with customers by telephone, they are engaged in a conversation in which the details of the customer's need will be conveyed by voice during the call. Agents will typically need to listen to the information being conveyed, then take specific actions within the agent desktop to progress the case or incident for the customer. In many instances, agents will need to refer to authoritative knowledgebase articles to guide them, and this will often require them to type queries into knowledgebase searches, to find appropriate articles. By transcribing the speech during the conversation, we can not only capture a text-based record of some or all of the conversation, but we can also use the captured text to automatically perform tasks such as presenting contextually relevant knowledge, without requiring the agent to type. Benefits include:
- Quicker access to relevant knowledge, reducing customer wait time, and overall call time
- Improved maintenance of issue context, through ongoing access to the previously transcribed text, both during the call, and after the call concludes
- Improved agent experience by interacting in a natural and intuitive manner
This 30-second video shows the custom control in action (with sound):
[video width="800" height="482" mp4="https://msdnshared.blob.core.windows.net/media/2016/05/CognitiveServiceSpeech_USD.mp4"][/video]
Real-time recognition and transcribing of speech within the agent desktop opens up a wide array of possibilities for adding value during customer interactions. Extensions of this functionality could include:
- Speech-driven interactions on other channels such as chat and email
- Other voice-powered automation of the agent desktop, aided by the Language Understanding Intelligent Service (LUIS), which is integrated into the Speech API, and which facilitates the understanding of intent of commands; As an example, this could allow the agent to “send an email”, or “start a funds transfer”
- Saving of the captured transcript in an Activity on the associated case, for a record of the conversation, in situations where automated call transcription is not done through the associated telephony provider
- Extending the voice capture to both agent and customer, through the Speech API’s ability to transcribe speech from live audio sources other than the microphone
The custom control we build in this post will allow us to click a button to initiate the capture of voice from the user’s microphone, transcribe the speech to text, present the captured speech in a textbox within the custom USD control, and trigger the search for knowledge in the Unified Service Desk KM Control by raising an event.
In this post, we will build on the sample code available in these two resources:
- Create custom Unified Service Desk hosted control on MSDN, and the associated USD Custom Hosted Control template in the CRM SDK
- The sample Windows application included in the Cognitive Services SDK
Pre-requisites
The pre-requisites for building and deploying our custom hosted control include:
- An instance of Dynamics CRM Online, with the Unified Service Desk installed
- You can request a trial of Dynamics CRM Online here
- When installing the Unified Service Desk in your instance of CRM Online and on your client desktop, ensure you deploy the Knowledge Management sample application
- A subscription and key for the Cognitive Services Bing Speech API
- As of the time of writing, you can obtain a free subscription to this preview service by logging in with your Microsoft account here, and requesting a new trial of the “Speech Preview” product
- Visual Studio 2015
- Microsoft .NET Framework 4.5.2
- NuGet Package Manager for Visual Studio 2015
- Microsoft Dynamics CRM SDK templates for Visual Studio that contains the Unified Service Desk custom hosted control project template. You can get it in one of the following ways:
- Download the CRM SDK template from the Visual Studio gallery. Double-click the CRMSDKTemplates.vsix file to install the template in Visual Studio.
- Download and install the CRM SDK. The templates file, CRMSDKTemplates.vsix, is located in the SDK\Templates folder. Double-click the template file to install it in Visual Studio.
- The Cognitive Services Speech-To-Text API client library, which can be downloaded in x86 or x64 build packages from GitHub here
Building our Custom Control
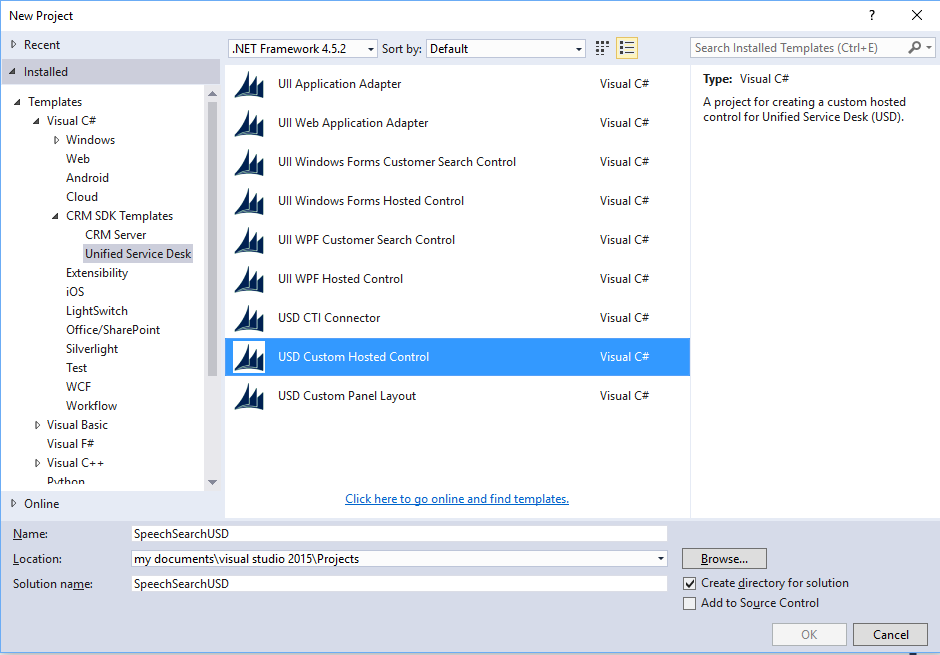
In Visual Studio 2015, we will first create a new project using the Visual C# USD Custom Hosted Control template, and will name our project SpeechSearchUSD.
We will use the instructions found on NuGet for our respective build to add the Speech-To-Text API client library to our project. For example, the x64 instructions can be found here.
We also set the Platform Target for our project build to the appropriate CPU (x64 or x86), to correspond with our Speech-to-Text client library.
Laying Out our UI
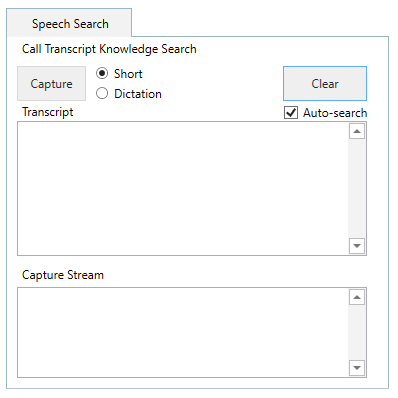
For our custom control, we will design it to sit in the LeftPanelFill display group of the default USD layout. In our XAML code, we add:
- A Button to initiate speech capture from the microphone, in both Long Dictation mode, and Short Phrase mode
- A Button to clear any previously captured speech transcripts
- Textboxes to present:
- the partial results as they are captured during utterances
- the final, best-choice results of individual utterances
- RadioButtons, to allow the agent to agent to specify Short Phrase mode, or Long Dictation mode
- Long Dictation mode can capture utterances of up to 2 minutes in length, with partial results being captured during the utterances, and final results being captured based on where the sentence pauses are determined to be
- Short Phrase mode can capture utterances of up to 15 seconds long, with partial results being captured during utterances, and one final result set of n-best choices
- A Checkbox, to allow the agent to choose whether knowledgebase searches are automatically conducted as final results of utterances are captured
Our final markup should appear as shown below:
[snippet slug=xaml-for-custom-usd-control-speech-search line_numbers=false lang=xml]
Our custom control should appear as shown below:
Adding Our C# Code
In our USDControl.xaml.cs code-behind, we add several using statements. We also:
- use a private a variable for our Bing Speech API Subscription Key that we obtained as one of our pre-requisites
- set a variable for the language we will use when recognizing speech; several languages are supported, but we will use English in our sample
- set several other variables and events that we will use in our code
[snippet slug=using-statements-for-speech-search-c line_numbers=false lang=c-sharp]
To our UII Constructor, we add a call to our InitUIBinding method, which configures some initial bound variables:
[snippet slug=initialization-for-speech-usd line_numbers=false lang=c-sharp]
We now add in our click event handler for our Capture button. In it, we set the SpeechRecognitionMode, depending on the checkbox selection of the agent. We temporarily disable our input buttons, and call our CreateMicrophoneRecognitionClient method with our capture mode, recognition language, and subscription key as parameters, and get a MicrophoneRecognitionClient object returned, which we then use to start recognition, with the StartMicAndRecognition method:
[snippet slug=capture-speech-search-click line_numbers=false lang=c-sharp]
We create our instance of the MicrophoneRecognitionClient class using the CreateMicrophoneRecognitionClient method. In this method, we use SpeechRecognitionServiceFactory to create our MicrophoneRecognitionClient. We then set event handlers as appropriate, depending on whether we are in Short Phrase, or Long Dictation mode:
[snippet slug=create-microphone-recognition-client line_numbers=false lang=c-sharp]
We adapt our event handlers from those included in the Windows sample application in the Cognitive Services SDK. For the partial response event handler, we will write the result to our Capture Stream Textbox. For the final response event handlers for Long Dictation and Short Dictation, we end the recognition capture, and re-enable our UI elements, as well as writing our final response results to the Transcript Textbox:
[snippet slug=response-received-handlers line_numbers=false lang=c-sharp]
When writing our final response after speech capture, we loop through the response results, and build a string containing each result, along with its corresponding Confidence, which we display in our Capture Stream Textbox. For the top result returned, we also display it in our Transcript Textbox, and if auto-searching is selected, we call our TriggerSearch method:
[snippet slug=write-response-result-method line_numbers=false lang=c-sharp]
In our TriggerSearch method, we adapt the sample included in the custom hosted control template to add our captured text string to the current USD context. We then fire an event named QueryTriggered:
[snippet slug=usdspeechsearch-triggersearch-method line_numbers=false lang=c-sharp]
We also add in an event handler to allow a text selection in the Transcript Textbox to trigger a search via the TriggerSearch method:
[snippet slug=usdspeechsearch-select-handler line_numbers=false lang=c-sharp]
In our code-behind, we add in some additional methods to write text to our textboxes, handle button clicks, and other basics. These additional code snippets are found in the downloadable solution at the end of this post.
We can now Build our solution in Visual Studio.
Upon successful build, we can retrieve the resulting DLL, which should be available in a subdirectory of our project folder:
.\SpeechSearchUSD\bin\Debug\SpeechSearchUSD.dll
We can copy this DLL into the USD directory on our client machine, which by default will be:
C:\Program Files\Microsoft Dynamics CRM USD\USD
We also copy the SpeechClient DLL that makes up the Cognitive Services Speech-To-Text API client library that we retrieved from GitHub earlier, into our USD directory.
Configuring Unified Service Desk
We now need to configure Unified Service Desk, by adding our custom hosted control, and the associated actions and events to allow it to display and interact with the KM control.
To start, we log in to the CRM web client as a user with System Administrator role.
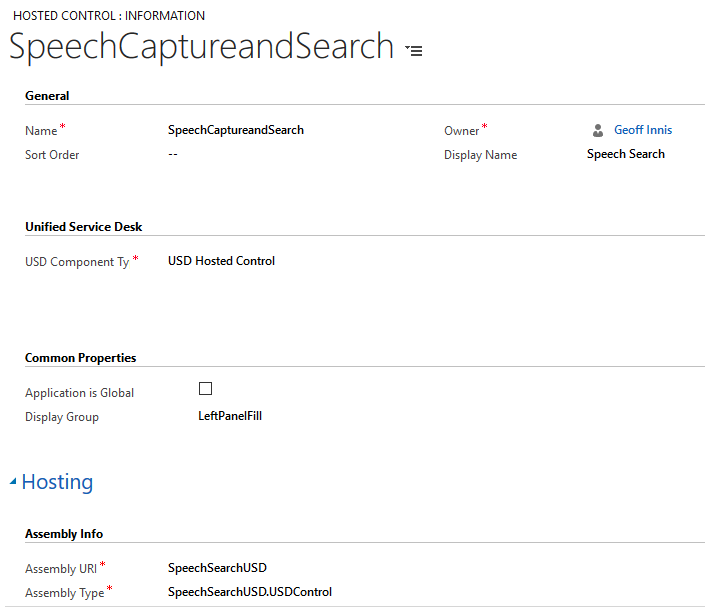
Next, we will add a new Hosted Control, which is our new custom control that we have created. By navigating to Settings > Unified Service Desk > Hosted Controls, we add in a Hosted Control with inputs as shown below. Note that the USD Component Type is USD Hosted Control, and the Assembly URI and Assembly Type values incorporate the name of our DLL.
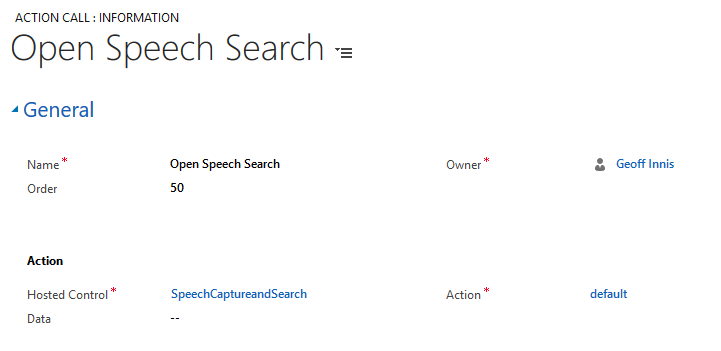
Next, we will add a new Action Call, by navigating to Settings > Unified Service Desk > Action Calls, and adding a new one, as shown below. We use the default action of our newly added hosted control, which will instantiate the control when the action is called:
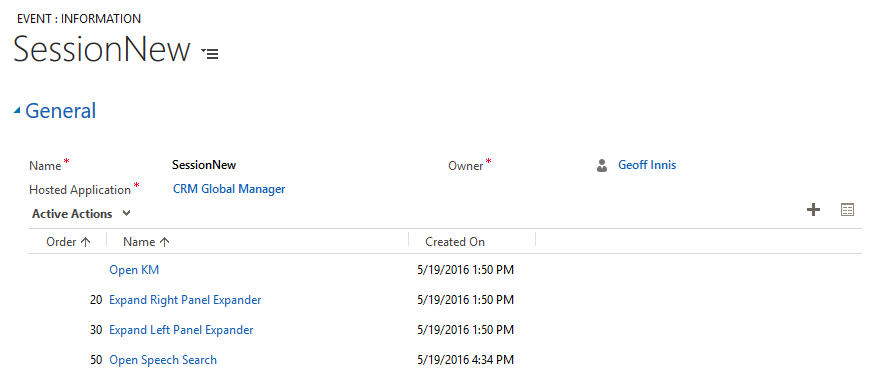
Next, we will add our new Action Call to the SessionNew event of the CRM Global Manager, which will cause our control to be instantiated when a new session is initiated. We can do this by navigating to Settings > Unified Service Desk > Events, and opening the SessionNew event of the CRM Global Manager. We add our new action to the Active Actions for the event:
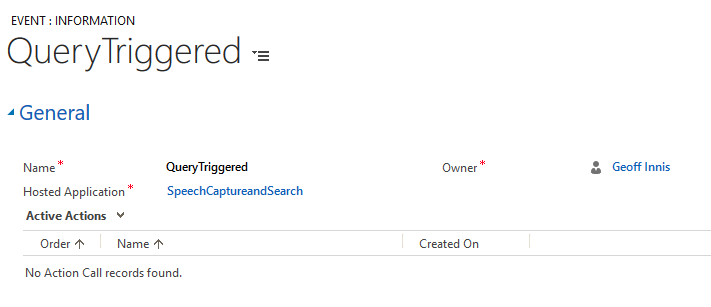
Next, we will add configurations to execute a knowledgebase search when appropriate, using the data from the control. We navigate to Settings > Unified Service Desk > Events, and add a New Event. Our Event is called QueryTriggered, to match the name of the event our custom USD control raises. We add this event to the SpeechCaptureandSearch Hosted Control:
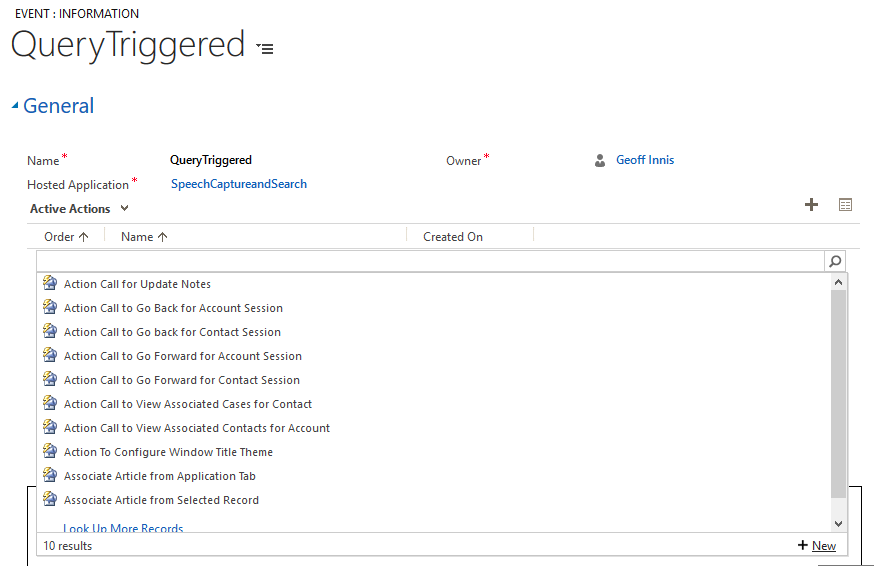
Next, we create a new Action Call for the QueryTriggered event, by clicking the + to the top-right of the sub-grid, searching, then clicking the ‘+New’ button, as shown below:
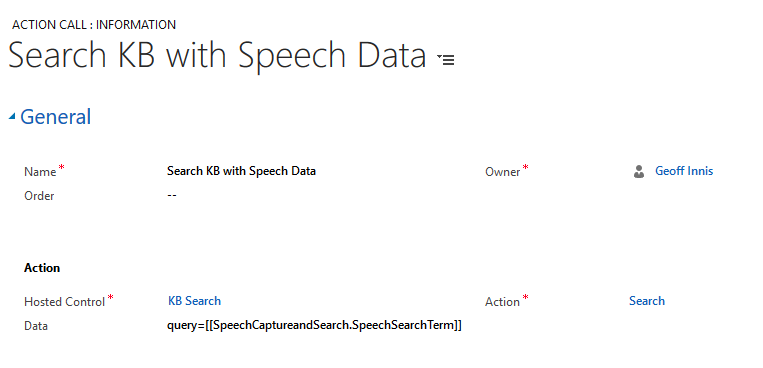
Our new Action Call will execute the Search action of the KB Search control, which is our name for our KM Control. We pass the search term data that our custom control added to the context, by adding a Data value of query=[[SpeechCaptureandSearch.SpeechSearchTerm]] .
We can also add a Condition to our Action Call, so that the search is only conducted when we have a non-empty search term, with a condition like this: "[[SpeechCaptureandSearch.SpeechSearchTerm]]" != "" 
If desired, we can also add some sub-actions to our Search KB with Speech Data Action Call by selecting the chevron in the top navigation, and choosing Sub Action Calls. For example, we may wish to ensure the right panel is expanded, and that the KB Search hosted control is being shown:
Testing our Custom Hosted Control
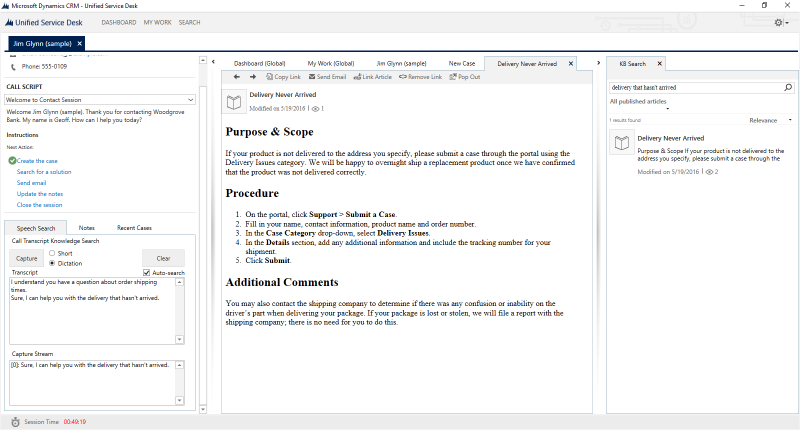
We are now ready to launch the Unified Service Desk on our client machine, and test the hosted control. After we log into USD, and start a session, our Speech Search control will appear, and we can start capturing our speech, and searching for related knowledge:
Some things to try, if starting with the sample data currently deployed in a CRM Trial, include:
- With the Short radio button selected, Auto-search checkbox checked, and your microphone enabled, click the Capture button, and say “Yes, I can help you with Order Shipping Times”, and see the corresponding KB article automatically surface in the KM Control
- Highlight the phrase “Order Shipping Times” from the Transcript Textbox, to see how you can automatically search on key phrases from the past conversation
The solution source code can be downloaded here. You will need to insert your Speech API subscription key into the placeholder in the code-behind.
