Test Automation Guidance using VS 2010 Coded UI
Author:
Raj Kamal (rajkamal@microsoft.com)
New !!! On special demand, sharing the below content in PDF format as well as sample reusable Coded UI Framework for your user
Objective
The objective of this artifact is to provide a L200 test automation guidance leveraging VS 2010 Coded UI features to foster a continuous, consistent and standard automation approach. The document can also be used as a quick jump start guide for beginners.
However the bigger objective is Build, Deploy and Test leveraging Visual Studio Lab Management features, which will allow Automation Testers to reap the benefits of the following
· Integrating with the build process for automatic build deployment
· Execution on VMs
· Capabilities of getting the test automation results reported as part of Test Manager (MTM) for better reporting.
Pre-requisites:
|
Jump to Case Study, if your objective is to get started with Coded UI using our recommended framework and practices.
Test Automation Process using Visual Studio 2010
It is not enough just to automate your tests but there is also an important need to automate the build process as well as automatic installation and deployment. This will eliminate manual intervention required to trigger the automation due to build and deployment dependencies.
Automated Build, Deploy and Test framework will also enable us to find out the build quality at the earliest by publishing the test results for every run against a new build.
You can run the test suites that are most important for your continuous builds because too many tests can delay the completion of build. Make sure that you run these tests for the current iteration.
Figure 1: The topology required for setting up Build, Deploy and Test environment using various VS components like Build Controller and Agents for Build, Test Controller and Agent for distributing test and collecting results, Virtual environment for Deployment and Execution (Reference taken from MSDN)
To run unit or functional automation tests, we can create a set of environments that are managed Hyper-V images in Microsoft Test Manager. Tests that are created at the start can be used as part of continuous integration.
1. For Daily build, we want to run very minimal set of test which are like Build Verification test or Smoke test
2. For Weekly builds, we want to run “Regression test” which will be more in number.
Figure 2: Steps for Build, Deploy and Test workflow
If you plan to run your automated tests by using Microsoft Test Manager, you must use a physical or virtual environment that contains a set of roles to run your tests from your test plan.
**Build, Deploy and Test using Visual Studio Lab Management will be demonstrated using the below case study in future editions of this document .
We will now learn Coded UI automation features as well as our recommended automation framework and best practices in rest of the document.
Case Study: Coded UI Automation
Case Study You have been given the task to test the basic functionality of Microsoft Bing www.bing.com and automation is in scope. You know that Microsoft Visual Studio Coded UI can be used to automate your functional tests. We assume that you have already written your functional test using MTM |
We are going provide guidance on Coded UI automation using a real world case study. We assume you are familiar with Microsoft Test Manager for writing test cases (otherwise please jump to Get started section in Appendix)
Here is a sample snapshot of your test cases in MTM:
In subsequent sections, we will present the various approaches and steps involved in Automation Development Lifecycle that you should take to achieve your objective while following the automation standards and guidelines that are recommended.
Step 1: Automation Planning
Like Project Planning or Test Planning, Automation planning is equally important to ensure that the teams are not directly jumping into automation scripting without taking all the important factors into consideration which are extremely critical for providing accurate estimates, deciding the right framework, choosing the right approach, the long term maintenance of automation and getting early ROI (Return on Investment).
This activity will be primarily focused on identifying the feasibility and the scope of automation.
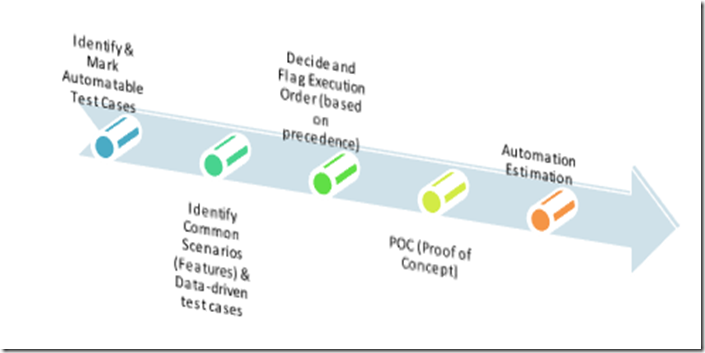
Figure 3: Steps involved in Automation Scope and Planning
Taking our case study, we will walk you through each of these steps below:
a) Identify Automatable Test Cases, Scenarios & plan Order of Execution
We must clearly know beforehand the test cases that are good automation candidates, the scenarios that can be converted into library methods for reuse and the sequence of execution if the tests are dependent on each other.
SL No. |
Checklist |
Description |
Y/N |
1. |
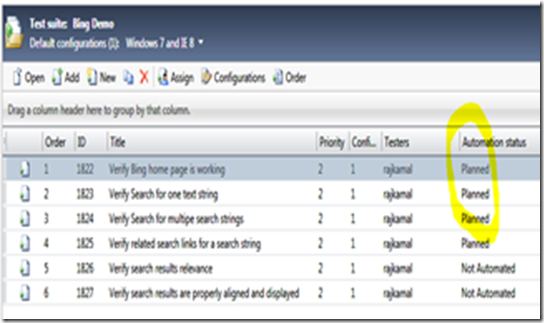
Have you identified and marked the automatable tests as PLANNED in Test Manager? |
Open your test cases in Test Manager that you want to automate and mark Automation Status = “Planned” for those For the case study, we have marked the automation candidate as “Planned” as shown below. Whereas the test which are not good candidates for automation are marked as “Not Automated” to show that they are out-of-scope for automation. |
☐ |
2. |
Have you identified your data-driven test cases? |
Identify your test cases that are data-driven (this will be required during automation design) For our case study, look at the example of one data-driven test related to Bing where you want to perform search multiple times for the list of values provided as Test data |
☐ |
3. |
Have you identified the common functionalities/scenarios OR SHARED STEPS which can be automated for Reusability? |
Ensure that you identify the Shared Steps or Common functionalities that can be later be converted into methods inside your application specific libraries to reduce automation effort and redundancy For the case study, here is one of the examples of Shared step or common functionality which can be added to the automation library. Note: This will be used during automation design |
☐ |
4. |
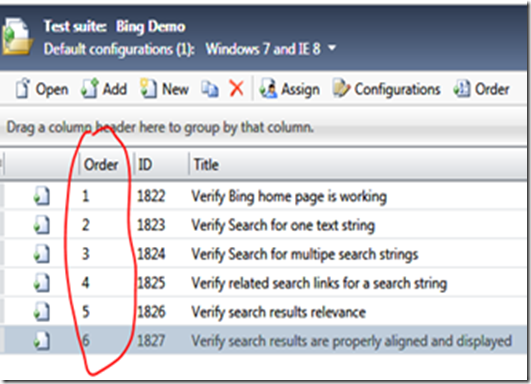
Have you identified the precedence / sequence of execution for your automated tests? |
Ensure that you mark the sequence / precedence for the automated tests that have to be run As shown below, define the order of execution for your automaton scripts using OrderID field |
☐ |
b) POC (Proof of Concept)
Now that we know the scope, we must also ensure that the application or technology in hand is actually supported by VS Coded UI Test by doing a POC on key scenarios. Many a times there might be custom controls and other components that are not automatable / supported by Coded UI out-of-the-box or need customization or are not worth automating due to low ROI. The outcome of this activity should help you decide your approach and next steps. You may mark the non-automatable test cases as out-of-scope for automation.
SL No. |
Checklist |
Yes/No |
1. |
Have you done a feasibility study to ensure VS 2010 Coded UI supports your application? Identify key scenarios of your application and ensure that they are supported by VS 2010 Coded UI by coding few scripts and checking the results. |
☐ |
2. |
Does your application have 3rd party controls or custom controls? Ensure that you call out the tests which are not supported by VS 2010 as “out-of-scope” for automation. |
☐ |
3. |
Testability: Have you worked with the development team to ensure that the properties of the objects are exposed and set appropriately for smooth automation? It is extremely important to work with the development team to work on the testability right from the design phase to make automation easier later in the cycle. |
☐ |
c) Automation Estimation
The estimation will decide the success or failure of your automation project as it has been observed that automation can take much more time than anticipated if all the key tasks involved in automation lifecycle development are not clearly thought of while estimating.
The following major activities in each phase of automation must be estimated.
Automation Initiation
· Tool/Framework Feasibility Study
· POC
Framework Design/Implement
· Design and Implement Various Framework Components
· Testing the Framework Components and End to End Testing
· Training Resources on the Framework/Tool
· Environment Setup
Script Development Phase
· Script Creation
· Script Debugging
· Script Review
· Review Comments Incorporation
Script Execution Phase
· Environment Setup
· Result Analysis
Follow the below checklist while coming up with you initial estimation apart from effort for automation design and execution.
SL No. |
Checklist |
Y/N |
1. |
Check if you have included automation planning effort in your estimation including POC (Proof of Concept)- if any |
☐ |
2. |
Check that you include environment preparation (installation, configuration) effort into estimations. |
☐ |
3. |
Have you identified the Shared Steps or Common functionalities that can be later on converted into methods inside your application specific libraries to reduce automation effort and redundancy |
☐ |
4. |
Ensure that you include effort for building framework reusable components (Libraries) |
☐ |
5. |
Ensure that you include extra effort required if third party or custom controls are there in the application. |
☐ |
6. |
Ensure that you include effort for code review, walkthroughs and compliance with the standards defined. Ensure that you call out the tests which are not supported by VS 2010 as “out-of-scope” for automation. |
☐ |
7. |
Ensure that you include effort for code review, walkthroughs and compliance with the standards defined |
☐ |
8. |
Ensure that you include effort for debugging and lead time to resolve bugs discovered in the product (troubleshooting and workarounds) |
☐ |
9. |
Ensure that you include effort for reporting and result analysis. |
☐ |
Now that we have the clarity on the scope, feasibility and estimates, we can move the next logical step which is creating your automation solution
Step 2: Creating a new Coded UI Project & Adding project to Source control
You can create a project from scratch or by using an existing template but it’s important to add your project to source control for version management and change tracking.
SL No. |
Topics |
Description |
Y/N |
1. |
Have you created new Coded UI project & Added it to Source Control (TFS)? |
Every automation project must be source controlled. Add project to Source Control by clicking the check box as shown Project Check-in Path: All application / project specific automation code tobe maintained under respective ‘project node’ of the TFS being used for the projects. Recommended Source Control Path: <Project-Node>/Main/Test/Test Automation Refer to Appendix: TFS Check-In Policies and Best Practices for details. |
☐ |
2. |
Open existing test project and using it as Template |
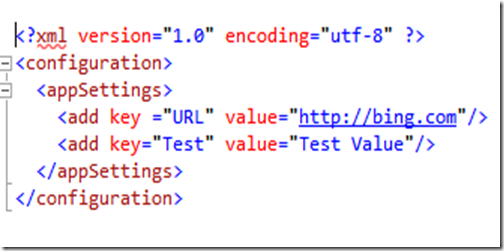
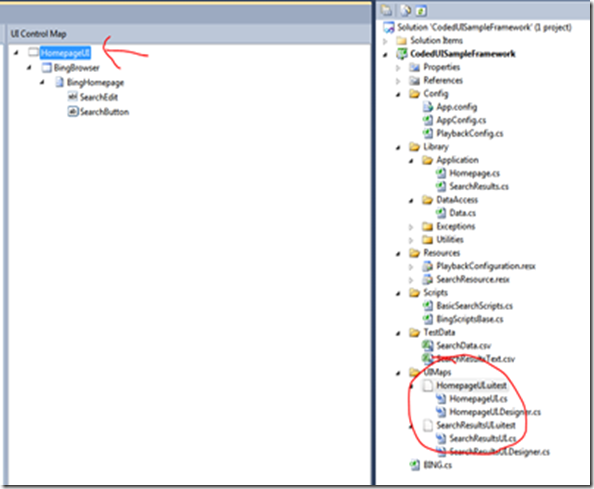
Launch Visual Studio, Browse and open existing ‘CodedUISampleFramework’ template and add it to Source control. You can change the properties as per your needs. Please find below a short description on the folder structure of the template project which will be used for case study: 1. Config: All your application configuration details and playback settings. etc will go here Example: Also refer to: https://msdn.microsoft.com/en-us/library/a65txexh(v=VS.100).aspx 2. Library: All your libraries- application level, data access, exceptions, utilities will go here. Please refer to Step 3 3. Resources: All your keys / strings that’s need to globally defined can be added here rather than hardcoding their values in code. Example: The resource file key “SearchTimeOut” can be used to set playback settings as per your project needs without hardcoding it in your code. 4. Scripts: Your actual test are stored in these .cs files along with components like Test Initialize, Test Cleanup etc 5. Test Data: These will contain your .CSV or .XML test data files for your data-driven automation test 6. UIMaps: These will contain your test object repository along with any test methods or assertions (if any) 7. Main Class file: One class that acts as a single point interface to all the test methods and contains instantiations of the UI maps |
☐ |
With next step, we are now entering into the most important phase of Automation Lifecycle Development which involves designing your automation framework. It is worth spending time on coming up with a good design rather than doing lot of rework later due to shortsightedness and eagerness to start scripting. I would strongly recommend you spend a good effort in coming with design/framework that suits your project requirement before writing your automation test.
Step 3: Automation Design & Development
Automation design and framework is one of the very important pillars of your automation success and it serves as a guiding light for your team members to follow a standard and consistent automation approach across the team.
In this section we will be walking through the automation framework design for Coded UI projects using our Case Study’s template project.
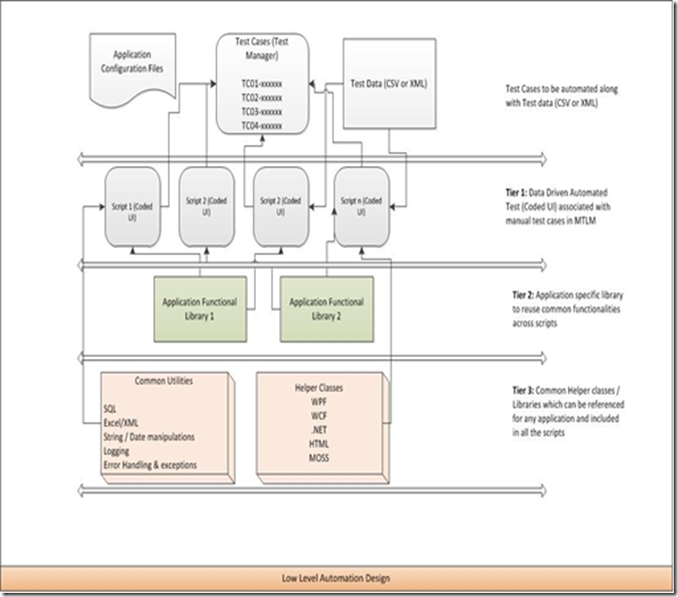
Figure 5: Proposed 3-Tier Architecture for maintaining automated test that promotes high modularity and maximum reuse with minimum maintenance effort in longer run
Follow the below steps for Automation design guidance:
SL No. |
Steps |
Description |
1. |
If you have created project from scratch, add Multiple UI Map files (In the template project, we already have 2 UIMap files for Case Study) |
Managing Object Repositories: Single UI Map File: By default only one UIMap File is created per project and it is appropriate for a project of small size Multiple UI Map File: (We recommend using Multi UIMap files for modularization) For large application, we should use multiple UI Map. Using multiple UI Map files can provide the following benefits: - Each map can be associated with a logical subset of the application. This makes changes easier to manage. - Each tester can work on a section of the application and check in their code without interfering with other testers working on other sections of the application. - Additions to the application UI can be scaled incrementally with minimal effect on tests for other parts of the UI You can add new UIMap files by selecting Add new Items option and then selecting CodedUI Test Map type and renaming it as per your needs. The system will launch Coded UI Test Builder which can be used to add object properties to your UIMap file. Press Generate Code button (Alt+G) . For Case Study, you will find the UIMap files as shown below: Open UIMap .CS files and add User friendly names to constructor: Go to your Main Class file (Bing.cs) in our Case Study and instantiate each Multi UIMap file Please refer to Appendix: Managing objects using UITestEditor for more details |
2. |
Add/Create Libraries to your project (For Case Study, We have already created libraries for Bing) |
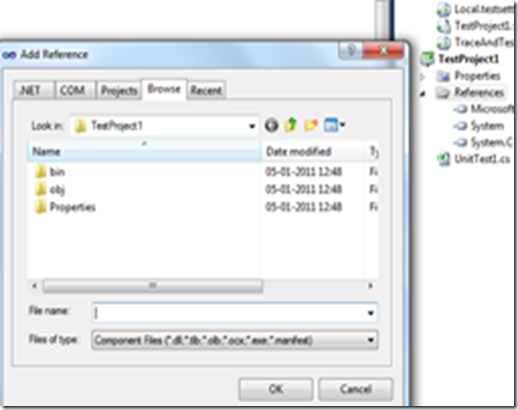
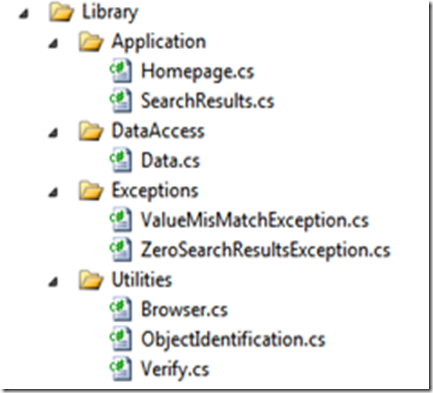
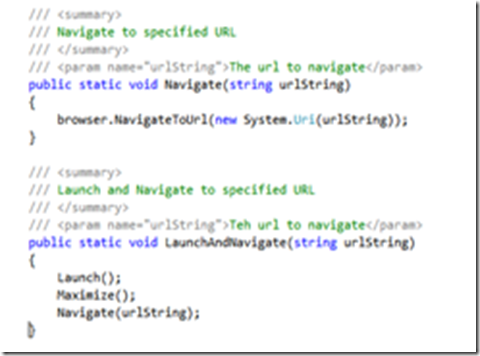
Managing Libraries: Application Functional Libraries using Multiple UI Map files Ensure common functionalities identified above in planning phase are automated as reusable methods which are then invokes from your Coded UI Test methods Create functional libraries as per functional modules for your application. Common Library / Helper Classes: a) Ensure common utilities like SQL connection, Excel/ XML, String/Date handling etc. are referenced from common library repository in your automated solution (instead of creating them from scratch) All common libraries need to be browsed and added to automation solution as “References” b) Ensure that common helper classes which are technology specific like WPF, WCR, SharePoint, Silverlight, .Net etc. are referenced in your solution (if any). Refer to Appendix: Managing Common Libraries in TFS For our case study, we have created/referenced following libaries based on the Shared Steps and scenarios identified from ‘automatable test cases’ selected in Step 1 (Automation Planning) Example of Application specific library methods Example of Common/Utilies based methods: |
3 |
Add your CodedUI scripts / Test Methods |
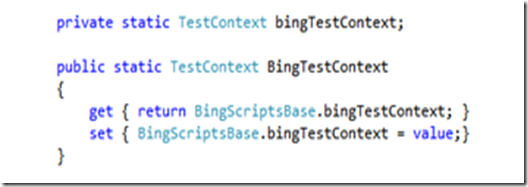
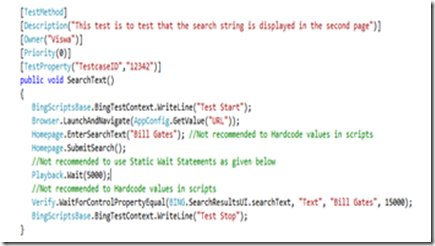
Automate your ‘automatable test cases’ as CodedUI Test Methods using application libraries, utilities and UI Maps defined above a) Set the test context which provides information about and functionality for the current test run. b) Test Initialize: To perform steps before running each test like instantiating UIMap files, setting TestContext for logging etc. c) Add your Test Methods As you can notice above that we have highlighted certain things which are not recommended like using static playback interval or hardcoding test data. We will see in next section how to handle these. d) Test Cleanup: To run code after running each steps |
4. |
Adding Checkpoints / Assertions |
For validation in Coded UI Testing, you need to use “Assertions” - Creating assertions using CUIT (Coded UI Test Recorder): You can create assertions without coding by using out-of-the-box feature provided with Coded UI Choose the property you want to validate and Click “Add Assertion”. - Creating assertions by hand coding: You can create assertions by writing you own code and capturing properties against expected values to validate at the run time. Verify.WaitForControlPropertyEqual(BING.SearchResultsUI.searchText, "Text", "Bill Gates", 15000); e.g. We have a method in our Utility “Verify” that waits for control property to be equal to some text value for certain period and returns PASS if found otherwise FAIL |
5. |
Make your scripts data-driven |
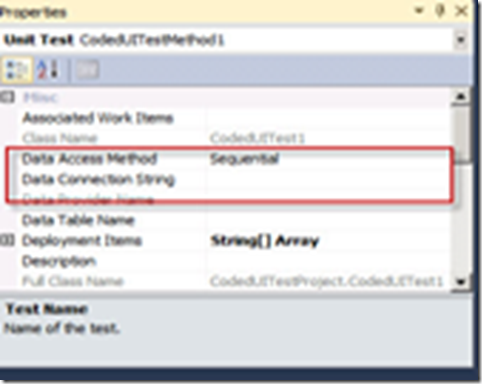
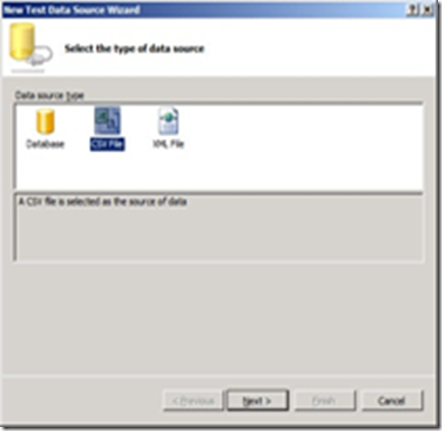
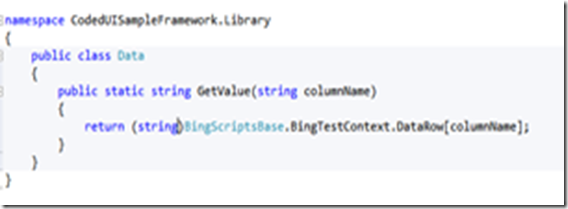
Data-Driven Test Ensure every variable is parameterized by passing the test data to each test using data-driven capabilities in VS 2010. Right-click on the Coded UI test and select Properties, to view the properties of the test To start making this a data-driven test, we have to first create a data source for the test to draw from. On the Data Connection String property, click the ellipse button to start the New Test Data Source Wizard There are three options for creating a data source: Database -- which allows you to connect to a database or Microsoft Excel spreadsheet CSV File -- which allows you to use a comma-delimited file XML File -- which allows you to use an XML file When you add a data source A Data Source attribute is added to the Coded UI Test. [DataSource("Microsoft.VisualStudio.TestTools.DataSource.CSV", "|DataDirectory|\\data.csv", "data#csv", DataAccessMethod.Sequential), DeploymentItem("data.csv"), TestMethod] For our Case study, let’s look at one of our data-driven test: a) We have a method in our data access library (Utilies) to read the data from data sources using the test context b) Another method as part of Application library returns the data from data source and inputs the same to application using the above data access library method c) Test data source which is stored in .CSV format d) Our Data-driven test method calls the above method as part of our functional |
Now I suppose you have your automation tests candidates designed and developed. After you write and debug your scripts its important to run them in a batch or as part of a suite. There are various way to do that and factors to keep in mind as we will see in next section.
Step 4: Automation Execution & Deployment
Ensure you have configured test settings to capture logs, code coverage, test impact etc. and you also need to keep in mind that your script should be able to successfully run in multiple environment (for ex. Test to UAT)
After automation design and debugging is completed, you can now run and deploy your automation scripts using the below steps:
SL No. |
Areas |
Description |
1. |
Configuring Test Settings |
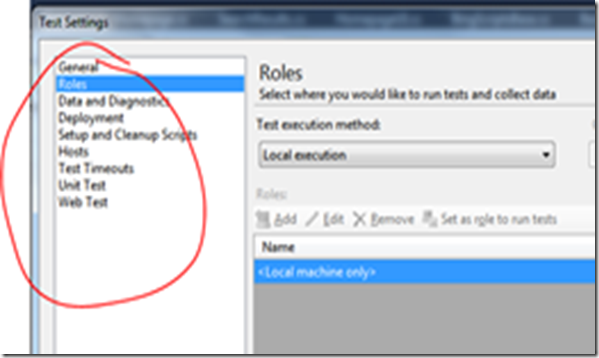
Test Settings a) Data and Diagnostic: Enable appropriate diagnostic are selected as shown below (Code Coverage, Event Log, Test Impact etc.) b) Define other settings like Roles, Test Timeouts, Setup and Clean scripts |
2. |
Deploy your test to multiple environments |
Deployment to different environments: We want to run the same test across multiple environments to ensure everything is still working correctly. Development-> Test -> UAT -> STAGE Example: We want to run these tests after each deploy to each environment. Each environment has as a different URL, username and password. public UIMap() { // Bind the parameters using Environment Variables. string testServer = Environment.GetEnvironmentVariable("TestServer"); string testUserName = Environment.GetEnvironmentVariable("TestUserName"); string testUserPassword = Environment.GetEnvironmentVariable("TestUserPassword"); } |
3. |
Command Line Execution (MSTest.Exe) |
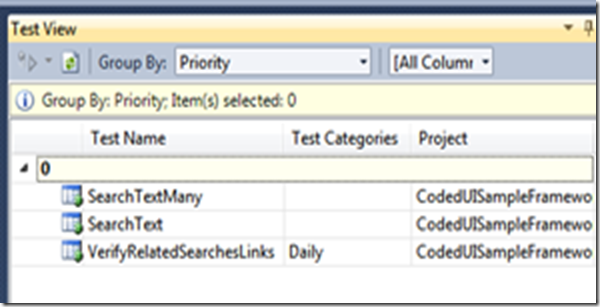
Grouping & Classifying Test Methods using various parameters It lets you run groups of tests based on their assigned categories without the requirement to maintain test lists. Go to Test View and you can filter and view your tests by setting these parameters MSTest.EXE Options : MSTest.exe is the command-line command that is used to run tests. This command has several options that you can use to customize your test run. You can specify these options in any order on the MSTest.exe command line. Example: mstest /testcontainer:"C:\TestProject2\generictest1.generic" /test:testproject32\generic Refer to https://msdn.microsoft.com/en-us/library/ms182489.aspx |
With this, we come to the end of our case study where we walked you through the complete automation development life cycle that involved Automation Planning, Automation Design and Development, and finally Automation execution and Deployment.
Automation scripts are just ‘Code’ at the end of the day and we can’t deny the importance of having high quality of code and best practices adopted for making our automation tests not only readable and easy to troubleshoot but also for long term maintainability.
Coding standards and best practices
We recommend following the below checklist and recommendations for your automation code. It is the responsibility of the entire team to follow these and imbibing a culture of peer and lead review of the automation code on a regular basis.
Checklist
SL No. |
Topic |
Description |
1. |
Object Synchronization over static wait/delay |
These synchronization points will make the scripts more resilient and robust. Wait for Control options: Ensure that you insert synchronization points by waiting for the object to be ready/exist/enabled etc. before trying to perform any critical action . Example: WaitForControlReady(),WaitForControlExist() etc Static Delay : Ensure that you use WaitForControl options as much as possible but in some unavoidable cases where you must have to hard wait/sleep use Playback.Wait() API instead of Thread.Sleep() API. |
2. |
Exceptions and Error Handling |
Ensure that you use the exception handling feature in all your scripts that C# provides i.e. try, catch and finally to do exception handling. The try encloses the statements that might throw an exception whereas catch handles an exception if one exists. The finally can be used for doing any cleanup process. The general form try-catch-finally in C# is shown below try { // Statement which can cause an exception. } catch(Type x) { // Statements for handling the exception } finally { //Any cleanup code } |
3. |
Logging |
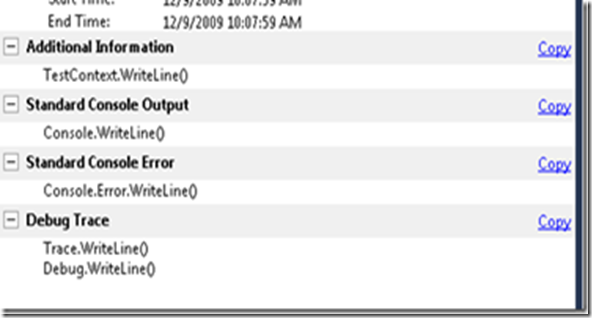
Sample Logging Code: 1: [TestMethod] 2: public void CodedUITestMethod1() 3: { 4: Console.WriteLine("Console.WriteLine()"); 5: Console.Error.WriteLine("Console.Error.WriteLine()"); 6: TestContext.WriteLine("TestContext.WriteLine()"); 7: Trace.WriteLine("Trace.WriteLine()"); 8: Debug.WriteLine("Debug.WriteLine()"); 9: } If you check the test result window, you should see output like – Each of these ways have their own advantages and disadvantages - TestContext.WriteLine: Advantage - Shows up property in the separate section in test result. It is meant for this purpose only. Disadvantage - You will have to pass TestContext around from you main test class to other classes (like UIMap class in Coded UI Test) to use it. Recommendation – Prefer this over other methods for tracing in test code. Trace.WriteLine: Advantage – Shows up in VS Output window too during debugging. Disadvantage - The message here could be lost among other trace messages from other components (or product code). Recommendation – Use it in your product code but avoid in test code. That is good way to separate out messages from product code vs test code. You can use this though in certain scenarios where either TestContext is not there or you want to determine the sequence of operation between test & product code Debug.WriteLine: Same as Trace.WriteLine except that this shows up only for Debug build and is no-op in Retail build. Console.WriteLine and Console.Error.WriteLine: These, though work, are tricky. The test harness redirects the Standard Output and Standard Error to capture the output\error from your product code and not for tracing. So, the recommendation is to avoid using these. In short, use TestContext.WriteLine wherever possible. |
4. 1. |
Naming Conventions |
When you create a method, use a meaningful method name instead of the default name. A meaningful name helps identify the purpose of the method. In the application under test, use meaningful names when you create the UI controls. This gives more meaning and usability to the automatically generated control names. |
5. |
Comments |
Have extensive and meaningful comments. Remember that code written by you will be around for a long time and has to be understood, extended and debugged by others who do not have the entire context you had when the code was originally developed. Unless there are good comments, it is hard for even the owner to understand the code few weeks or months later. |
6. |
Startup & Cleanup Scripts |
Using Code: Create a test in your test project. In the test class, create methods with the [TestInitialize] and [TestCleanup] attributes. They will be run before/after each test method. Or, if you want to run before/after all test in that class, create static methods with [ClassInitialize] and [ClassCleanup] attributes. Lastly, to run before/after all tests in the assembly, create static methods with [AssemblyInitialize] and [AssemblyCleanup] attributes. |
We are also providing a compilation of best practices collected from various forums which can be used as a reminder when writing coded UI test.
Do’s and Don’ts of UI Automation
Do(s)
o Each recorded method should act on a single page, form, or dialog box. Create a new test method for each new page, form or dialog box.
o Use the Coded UI Test Builder whenever possible.
o Explicitly set focus to the window on which the test Case is expected to input data.
o When possible, limit each recorded method to fewer than 10 actions. This modular approach makes it easier to replace a method if the UI changes.
o Create a separate UIMap file for each module in your application under test. For more information, see Testing a Large Application with Multiple UI Maps.
o If you are creating assertions by coding with the API, create a method for each assertion in the part of the UIMap class that is in the UIMap.cs file. Call this method from your test method to execute the assertion.
o Capture screen shots for failures. Helps in debugging.
o Leave the UI in a known state after a test Case is done executing. E.g.: Close the wizard even if the test Case is to test the first screen of a wizard by cancelling out of the wizard after the first screen.
o Validate that the object being created using the UI with the one being stored in the backend system
o Log before you do something, not after.
o In code reviews for test cases, or new framework automation support review the log messages, is it clear what the test did from just the log?
o Log the origin of messages. If the framework logs, say that it logged, if the test case logged, say that. |
o Have two assertion modes that are configurable: 1. Fail instantly. 2. Delay assertion of failure until the test has completed. Steps might be mutually exclusive, you’re losing coverage.
o Log non-fatal exceptions so as not to abort a test, bubble fatal exceptions up to the test and let the exception assert failure.
o Log every valid UI operation being performed in the test Case.
o Use resource files for all data required to be entered in the UI.
o Use Refactoring: Refactoring implies removing a block of code that is being used repeatedly throughout the program into a single function. This helps in reuse of code and makes the code cleaner, and improves readability.
o Use Constructor of classes for meaningful things: In any class avoid unnecessary overloading of constructors. Minimize the amount of work done in a constructor. Constructors should mainly be used for initialization of members. It is always good practice to have accessory methods (get/set) to expose member variables and also initialize them.
o Using string. Compare () instead of "==" or "Equals ()": It is advisable use string.compare() as in that case we don't have to worry about NullPointerException, unlike using Equals() -- you have to make sure that the object that calls Equals() is not null.
o Using List<class name> instead of Arrays: Arrays are not type safe, so it is advisable to use the inherent .Net 2.0 collection objects like IList<T>, ICollections<T>. They provide additional type-checking during compile time.
o Use “this.”: Whenever you use a member variable of class, it is a good practice to put "this" in front of the variable. This improves readability and avoids conflicts when the parameter name and the member variable names are same.
o Using .NET attributes for test cases: Attributes provide a mechanism to enable additional data to the Test Code during runtime and it also helps in keeping information associated with the Test Case in the code itself.
Don’t(s):
o Do not modify the UIMap.designer.cs file directly. If you do this, the changes to the file will be overwritten.
o Do not log multiple times.
o Do not sleep after every UI operation.
o Do not give unusually long timeouts for every major operation.
o Fail immediately after an unexpected screen.
o Do not re-launch the UI application for every test Case as it is a time consuming process.
o Test cases should never have hard-coded strings. This includes control ids, menu paths, etc. Even control IDs and menu paths change over time.
o Do not use sleep
o Avoid too many parameters in a Method/Function. It is best practice to avoid passing too many parameters to a function or method. This indicates lack of abstraction. In this case encapsulating the parameters in a separate class or struct may help.
o Avoid Lengthy Functions: If a function is longer than a page, it is a good practice to break it up into smaller functions. However, if the code has a switch statement or straight line code with no loop back, then it is still OK, but in almost all other cases, the code can be simplified by splitting it up into multiple functions.
o Avoid Hard-Coded strings: Avoid the usage of hard coded strings in the code. Instead use the constants utility to store them.
Appendix
i. Getting Started with VS 2010 Coded UI
Getting Started |
|
Online Help |
|
Forum |
|
Product Overview |
|
Webcasts & Videos |
Functional UI Testing Visual Studio Team System 2010: Manual Test To Coded UI Test |
Guidance and References |
|
Coded UI Test Bloggers |
Anutthara Bharadwaj Gautam Goenka Balachander G. Subramaniam Rubel Singhal Rituparna Paul Team Blog |
What’s new in Beta2 |
ii. Visual Studio 2010 Installation
This step is required to ensure that environment is setup and configured to get started with automation,
- Installation: Have you installed VS 2010 Ultimate?
Go to Microsoft.com Download page
- Installation: Have you installed VS 2010 Feature Pack 2
Refer to https://msdn.microsoft.com/en-us/vstudio/ff655021.aspx to find out new features in FP2
- Installation: Have you connected to you Source control (TFS node)?
Go to VS 2010 Ultimate -> Team -> Connect to Team Foundation Server
Add your TFS server name, Choose Project Collection, Select your team project and say Connect
iii. TFS Check-in Policies & Best Practices
- Ensure that policies enforced by project administrator are met
Tip: For example “comment” must be entered every time checking the code
https://msdn.microsoft.com/en-gb/library/ms181460.aspx
Apart from that, following are available by default
o Builds: Requires that the last build was successful before a check-in.
o Code Analysis: Requires that code analysis is run before check-in.
o Testing Policy: Requires that certain tests are completed before check-in.
o Work Items: Requires that one or more work items be associated with the check-in.
https://msdn.microsoft.com/en-gb/library/ms181411.aspx
https://msdn.microsoft.com/en-gb/library/ms245460(v=VS.100).aspx
- Ensure that any custom policies enforced by administrator are met.
- As a best practice, check-in the files at the end of the day
- Code Branching and Merging
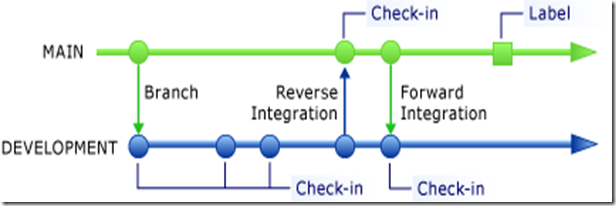
One of the most common branching strategies is to align branches with product releases. A branch holds all the software development assets for a single release. Occasionally, you must merge updates from one release to another, but they usually never merge. You discontinue a branch when you discontinue its release.
The mechanics of branching in TFS are simplified to a single right-click à Branching and Merging | Branch command.
Figure 6: Courtesy: ALM Rangers Codeplex Branching guidance
If you have more than one work (DEVELOPMENT) branch, forward integration to all work branches should occur as soon as any branch integrates into the MAIN branch. Because the MAIN branch is kept stable, forward integration is safe..
Refer to https://msdn.microsoft.com/en-us/library/ee782536.aspx and https://tfsbranchingguideiii.codeplex.com/ for detailed guidance from ALM Rangers team
- Ensure Reverse Integration and Forward Integration process when multiple teams (Onsite Offshore are working together on same engagement)
FORWARD INTEGRATE (FI) – merges from parent to child branches.
REVERSE INTEGRATE (RI) – merges from child to parent branches
Refer to https://branchingguidance.codeplex.com/wikipage?title=Code%20Promotion%20Best%20Practices
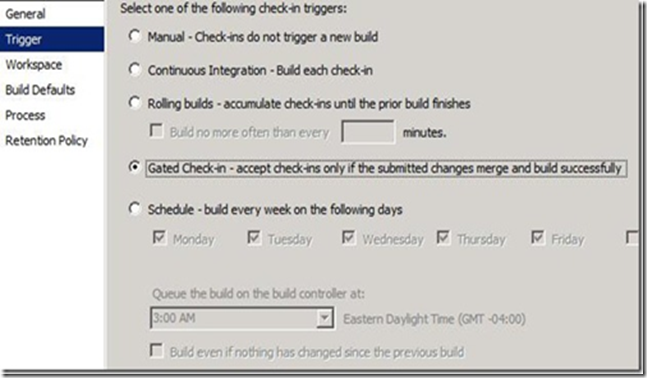
- Gated Check-ins: Ensure the solution is built before the automation code check-in
By using a gated check-in for the MAIN branch, you help make the reverse integration much easier because quality gates help avoid conflicts or errors in the MAIN branch. For more information, see https://msdn.microsoft.com/en-us/library/dd794776.aspx and https://blogs.msdn.com/b/patcarna/archive/2009/06/29/an-introduction-to-gated-check-in.aspx
https://intovsts.net/2010/04/18/the-gated-check-in-build-in-tfs2010/
When this trigger is selected for a build definition, any check-in that is made to a file that is mapped in the associated workspace will trigger a verification build. If the build succeeds, the changes will be submitted to the repository. If the build fails, the changes are not allowed to be submitted and must be fixed and resubmitted.
iv. Coded UI Frameworks
Details of each UI Framework Supported - Differences, Known Issues and Workarounds |
|
Web |
IE Plugin Part 1 IE Plugin Part 2 UI Test Framework Firefox support |
WinForms |
|
WPF |
|
SharePoint |
|
MFC/Win32 |
v. Managing common libraries in TFS
All common code and libraries to be maintained at a centralized node which wil be accessible (read-only) to all the projects/apps to be included for reusability.
Note: Only the automation group member will have the add/edit permission on this node to control the change.
Common TFS Project & Node: < placeholder >
Library Path: Automation/Libraries
vi. Data driven testing
Use below link if you need more information about Data driven testing using Coded UI and access/store data in MS EXCEL from Coded UI
https://msdn.microsoft.com/en-us/library/ee624082(VS.100).aspx
https://msdn.microsoft.com/en-us/magazine/cc163536.aspx
vii. Managing object repository using UI Test Editor
This is a new feature launched in FP2 which lets you better manage your object repository.
The Coded UI Test Editor toolbar offers the following commands:
1. Find helps to locate UI actions and controls.
2. Delete removes unwanted UI actions.
3. Rename changes the names for test methods and controls.
4. Properties Opens the Properties Window for selected item.
5. Split into a new method lets you modularize the UI actions.
6. Move Code adds custom code to your test methods.
7. Insert Delay Before adds a pause prior to a UI action specified in milliseconds.
8. Locate the UI Control identifies the location of the control in the UI of application under test.
9. Locate All helps to verify control property and significant changes to the application’s controls.
Refer to: https://msdn.microsoft.com/en-us/library/gg269469.aspx
viii. Extending Coded UI
VS 2010 Coded UI support extensibility for technologies which are not supported out-of-the-box like Excel or custom controls.
Refer this example for WPF calendar support
ix. Support & Help
- Discussion forum (External)
https://social.msdn.microsoft.com/Forums/en/vsautotest/threads
Comments
Anonymous
December 10, 2011
Very helpful - Thanks :-)Anonymous
December 10, 2011
Is this available in word format? The images looks squished in your blog post.Anonymous
December 10, 2011
Where do I get the sample Coded UI project prerequisite?Anonymous
December 11, 2011
Oliver, Thanks :)Anonymous
December 11, 2011
Allen, updated blog with the documentation link and sample project for downloadAnonymous
December 11, 2011
The comment has been removedAnonymous
December 27, 2011
Helped a lot......Thanks :)Anonymous
March 09, 2012
Can you post the URL for the Test Manager API. I would like to see if I can update the status of a test case through that API, as well as see if I can access the test data associated with the test case, instead of creating a new data source for my automation. Thanks


