Building the ASP.net Core WebAPI backend – CORS tutorial
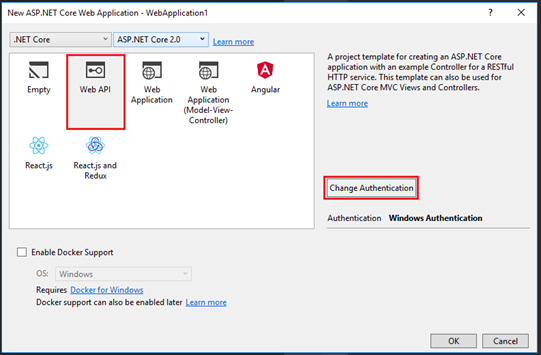
With the front end site complete, we can shift focus to building the WebAPI backend that will be powering the Echo Text service. Just as for the front-end site, In Visual Studio 2017, you can choose to create a new Project, and select the 'Web' category. Give the project a name and then select the WebAPI application template from the second step of the new project Wizard. Do not forget to setup Windows Integrated as an authentication method for this backed application as well, by pressing the Change Authentication button in this step of the Wizard.

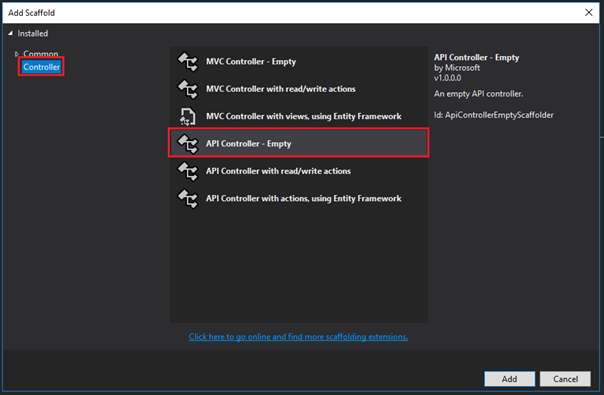
Once the project is created on disk by Visual Studio, you can proceed and delete the ValuesController class that is located under the 'Controllers' folder inside the Solution Explorer. Then add a new Controller to the folder, and chose the WebAPI Empty Controller template:

Call the new controller 'EchoCorsController'. Be careful, for the project to work as shown here, you will need to respect the name of the controller class, otherwise the JavaScript code from the previous tutorial will not POST to the correct url.
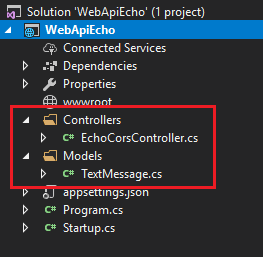
For completeness, I will also be using a model class to represent the data received from the front end site. To achieve this, create a Models folder in the solution, and add a class called TextMessage inside. The end result should have the project looking like the following in the solution explorer: 
The TextMessage class contains a single string property called EchoText, and is a POCO object (Plain old CLR objet):
public class TextMessage
{
public string EchoText { get; set; }
}
It will be an instance of the TextMessage object that we will be binding to in the EchoCorsController when receiving the JSON data from the front end. Here is the code of the controller class:
[Produces("application/json")]
[Route("api/EchoCors")]
public class EchoCorsController : Controller
{
// POST api/echocors
[HttpPost]
public IEnumerable<string> Post([FromBody]TextMessage eMessage)
{ //return back a JsonResult to echo the text return new string[] { "Echo back:" + eMessage.EchoText };
}
}
The controller has one method called Post. By convention this will respond to incoming Http POST requests. To make sure that the Post method is only invoked by POST requests, the [HttpPost] attribute has been added to decorate the action method.
The method will take a parameter of type TextMessage (our model class), and, before invoking the action method, the MVC Framework will look to data-bind data from the request to populate the fields of this object instance. The [FromBody] attribute will indicate to the data binder that it should only seek to find suitable values for the TextMessage's properties inside the request body, and not in the query string, route data, etc…
Below I have placed a POST request captured with the Chrome F12 browser tools from the front end. The part highlighted in gray represents the request body, and contains the JSON data that the front-end will be transmitting.
POST /api/EchoCors HTTP/1.1
Host: corewebapi
Connection: keep-alive
Content-Length: 48
Accept: application/json, text/javascript, */*; q=0.01
Origin: https://corerazor
User-Agent: Mozilla/5.0 (Windows NT 10.0; Win64; x64) AppleWebKit/537.36 (KHTML, like Gecko) Chrome/62.0.3202.94 Safari/537.36
Content-Type: application/json
Referer: https://corerazor/AsyncPoster
Accept-Encoding: gzip, deflate
{"echoText":"Life is too short - learn ASP.net"}
The last two steps of the implementation will have us making sure that only authenticated users can access the controller's POST method, and setting up CORS access.
Ensuring only authenticated users are allowed to access the POST method of the controller is very simple. The [Authorize] attribute will be used to make sure that all requests are authenticated before the action method code will be executed:
// POST api/echocors
[HttpPost]
[Authorize]
[EnableCors("AllowSpecificOrigin")]
public IEnumerable<string> Post([FromBody]TextMessage eMessage)
{
//return back a JsonResult to echo the text return new string[] { "Echo back:" + eMessage.EchoText };
}
By default, and for security purposes, Javascript on a page can only formulate and send requests back to the server the page was loaded from. Since the front end site page was loaded from https://corerazor
it should not be able to send requests to another server called https://corewebapi . To allow this to happen, we need to setup CORS – Cross Origin Requests. This is explained in the following tutorial: /en-us/aspnet/core/security/cors .
I will outline the steps, and also explain some of the extras we need to do in our project. The first thing is to install the ASP.net Cors Nuget package. A simple command in the Nuget Package manager console for our solution will help us achieve this:
Install-Package Microsoft.AspNetCore.Cors
This command will bring in the Nuget package and make sure that all dependencies are in place to start working with CORS.
Once the package is installed, it has to be enabled. There are OWIN services are to be configured in the project's startup.cs class in the ConfigureService method. Let's start with the services configuration:
public void ConfigureServices(IServiceCollection services)
{
services.AddCors(options =>
{
options.AddPolicy("AllowSpecificOrigin", builder =>
{
builder.WithOrigins("https://dev-web17:81", "https://corerazor");
builder.AllowCredentials();
builder.AllowAnyHeader();
builder.AllowAnyMethod();
});
});
services.AddMvc();
}
Using the AddCors extension method, and the options pattern, we will add the Cors service before the MVC service. There are several important options we want to pass to this method. The first indicates that we will be creating a policy object called 'AllowSpecificOrigin'. Inside the policy object, we use the options pattern again to setup the parameters for this policy. We indicate the urls that we want to accept requests from – here I am adding a local url (https://dev-web17:81) and the production url (https://corerazor
). We then need to specify that we are allowing CORS requests to send credentials using the AllowCredentials extension method. We also want to specify that we accept all http headers using the AllowAnyHeader extension method. And finally, we indicate that we allow all kinds of HTTP vers (GET, POST, etc) by using the AllowAnyMethod extension method.
Once the CORS access policy is declared in the Startup.cs class of the project, we can augment the controller action method with an attribute which will apply the policy we have defined at the previous step. The action method code is augmented with the EnableCors attribute, which takes as an argument, the name of the policy we created when setting up the CORS service:
// POST api/echocors
[HttpPost]
[Authorize]
[EnableCors("AllowSpecificOrigin")]
public IEnumerable<string> Post([FromBody]TextMessage eMessage)
{
//return back a JsonResult to echo the text
return new string[] { "Echo back:" + eMessage.EchoText };
}
With this last modification, the project is complete and we can proceed with IIS publishing just like the front-end project. You can refer back to the front-end tutorial for publishing ASP.net Core projects to IIS: /en-us/aspnet/core/publishing/iis?tabs=aspnetcore2x .
Proceed to the next article in the series ->
By Paul Cociuba https://linqto.me/about/pcociuba