Scale an App Service from FREE to SHARED BASIC STANDARD or PREMIUM using PowerShell
Although I really prefer GUIs over scripts, I still find myself needing to help others resolve scripting issues. I recently needed to help find the way to scale an Azure App Service Web App from the default Tier of FREE to STANDARD. FREE is default when created from PowerShell and you do not provide a value for the Tier parameter just like the Resource Group is defaulted to Default1 if again, one is not specified.
You can also scale with CLI using az or azure commands like I discussed here.
Azure PowerShell is open source and can be found here. If you ever have a question like: What is the difference between New-AzureRmResource and New-AzureRmWebApp, you can review the code and find out why for yourself, coolness ![]()
Descriptions of the Azure Resource Management Web Site / Web App cmdlets can be found here. For example:
Before you begin, I recommend that you upgrade to the most current version of the Microsoft Azure PowerShell version, I discussed how to do this here. Once updated, perform the following steps:
- Manually create a Resource Group
- Login via PowerShell
- Create the Azure App Service Web App
- View the App Service Web App settings
- View the App Service Plan settings
- Scale from Free to Standard
- Confirm the App Service Plan settings
Once complete, you will have scaled an Azure App Service Web App from the FREE tier to the STANDARD tier.
Manually create a Resource Group
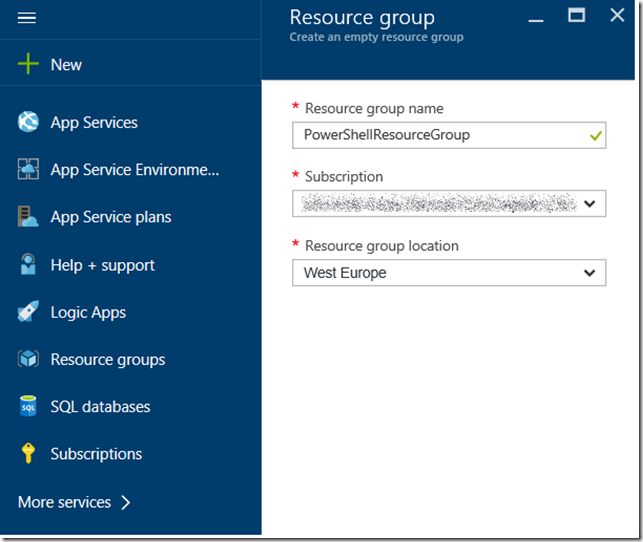
As shown in Figure 1, I logged into the Azure Portal and created a Resource Group named PowerShellResourceGroup in the West Europe (AM2) region.
Figure 1, create an Azure Resource Group
Next, open the PowerShell console and execute some Azure PowerShell cmdlets.
Login via PowerShell
I like to use the Windows PowerShell ISE console app because I find it more friendly, but choose you own approach. Enter the following command to login your PowerShell to Azure:
Login-AzureRmAccount
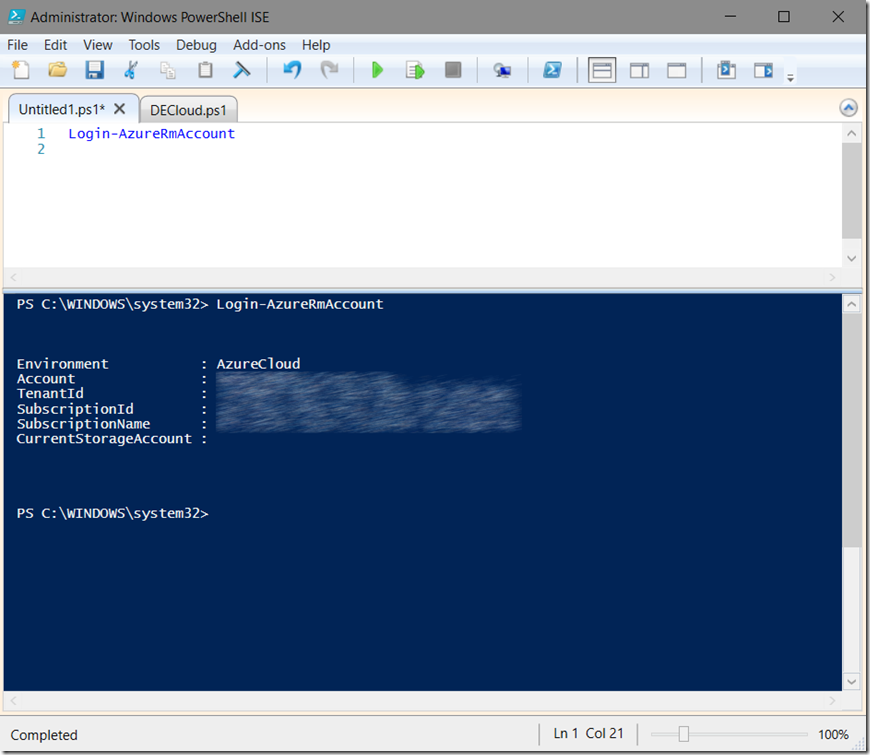
This will open a challenge/response window where you can enter your userid and password, use the same credentials that you used when you created the PowerShellResourceGroup in the previous section. Once successfully logged in, you will see some output similarly to that shown in Figure 2.
Figure 2, Login to the Azure Portal using PowerShell
Confirm that the SubscriptionId shown in the output is the same SubscriptionId into which you created the PowerShellResourceGroup. It is common to have multiple subscriptions linked to the same user credentials, so if you see a different SubscriptionId, try executing the Set-AzureSubscription cmdlet which can set your session to the correct subscription.
Create the Azure App Service Web App
Execute the following command to create the Azure App Service Web App:
New-AzureRmResource -Location "West Europe" -Properties @{ "Description"="PowerShellWebApp" } -ResourceName "PSWebApp001" -ResourceType "Microsoft.Web/sites" -ResourceGroupName "PowerShellResourceGroup" –Force
You can review what the meaning of each of those parameters are here. I recommend that:
- the Location is set to the same location as the Resource Group, although this is not required, it keeps things aligned
- Take notice that you use the same Resource Group name you created in the first step
- Take a look at the Properties parameter and learn more about what can be set
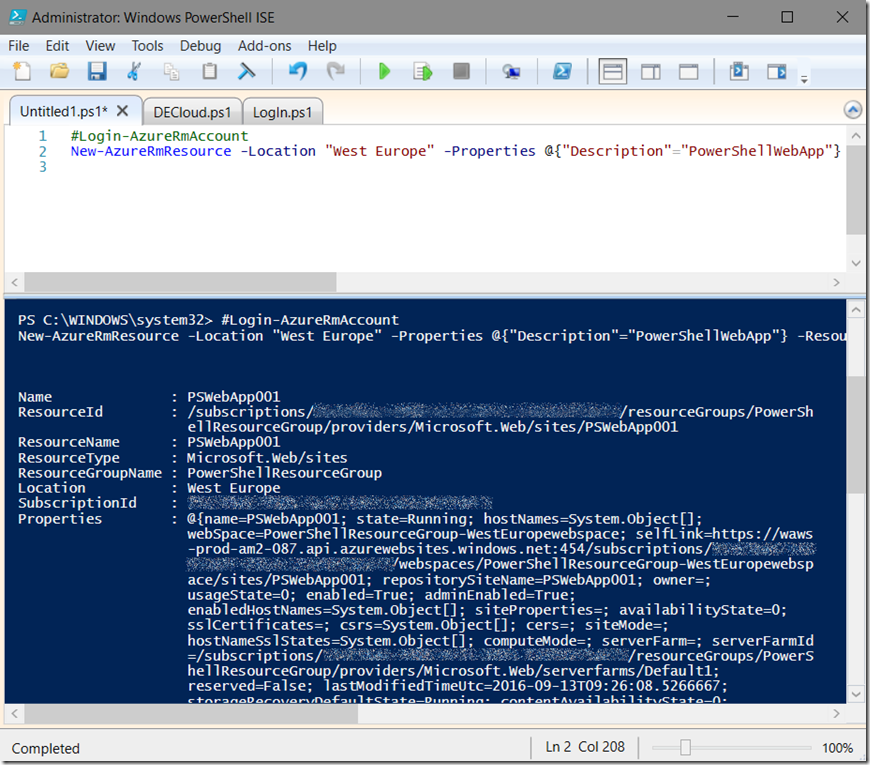
The output of the command should look something like this, Figure 3.
Figure 3, create an Azure App Service Web App using PowerShell
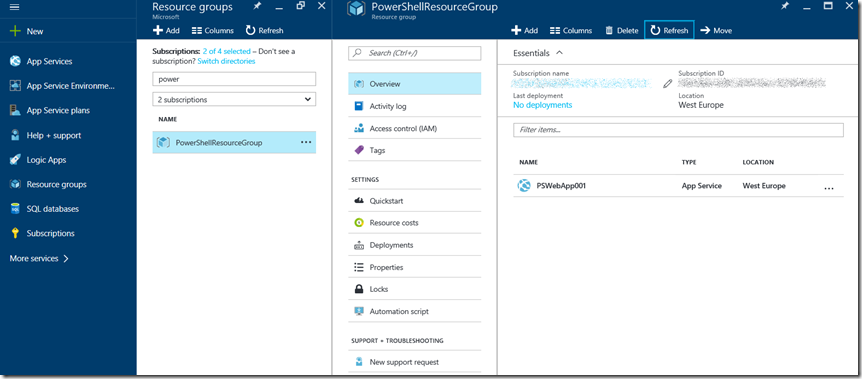
You can also confirm that it gets created from within the Azure Portal as shown in Figure 4.
Figure 4, view an Azure App Service Web App created using PowerShell in the Azure Portal
When I first attempted to create this Web App I was using a new subscription and I received this error:
New-AzureRmResource : MissingSubscriptionRegistration : The subscription is not registered to use namespace 'Microsoft.Web'.
I executed these commands to register my subscription to that namespace:
- Get-AzureRmResourceProvider –ListAvailable
- Register-AzureRmResourceProvider -ProviderNamespace Microsoft.Web
- Get-AzureRmResourceProvider -ProviderNamespace Microsoft.Web
Now lets look at the App Service Plan settings.
View the App Service Web App settings
To view the details of the Azure App Service Web App, execute the following cmdlet:
Get-AzureRmWebApp -ResourceGroupName "PowerShellResourceGroup" -Name "PSWebApp001"
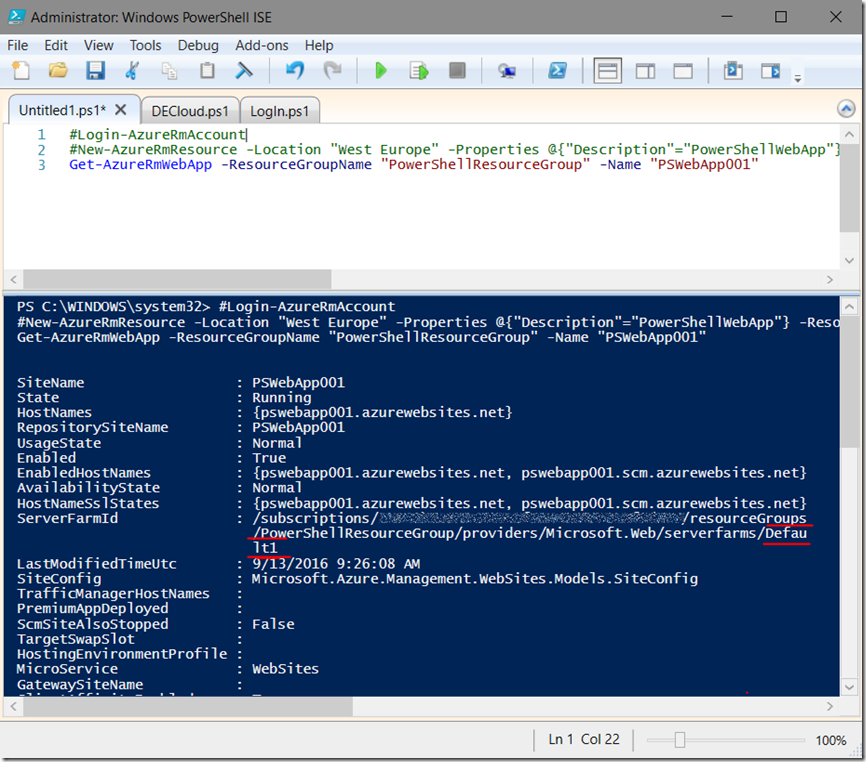
The output will be something similiar to that shown in Figure 5.
Figure 5, view the App Service Web App details using PowerShell
Have a look at the output, you will notice that you do not see the SKU/Tier (I.e. FREE, SHARED, BASIC, STANDARD or PREMIUM). Do you know why? Read the next question to find out.
Also notice that the names of the serverfarms/ASP is set to Default1 as mentioned previously.
View the App Service Plan settings
As you may know, you can have multiple App Service Web Apps running on the same App Service Plan (ASP). An ASP is in a lot of way synonymous with a Virtual Machine or VM, where the VM can be SMALL, MEDIUM or LARGE. In this example I created a new Resource Group and then added an Azure App Service Web App to it and because there was no App Service Plan, one was created automatically. Like I mentioned initially, the default name for an ASP is Default1.
The answer to the question in the previous section is that the Tier/SKU/PLAN in which an Azure App Service Web App runs is not linked to the Web App, but rather the App Service Plan on which is, and possibly many others run.
Lets look at the ASP details by executing this command:
Get-AzureRmResource -ResourceType "microsoft.web/serverfarms" -ResourceGroupName "PowerShellResourceGroup" -ResourceName "Default1"
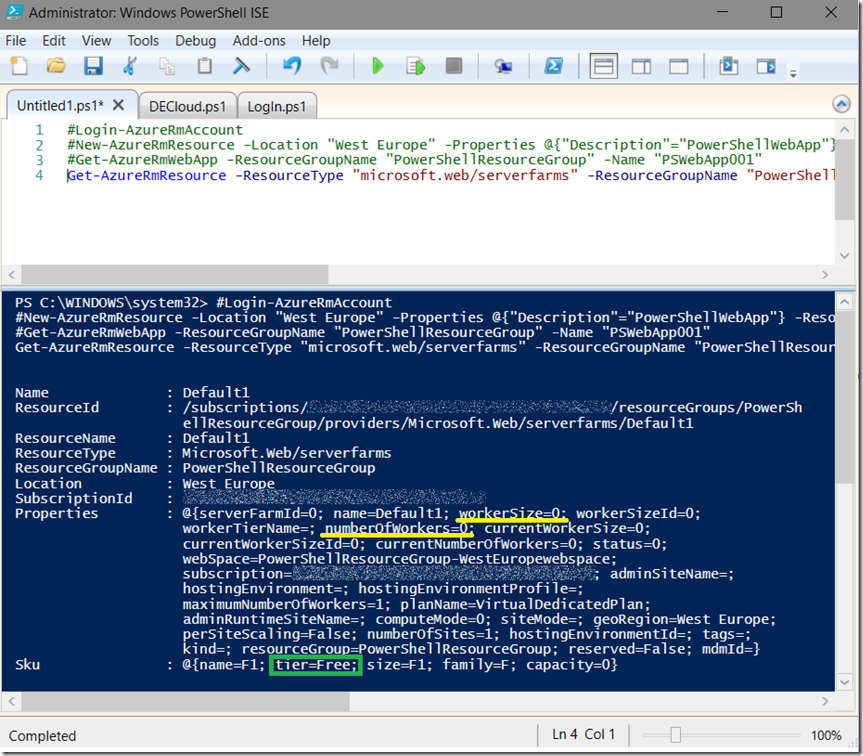
The output would be something similar to that shown in Figure 6.
Figure 6, view the plan/SKU/tier of the App Service Plan
Now you can see that the tier is indeed FREE.
I would like to also call out two other properties:
- workerSize is the size of the VM, for example SMALL, MEDIUM or LARGE. In FREE and SHARED mode this is not relavent as the VM is shared, but in BASIC, STANDARD or PREMIUM it is. The values for this property can be set to:
- 0 for SMALL
- 1 for MEDUM
- 2 for LARGE
- numberOfWorkers is the number of VMs you want to scale to. You may know that it is possible to scale your Azure App Service Web App to more than a single VM. You can see the max number of instances per SKU/TIER/PLAN here.
Now, scale the Azure App Service Web App from FREE to STANDARD.
Scale from Free to Standard
Scale from FREE to STANDARD using the following command:
Set-AzureRMAppServicePlan -ResourceGroupName "PowerShellResourceGroup" -Name "Default1" -Tier Standard
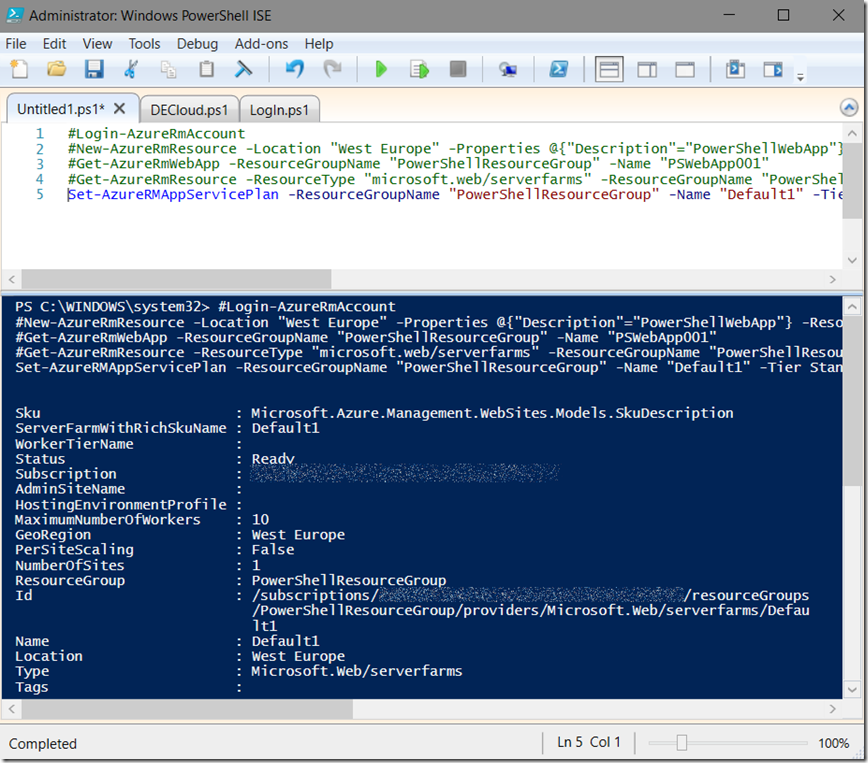
Notice that we are scaling the App Service Plan (ASP) and not the Web App itself. This means also that all the other Web Apps running on the ASP will be scaled to the same plan as well. The output of the command should look something like that shown in Figure 7.
Figure 7, Scale an Azure App Service Web App using PowerShell
It may take a moment to complete. Next confirm the scale was successful by viewing the properties of the ASP.
Confirm the App Service Plan settings
Run this command to confirm the scale from FREE to STANDARD using PowerShell was successful:
Get-AzureRmResource -ResourceType "microsoft.web/serverfarms" -ResourceGroupName "PowerShellResourceGroup" -ResourceName "Default1"
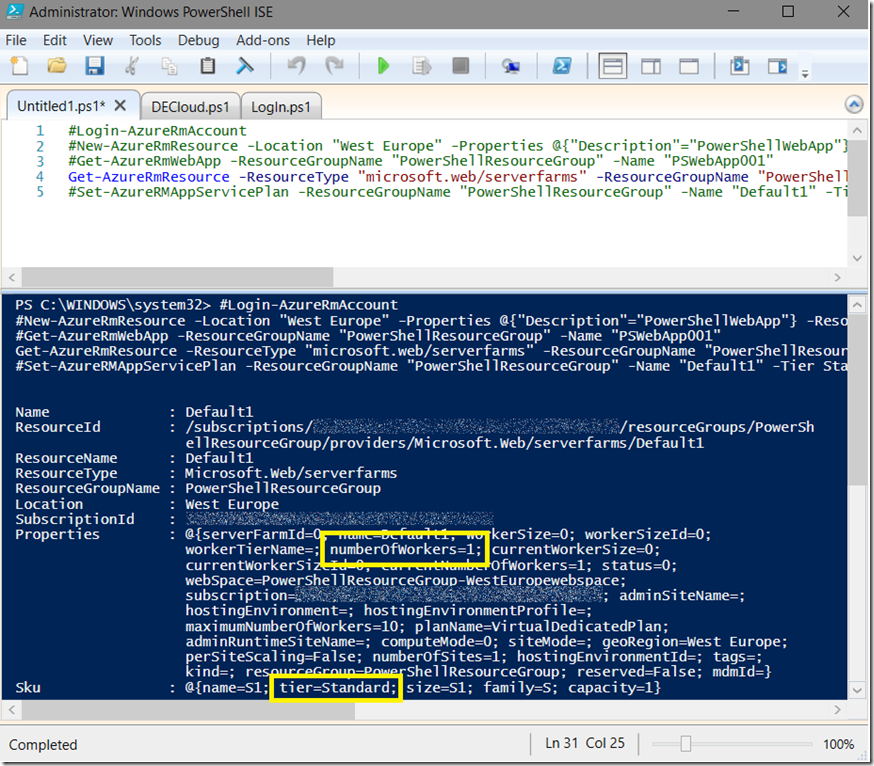
The output should be something like that illustrated in Figure 8
Figure 8, confirm the scale, change of tier or SKU worked as expected using PowerShell
Notice that the tier is now set to Standard and also notice that the numberOfWorkers is set to 1 as your Azure App Service Web App is running on its own VM now…assuming you do not have other Web Apps running in the same ASP.
You can also check the values in the portal as shown in Figure 9.
Figure 9, check the tier/SKU/Plan in the Azure portal
Conclusion
I hope you found this helpful, not back to my GUI.
