Distributed File System Consolidation of a Standalone Namespace to a Domain-Based Namespace
Hello again everyone! David here to discuss a scenario that is becoming more and more popular for administrators of Distributed File System Namespaces (DFSN): consolidation of one or more standalone namespaces that are referenced by a domain-based namespace. Below I detail how this may be achieved.
History: Why create interlinked namespaces?
First, we should quickly review the history of why so many administrators designed interlinked namespaces.
In Windows Server 2003 (and earlier) versions of DFSN, domain-based namespaces were limited to hosting approximately 5,000 DFS folders per namespace. This limitation was simply due to how the Active Directory JET database engine stored a single binary value of an attribute. We now refer to this type of namespace as "Windows 2000 Server Mode". Standalone DFS namespaces (those stored locally in the registry of a single namespace server or server cluster) are capable of approximately 50,000 DFS folders per namespace. Administrators would therefore create thousands of folders in a standalone namespace and then interlink (cascade) it with a domain-based namespace. This allowed for a single, easily identifiable entry point of the domain-based namespace and leveraged the capacity of the standalone namespaces.
"Windows Server 2008 mode" namespaces allow for domain-based namespaces of many thousands of DFS folders per namespace (look here for scalability test results). With many Active Directory deployments currently capable of supporting 2008 mode namespaces, Administrators are wishing to remove their dependency on the standalone namespaces and roll them up into a single domain-based namespace. Doing so will improve referral performance, improve fault-tolerance of the namespace, and ease administration.
How to consolidate the namespaces
Below are the steps required to consolidate one or more standalone namespaces into an existing domain-based namespace. The foremost goal of this process is to maintain identical UNC paths after the consolidation so that no configuration changes are needed for clients, scripts, or anything else that references the current interlinked namespace paths. Because so many design variations exist, you may only require a subset of the operations or you may have to repeat some procedures multiple times. If you are not concerned with maintaining identical UNC paths, then this blog does not really apply to you.
For demonstration purposes, I will perform the consolidation steps on a namespace with the following configuration:
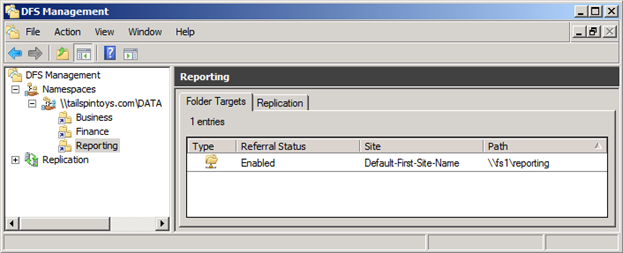
Domain-based Namespace: \\tailspintoys.com\data
DFS folder: "reporting" (targeting the standalone namespace "reporting" below)
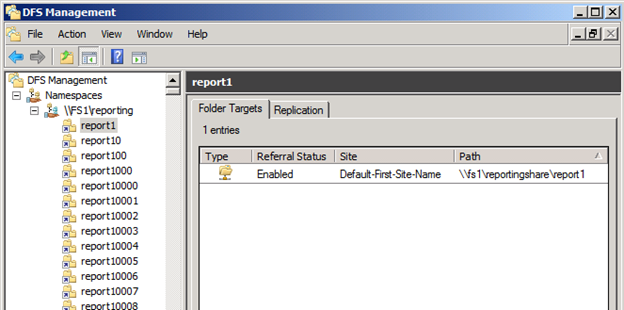
Standalone Namespace: \\server1\reporting
DFS folders: "report####" (totaling 10,000 folders)
Below is what these namespaces look like in the DFS Management MMC.
Domain Namespace DATA:
Standalone Namespace "Reporting" hosted by server "FS1" and has 15,000 DFS folders:
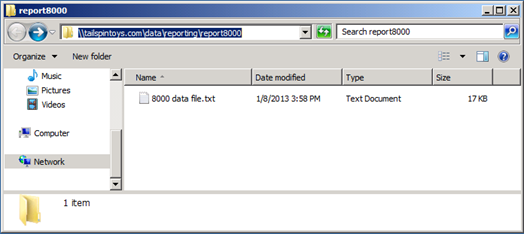
For a client to access a file in the "report8000" folder in the current DFS design, the client must access the following path:
\\tailspintoys.com\data\reporting\report8000
Below are the individual elements of that UNC path with descriptions below each:
\\tailspintoys.com |
\Data |
\Reporting |
\Reporting8000 |
Domain |
Domain-based Namespace |
Domain-Based Namespace folder |
|
Standalone Namespace |
Standalone Namespace folder targeting a file server share |
Note the overlap of the domain-based namespace folder "reporting" (dark green) with the standalone namespace "reporting" (light green). Each item in the UNC path is separated by a "\" and is known as a "path component".
In order to preserve the UNC path using a single domain-based namespace we must leverage the ability for DFSN to host multiple path components within a single DFS folder. Currently, the "reporting" DFS folder of the domain-based namespace refers clients to the standalone namespace that contains DFS folders, such as "reporting8000", beneath it. To consolidate those folders of the standalone root to the domain-based namespace, we must merge them together.
To illustrate this, below is how the new consolidated "Data" domain-based namespace will be structured for this path:
\Data |
\Reporting\Reporting8000 |
|
Domain |
Domain-based Namespace |
Domain-based Namespace folder targeting a file server share |
Notice how the name of the DFS folder is "Reporting\Reporting8000" and includes two path components separated by a "\". This capability of DFSN is what allows for the creation of any desired path. When users access the UNC path, they ultimately will still be referred to the target file server(s) containing the shared data. "Reporting" is simply a placeholder serving to maintain that original path component.
Step-by-step
Below are the steps and precautions for consolidating interlinked namespaces. It is highly recommended to put a temporary suspension on any administrative changes to the standalone namespace(s).
Assumptions:
The instructions assume that you have already met the requirements for "Windows Server 2008 mode" namespaces and your domain-based namespace is currently running in "Windows 2000 Server mode".
However, if you have not met these requirements and have a "Windows 2000 Server mode" domain-based namespace, these instructions (with modifications) may still be applied *if* after consolidation the domain-based namespace configuration data is less than 5 MB in size. If you are unsure of the size, you may run the "dfsutil /root:\\<servername>\<namespace_name> /view" command against the standalone namespace and note the size listed at the top (or bottom) of the output. The reported size will be added to the current size of the domain-based namespace and must not exceed 5 MB. Cease any further actions if you are unsure, or test the operations in a lab environment. Of course, if your standalone namespace size was less than 5 MB in size, then why did you create a interlinked namespace to begin with? Eh…I'm not really supposed to ask these questions. Moving on…
Step 1
Export the standalone namespace.
Dfsutil root export \\fs1\reporting c:\exports\reporting_namespace.txt
Step 2
Modify the standalone namespace export file using a text editor capable of search-and-replace operations. Notepad.exe has this capability. This export file will be leveraged later to create the proper folders within the domain-based namespace.
Replace the "Name" element of the standalone namespace with the name of the domain-based namespace and replace the "Target" element to be the UNC path of the domain-based namespace server (the one you will be configuring later in step 6). Below, I highlighted the single "\\FS1\reporting" 'name' element that will be replaced with "\\TAILSPINTOYS.COM\DATA". The single "\\FS1\reporting" element immediately below it will be replaced with "\\DC1\DATA" as "DC1" is my namespace server.

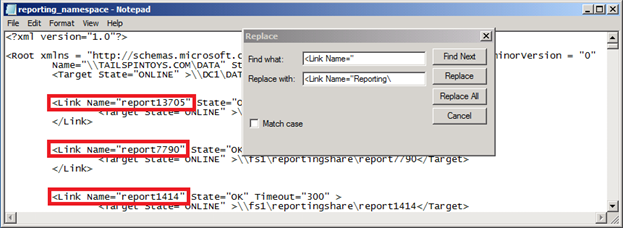
Next, prepend "Reporting\" to the folder names listed in the export. The final result will be as follows:

One trick is to utilize the 'replace' capability of Notepad.exe to search out and replace all instances of the '<Link Name="' string with '<Link Name="folder\' ('<Link Name="Reporting\' in this example). The picture below shows the original folders defined and the 'replace' dialog responsible for changing the names of the folders (click 'Replace all' to replace all occurrences).
Save the modified file with a new filename (reporting_namespace_modified.txt) so as to not overwrite the standalone namespace export file.
Step 3
Export the domain-based namespace
dfsutil root export \\tailspintoys.com\data c:\exports\data_namespace.txt
Step 4
Open the output file from Step 3 and delete the link that is being consolidated ("Reporting"):
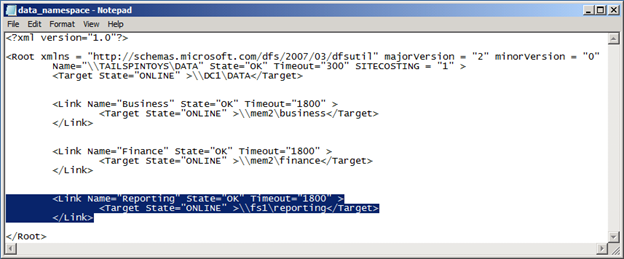
Save the file as a separate file (data_namespace_modified.txt). This export will be utilized to recreate the *other* DFS folders within the "Windows Server 2008 Mode" domain-based namespace that do not require consolidation.
Step 5
This critical step involves deleting the existing domain-based namespace. This is required for the conversion from "Windows 2000 Server Mode" to "Windows Server 2008 Mode".
Delete the domain-based namespace ("DATA" in this example).
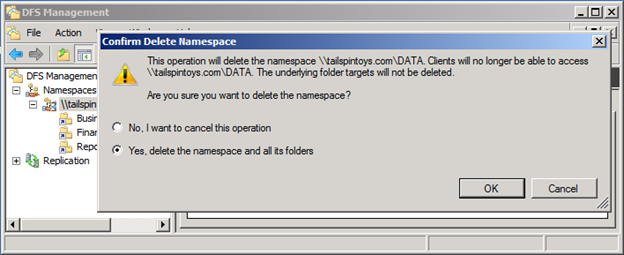
Step 6
Recreate the "DATA" namespace, specifying the mode as "Windows Server 2008 mode". Specify the namespace server to be a namespace server with close network proximity to the domain's PDC. This will significantly decrease the time it takes to import the DFS folders. Additional namespace servers may be added any time after Step 8.

Step 7
Import the modified export file created in Step 4:
dfsutil root import merge data_namespace_modified.txt \\tailspintoys.com\data
In this example, this creates the "Business" and "Finance" DFS folders:

Step 8
Import the modified namespace definition file created in Step 2 to create the required folders (note that this operation may take some time depending on network latencies and other factors):
dfsutil root import merge reporting_namespace_modified.txt \\tailspintoys.com\DATA

Step 9
Verify the structure of the namespace:
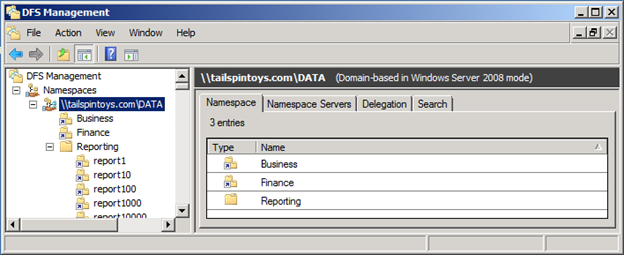
Step 10
Test the functionality of the namespace. From a client or another server, run the "dfsutil /pktflush" command to purge cached referral data and attempt access to the DFS namespace paths. Alternately, you may reboot clients and attempt access if they do not have dfsutil.exe available.
Below is the result of accessing the "report8000" folder path via the new namespace:
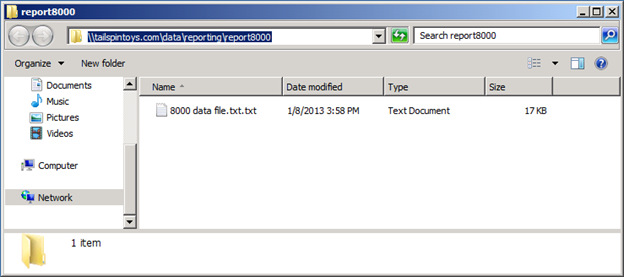
Referral cache confirms the new namespace structure (red line highlighting the name of the DFS folder as "reporting\report8000"):

At this point, you should have a fully working namespace. If something is not working quite right or there are problems accessing the data, you may return to the original namespace design by deleting all DFS folders in the new domain-based namespace and importing the original namespace from the export file (or recreating the original folders by hand). At no time did we alter the standalone namespaces, so returning to the original interlinked configuration is very easy to accomplish.
Step 11
Add the necessary namespace servers to the domain-based namespace to increase fault tolerance.
Notify all previous administrators of the standalone namespace(s) that they will need to manage the domain-based namespace from this point forward. Once you confident with the new namespace, the original standalone namespace(s) may be retired at any time (assuming no systems on the network are using UNC paths directly to the standalone namespace).
Namespace already in "Windows Server 2008 mode"?
What would the process be if the domain-based namespace is already running in "Windows Server 2008 mode"? Or, you have already run through the operations once and wish to consolidate additional DFS folders? Some steps remain the same while others are skipped entirely:
Steps 1-2 (same as detailed previously to export the standalone namespace and modify the export file)
Step 3 Export the domain-based namespace for backup purposes
Step 4 Delete the DFS folder targeting the standalone namespace--the remainder of the domain-based namespace will remain unchanged
Step 8 Import the modified file created in step 2 to the domain-based namespace
Step 9-10 Verify the structure and function of the namespace
Caveats and Concerns
Ensure that no data exists in the original standalone namespace server's namespace share. Because clients are now no longer using the standalone namespace, the "reporting" path component exists as a subfolder within each domain-based namespace server's share. Furthermore, hosting data within the namespace share (domain-based or standalone) is not recommended. If this applies to you, consider moving such data into a separate folder within the new namespace and update any references to those files used by clients.
These operations should be performed during a maintenance window. The length of which is dictated by your efficiency in performing the operations and the length of time it takes to import the DFS namespace export file. Because a namespace is so easily built, modified, and deleted, you may wish to consider a "dry run" of sorts. Prior to deleting your production namespace(s), create a new test namespace (e.g. "DataTEST"), modify your standalone namespace export file (Step 2) to reference this "DataTEST" namespace and try the import. Because you are using a separate namespace, no changes will occur to any other production namespaces. You may gauge the time required for the import, and more importantly, test access to the data (\\tailspintoys.com\DataTEST\Reporting\Reporting8000 in my example). If access to the data is successful, then you will have confidence in replacing the real domain-based namespace.
Clients should not be negatively affected by the restructuring as they will discover the new hierarchy automatically. By default, clients cache namespace referrals for 5 minutes and folder referrals for 30 minutes. It is advisable to keep the standalone namespace(s) operational for at least an hour or so to accommodate transition to the new namespace, but it may remain in place for as long as you wish.
If you decommission the standalone namespace and find some clients are still using it directly, you could easily recreate the standalone namespace from our export in Step 1 while you investigate the client configurations and remove their dependency on it.
Lastly, if you are taking the time and effort to recreate the namespace for "Windows Server 2008 mode" support, you might as well consider configuring the targets of the DFS folders with DNS names (modify the export files) and also implementing DFSDnsConfig on the namespace servers.
I hope this blog eliminates some of the concerns and fears of consolidating interlinked namespaces!
Dave "King" Fisher
Comments
- Anonymous
February 08, 2013
thanks for information.