Windows 10 Device Guard and Credential Guard Demystified
While helping Windows Enterprise customers deploy and realize the benefits of Windows 10, I've observed there's still a lot of confusion regarding the security features of the operating system. This is a shame since some of the key benefits of Windows 10 involve these deep security features. This post serves to detail the Device Guard and Credential Guard feature sets, and their relationship to each other.
First, let's set the foundation by thinking about the purpose of each feature:
Device Guard is a group of key features, designed to harden a computer system against malware. Its focus is preventing malicious code from running by ensuring only known good code can run.
Credential Guard is a specific feature that is not part of Device Guard that aims to isolate and harden key system and user secrets against compromise, helping to minimize the impact and breadth of a Pass the Hash style attack in the event that malicious code is already running via a local or network based vector.
The two are different, but complimentary as they offer different protections against different types of threats. Let's dive in and take a logical approach to understanding each.
It’s worth noting here that these are enterprise features, and as such are included only in the Windows Enterprise client.
Virtual Secure Mode
The first technology you'll need to understand before we can really dig into either Device Guard or Credential Guard, is Virtual Secure Mode (VSM). VSM is a feature that leverages the virtualization extensions of the CPU to provide added security of data in memory. We call this class of technology Virtualization Based Security (VBS), and you may have heard that term used elsewhere. Anytime we’re using virtualization extensions to provide security, we're essentially talking about a VBS feature.
VSM leverages the on chip virtualization extensions of the CPU to sequester critical processes and their memory against tampering from malicious entities.
The way this works is the Hyper-V hypervisor is installed - the same way it gets added in when you install the Hyper-V role. Only the hypervisor itself is required, the Hyper-V services (that handle shared networking and the management of VMs themselves) and management tools aren't required, but are optional if you’re using the machine for ‘real’ Hyper-V duties. As part of boot, the hypervisor loads and later calls the real 'guest' OS loaders.
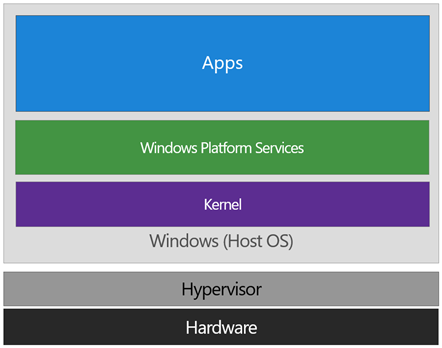
The diagram below illustrates the relationship of the hypervisor with the installed operating system (usually referred to as the host operating system)
The difference between this and a traditional architecture is that the hypervisor sits directly on top of the hardware, rather than the host OS (Windows) directly interacting at that layer. The hypervisor serves to abstract the host OS (and any guest OS or processes) from the underlying hardware itself, providing control and scheduling functions that allow the hardware to be shared.
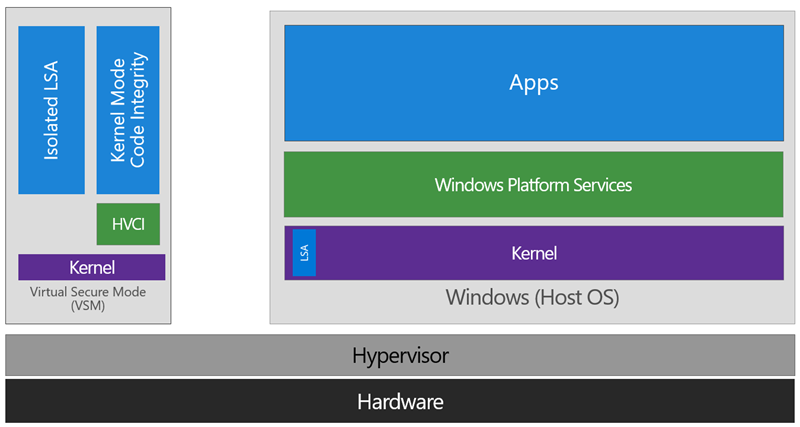
In VSM, we’re able to extend this by tagging specific processes and their associated memory as actually belonging to a separate operating system, creating a ‘bubble’ sitting on top of the hypervisor where security sensitive operations can occur, independent of the host OS:
In this way, the VSM instance is segregated from the normal operating system functions and is protected by attempts to read information in that mode. The protections are hardware assisted, since the hypervisor is requesting the hardware treat those memory pages differently. This is the same way to two virtual machines on the same host cannot interact with each other; their memory is independent and hardware regulated to ensure each VM can only access it’s own data.
From here, we now have a protected mode where we can run security sensitive operations. At the time of writing, we support three capabilities that can reside here: the Local Security Authority (LSA) , and Code Integrity control functions in the form of Kernel Mode Code Integrity (KMCI) and the hypervisor code integrity control itself, which is called Hypervisor Code Integrity (HVCI) .
Each of these capabilities (called Trustlets) are illustrated below:
When these capabilities are handled by Trustlets in VSM, the Host OS simply communicates with them through standard channels and capabilities inside of the OS. While this Trustlet-specific communication is allowed, having malicious code or users in the Host OS attempt to read or manipulate the data in VSM will be significantly harder than on a system without this configured, providing the security benefit.
Running LSA in VSM, causes the LSA process itself (LSASS) to remain in the Host OS, and a special, additional instance of LSA (called LSAIso – which stands for LSA Isolated) is created. This is to allow all of the standard calls to LSA to still succeed, offering excellent legacy and backwards compatibility, even for services or capabilities that require direct communication with LSA. In this respect, you can think of the remaining LSA instance in the Host OS as a ‘proxy’ or ‘stub’ instance that simply communicates with the isolated version in prescribed ways.
Deploying VSM is fairly straightforward. You simply need to verify you have the appropriate hardware configuration, install certain Windows features, and configure VSM via Group Policy.
Step One: Configure Hardware
In order to use VSM, you’ll need a number of hardware features to be present and enabled in the firmware of the machine:
- UEFI running in Native Mode (not Compatibility/CSM/Legacy mode)
- Windows 64bit and it’s associated requirements
- Second Layer Address Translation (SLAT) and Virtualization Extensions (Eg, Intel VT or AMD V)
- A Trusted Platform Module (TPM) is recommended.
Step Two: Enable Windows Features
The Windows features you’ll need to make VSM work are called Hyper-V Hypervisor (you don’t need the other Hyper-V components) and Isolated User Mode:
If these options are greyed out or unavailable for install, it will typically indicate that the hardware requirements in step one haven’t been met.
You’ll notice the name of the feature is called Isolated User Mode in here. It actually is the Virtual Secure Mode feature – you can thank a last minute name change for that. In order to not confuse people, this isn’t planned to change to reflect the VSM name at this time, and may look to being integrated as a standard Windows feature at a later stage.
Update: In Windows 10, Version 1607 this is indeed an integrated feature and no longer needs to be explicitly enabled.
Step Three: Configure VSM
VSM and the Trustlets loaded within are controlled via either Mobile Device Management (MDM) or Group Policy (GP).
For the purposes of this article, I’ll cover the Group Policy method as that’s the most commonly used option, but the same configuration is possible with MDM.
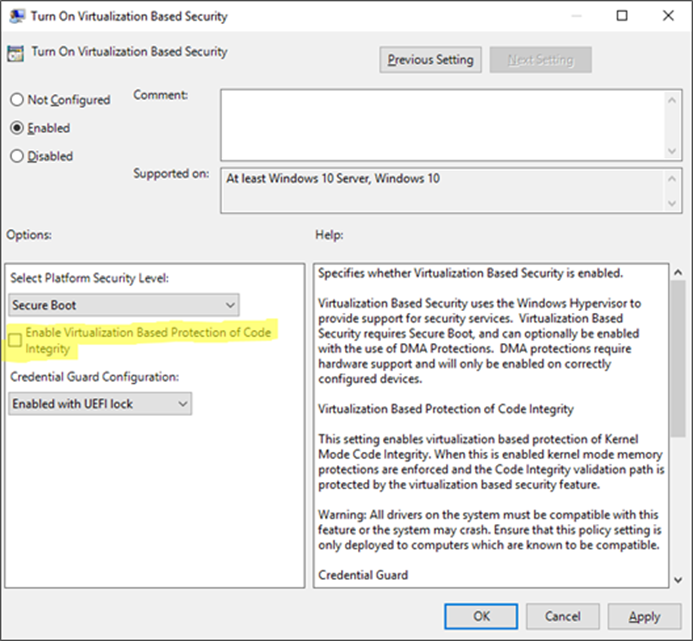
The GP setting you need to know about is called Turn On Virtualization Based Security, located under Computer Configuration \ Administrative Templates \ System \ Device Guard in the Group Policy Object Editor:
Enabling this setting, and leaving all the settings blank or at their defaults will turn on VSM, ready for the steps below for Device Guard and Credential Guard. In this default state, only the Hypervisor Code Integrity (HVCI) runs in VSM until you enable the features below (protected KMCI and LSA).
Device Guard
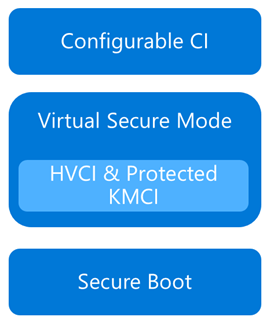 Now that we have an understanding of Virtual Secure Mode, we can begin to discuss Device Guard. The most important thing to realize is that Device Guard is not a feature; rather it is a set of features designed to work together to prevent and eliminate untrusted code from running on a Windows 10 system.
Device Guard consists of three primary components:
- Configurable Code Integrity (CCI) – Ensures that only trusted code runs from the boot loader onwards.
- VSM Protected Code Integrity – Moves Kernel Mode Code Integrity (KMCI) and Hypervisor Code Integrity (HVCI) components into VSM, hardening them from attack.
- Platform and UEFI Secure Boot – Ensuring the boot binaries and UEFI firmware are signed and have not been tampered with.
When these features are enabled together, the system is protected by Device Guard, providing class leading malware resistance in Windows 10.
Configurable Code Integrity (CCI)
CCI dramatically changes the trust model of the system to require that code is signed and trusted for it to run. Other code simply cannot execute. While this is extremely effective from a security perspective, it provides some challenges in ensuring that code is signed.
Your existing applications will likely be a combination of code that is signed by the vendor, and code that is not. For code that is signed by the vendor, the easiest option is just to use a tool called signtool.exe to generate security catalogs (signatures) for just about any application.
More detail on this in an upcoming post.
The high level steps to configure code integrity for your organization is:
- Group devices into similar roles – some systems might require different policies (or you may wish to enable CCI for only select systems such as Point of Sale systems or Kiosks.
- Use PowerShell to create integrity policies from “golden” PCs
(use the New-CIPolicy Cmdlet) - After auditing, merge code integrity policies using PowerShell (if needed)
(Merge-CIPolicy Cmdlet) - Discover unsigned LOB apps and generate security catalogs as needed (Package Inspector & signtool.exe – more info on this in a subsequent post)
- Deploy code integrity policies and catalog files
(GP Setting Below + Copying .cat files to catroot - C:\Windows\System32\\{F750E6C3-38EE-11D1-85E5-00C04FC295EE}\)
The Group Policy setting in question is Computer Configuration \ Administrative Templates \ System \ Device Guard \ Deploy Code Integrity Policy: 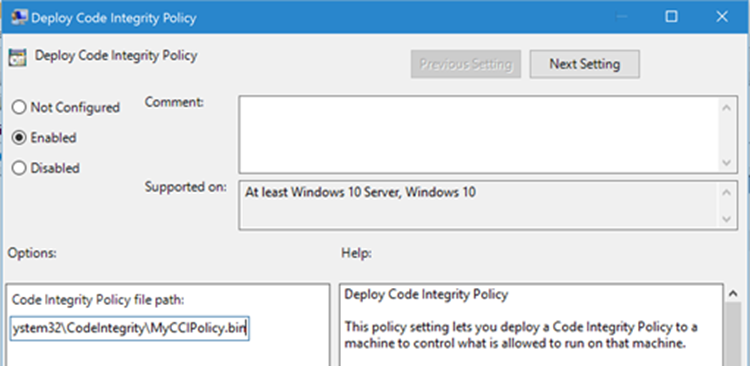
VSM Protected Code Integrity
The next component of Device Guard we’ll cover is VSM hosted Kernel Mode Code Integrity (KMCI). KMCI is the component that handles the control aspects of enforcing code integrity for kernel mode code. When you use Configurable Code Integrity (CCI) to enforce a Code Integrity policy, it is KMCI and it’s User-Mode cousin, UMCI – that actually enforces the policy.
Moving KMCI to being protected by VSM ensures that it is hardened to tampering by malware and malicious users.
Platform & UEFI Secure Boot
While not a new feature (introduced in Windows 8), Secure Boot provides a high-value security benefit by ensuring that firmware and boot loader code is protected from tampering using signatures and measurements.
To deploy this feature you must be UEFI booting (not legacy), and the Secure Boot option (if supported) must be enabled in the UEFI. Once this is done, you can build the machine (you’ll have to wipe & reload if you’re switching from legacy to UEFI) and it will utilize Secure Boot automatically.
For more information about the specifics of deploying Device Guard, start with the deployment guide.
Credential Guard
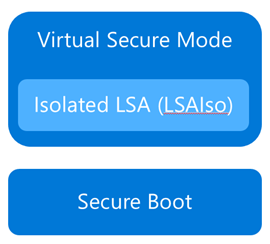 Although separate from Device Guard, the Credential Guard feature also leverages Virtual Secure Mode by placing an isolated version of the Local Security Authority (LSA – or LSASS) under it’s protection.
The LSA performs a number of security sensitive operations, the main one being the storage and management of user and system credentials (hence the name – Credential Guard)
Credential guard is enabled by configuring VSM (steps above) and configuring the Virtualization Based Security Group Policy setting with Credential Guard configured to be enabled.
Once this is done, you can easily check if Credential Guard (or many of the other features from this article) is enabled by launching MSINFO32.EXE and viewing the following information:
You can also check for the presence of the LSAIso process, which is running in VSM:
I hope this article has been useful for you and answered at least some of your questions about Device Guard and Credential Guard.
If your thirst for knowledge is not yet quenched and you need more information while you wait for the follow up posts, check out the following Channel9 videos that cover this topic:
https://channel9.msdn.com/Blogs/Seth-Juarez/Isolated-User-Mode-in-Windows-10-with-Dave-Probert https://channel9.msdn.com/Blogs/Seth-Juarez/Isolated-User-Mode-Processes-and-Features-in-Windows-10-with-Logan-Gabriel https://channel9.msdn.com/Blogs/Seth-Juarez/Isolated-User-Mode-in-Windows-10-with-Dave-Probert
Stay tuned for further posts about this and other Windows 10 features. Hey, why not subscribe?
Ash.
Comments
- Anonymous
March 02, 2016
@Jari Kukkonen - Thanks! Fixed :-) - Anonymous
March 03, 2016
My BlackHat 2016 presentation, available on Youtube, and slides, go deeper into the implementation of VSM, for those curious.http://www.alex-ionescu.com/blackhat2015.pdf- Anonymous
January 13, 2017
Great presentation Alex thanks for the insights.
- Anonymous
- Anonymous
March 15, 2016
Great post, everything at one place !!! - Anonymous
March 21, 2016
As more workloads move to become cloud-based, how does this technology work there? (most if not all cloud service providers don't expose VT-x / SVM to instance VMs). - Anonymous
July 17, 2016
Hi Ash,Very good post! make things a lot clearer to me.just one question that wasn't captured in this thread, does any of these features protects against RAM sniffing (connecting RAM readers to memory HW bus? if not, is there any other solution that protects against such attack?thanks!- Anonymous
August 12, 2016
Hi MaorIt really depends on the specifics of the attack, but if reading direct from memory then these mitigations won't help with that - this is primarily aimed at attacks coming from within the running operating system itself.
- Anonymous
- Anonymous
July 28, 2016
wow You dont over teach or go off topic.and you have kept it easy enough for a Novice to follow along..thank you! - Anonymous
December 20, 2016
Thanks for the scan to find out there is no threat! However, the sound device is not malfunction and found not plugin. There is a red cross in the sound icon. HD Audio Device cannot be activated, configured or tested in the menu. Win 10 update couldn't do to install it. Please help the device! - Anonymous
January 03, 2017
You mentioned "Discover unsigned LOB apps and generate security catalogs as needed (Package Inspector & signtool.exe – more info on this in a subsequent post)" in the article above, but I cannot find it. Is this still to come? ;-) - Anonymous
January 10, 2017
Amazing....You are my hero SIR - Anonymous
February 28, 2017
Great, I am looking for some Training on this, can somebody suggest where can find training in CG and DG - Anonymous
March 02, 2017
Hi Ash!Is there still an issue of incompatibility with non-Hyper-V hypervisors while running Device and/or Credential Guard? ..in that activating Hyper-V monopolizes the virtualization features of the processer, leaving VirtualBox or VMWare or others to run in non-accellerated states? - Anonymous
March 04, 2017
Unfortunately, just like Hyper-V services, this feature disabled hardware virtualization in the Windows OS, preventing apps such as VMware Workstation, VirtualBox, and Intel HAXM from functioning. Please consider virtualizing VT-x even on Client versions of Windows, at least for the boot instance, so we can run these third-party apps while still being able to take advantage of this new feature. - Anonymous
April 03, 2017
When will the next post of this article be available? - Anonymous
April 17, 2017
The best article I have read to explain VBS/DG/CG clearly. Thank you very much! - Anonymous
June 08, 2017
Did you publish any follow-up posts? - Anonymous
June 18, 2017
The 3rd link to the channel9 talk is the same as the 1st. You really wanted to look at this one: https://channel9.msdn.com/Blogs/Seth-Juarez/More-on-Processes-and-Features-in-Windows-10-Isolated-User-Mode-with-Dave-Probert- Anonymous
July 09, 2017
Thanks!
- Anonymous
