Using Azure Analysis Services on Top of Azure Data Lake Store
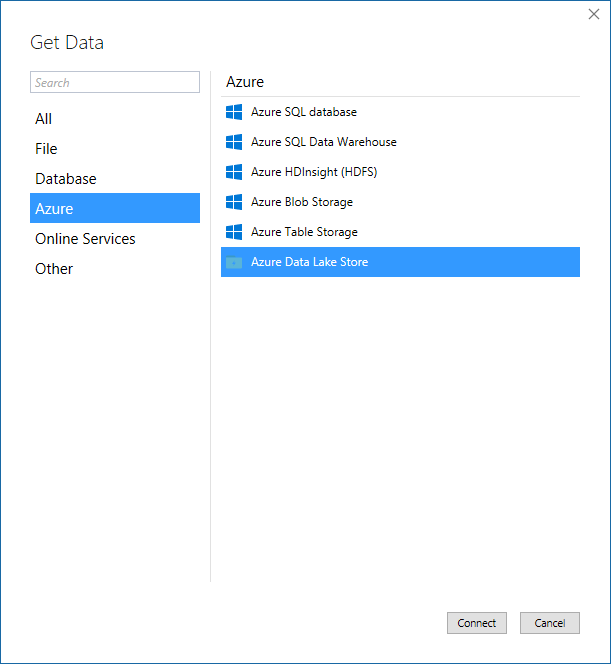
The latest release of SSDT Tabular adds support for Azure Data Lake Store (ADLS) to the modern Get Data experience (see the following screenshot). Now you can augment your big data analytics workloads in Azure Data Lake with Azure Analysis Services and provide rich interactive analysis for selected data subsets at the speed of thought!
If you are unfamiliar with Azure Data Lake, check out the various articles at the Azure Data Lake product information site. Also read the article "Get started with Azure Data Lake Analytics using Azure portal."?
Following these instructions, I provisioned a Data Lake Analytics account called tpcds for this article and a new Data Lake Store called tpcdsadls. I also added one of my existing Azure Blob Storage accounts, which contains a 1 TB TPC-DS data set, which I already created and used in the series "Building an Azure Analysis Services Model on Top of Azure Blob Storage."? The idea is to move this data set into Azure Data Lake as a highly scalable and sophisticated analytics backend, from which to serve a variety of Azure Analysis Services models.
For starters, Azure Data Lake can process raw data and put it into targeted output files so that Azure Analysis Services can import the data with less overhead. For example, you can remove any unnecessary columns at the source, which eliminates about 60 GB of unnecessary data from my 1 TB TPC-DS data set and therefore benefits processing performance, as discussed in "Building an Azure Analysis Services Model on Top of Azure Blob Storage--Part 3"?.
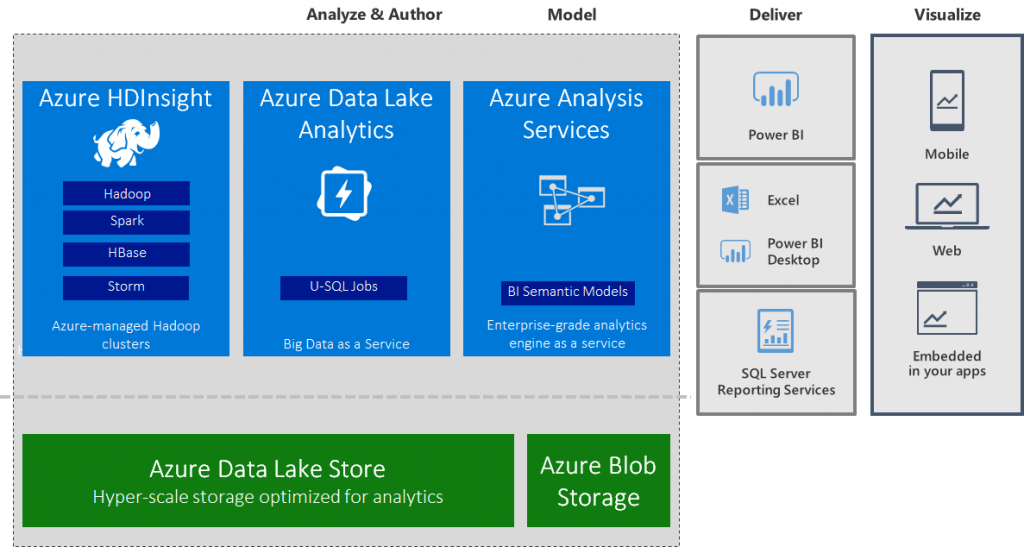
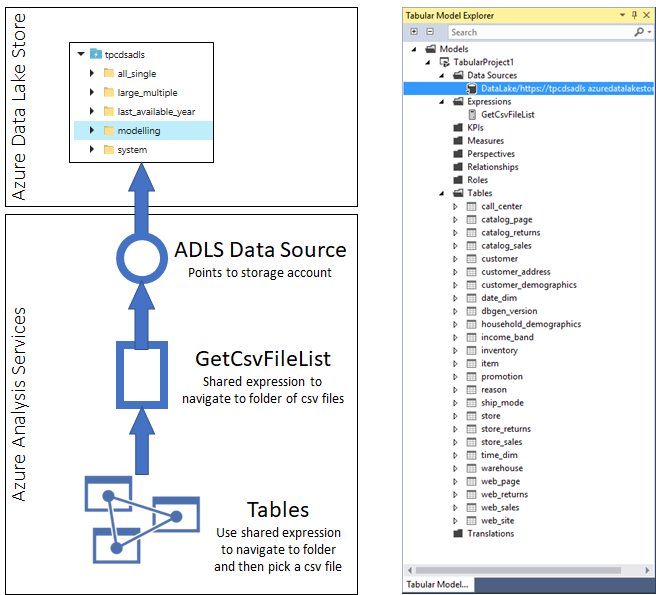
Moreover, with relatively little effort and a few small changes to a U-SQL script, you can provide multiple targeted data sets to your users, such as a small data set for modelling purposes plus one or more production data sets with the most relevant data. In this way, a data modeler can work efficiently in SSDT Tabular against the small data set prior to deployment, and after production deployment, business users can get the relevant information they need from your Azure Analysis Services models in Microsoft Power BI, Microsoft Office Excel, and Microsoft SQL Server Reporting Services. And if a data scientist still needs more than what's readily available in your models, you can use Azure Data Lake Analytics (ADLA) to run further U-SQL batch jobs directly against all the terabytes or petabytes of source data you may have. Of course, you can also take advantage of Azure HDInsight as a highly reliable, distributed and parallel programming framework for analyzing big data. The following diagram illustrates a possible combination of technologies on top of Azure Data Lake Store.
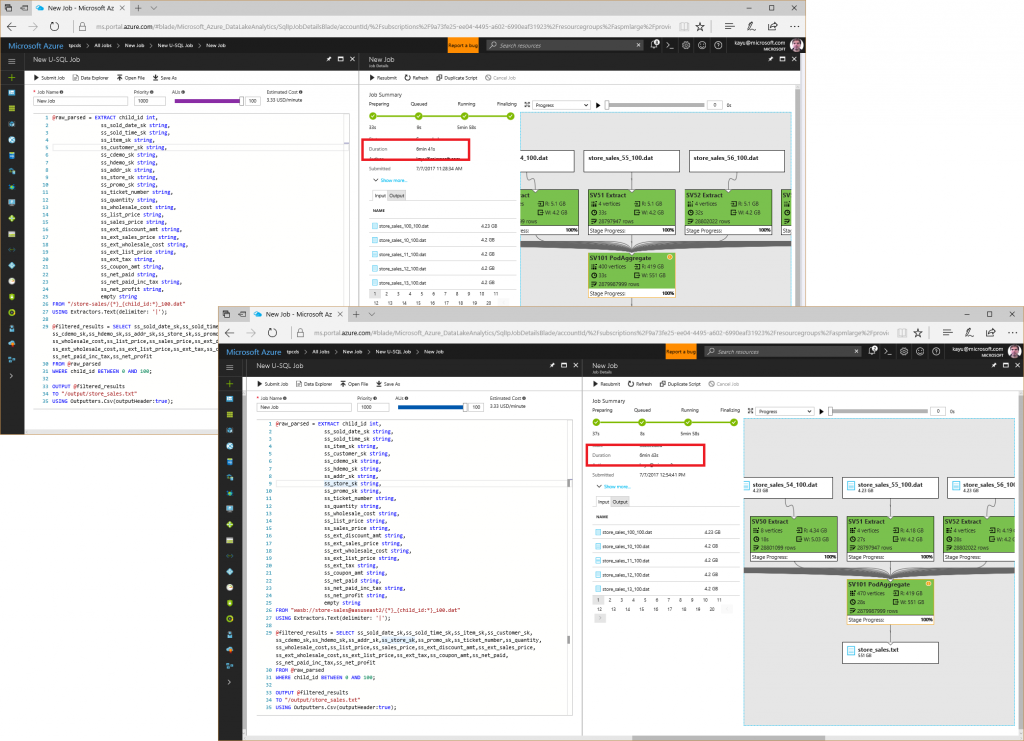
Azure Data Lake Analytics (ADLA) can process massive volumes of data extremely quickly. Take a look at the following screenshot, which shows a Data Lake job processing approximately 2.8 billion rows of TPC-DS store sales data (~500 GB) in under 7 minutes!
The screen in the background uses source files in Azure Data Lake Store and the screen in the foreground uses source files in Azure Blob Storage connected to Azure Data Lake. The performance is comparable, so I decided to leave my 1 TB TPC-DS data set in Azure Blob Storage, but if you want to ensure absolute best performance or would like to consolidate your data in one storage location, consider moving all your raw data files into ADLS. It's straightforward to copy data from Azure Blob Storage to ADLS by using the AdlCopy tool, for example.
With the raw source data in a Data Lake-accessible location, the next step is to define the U-SQL scripts to extract the relevant information and write it along with column names to a series of output files. The following listing shows a general U-SQL pattern that can be used for processing the raw TPC-DS data and putting it into comma-separated values (csv) files with a header row.
 @raw_parsed = EXTRACT child_id int,
                 <list of all table columns> ,
                empty string
FROM " <URI to Blob Container> /{*}_{child_id}_100.dat"
USING Extractors.Text(delimiter: '|');

@filtered_results = SELECT  <list of relevant table columns>
FROM @raw_parsed
 <WHERE clause to extract specific rows for output> ;

OUTPUT @filtered_results
TO "/ <output folder> / <filename> .csv"
USING Outputters.Csv(outputHeader:true);
The next listing shows a concrete example based on the small income_band table. Note how the query extracts a portion of the file name into a virtual child_id column in addition to the actual columns from the source files. This child_id column comes in handy later when generating multiple output csv files for the large TPC-DS tables. Also, the WHERE clause is not strictly needed in this example because the income_band table only has 20 rows, but it’s included to illustrate how to restrict the amount of data per table to a maximum of 100 rows to create a small modelling data set.
 @raw_parsed = EXTRACT child_id int,
                      b_income_band_sk string,
                      b_lower_bound string,
                      b_upper_bound string,
                      empty string
FROM "wasb://income-band@aasuseast2/{*}_{child_id}_100.dat"
USING Extractors.Text(delimiter: '|');

@filtered_results = SELECT b_income_band_sk,
                           b_lower_bound,
                           b_upper_bound
FROM @raw_parsed
ORDER BY child_id ASC
FETCH 100 ROWS;
You can find complete sets of U-SQL scripts to generate output files for different scenarios (modelling, single csv file per table, multiple csv files for large tables, and large tables filtered by last available year) at the GitHub repository for Analysis Services.
For instance, for generating the modelling data set, there are 25 U-SQL scripts to generate a separate csv file for each TPC-DS table. You can run each U-SQL script manually in the Microsoft Azure portal, yet it is more convenient to use a small Microsoft PowerShell script for this purpose. Of course, you can also use Azure Data Factory, which among other things enables you to run U-SQL scripts on a scheduled basis. For this article, however, the following Microsoft PowerShell script suffices.
 $script_folder = "<Path to U-SQL Scripts>"
$adla_account = "<ADLA Account Name>"
Login-AzureRmAccount -SubscriptionName "<Windows Azure Subscription Name>"

Get-ChildItem $script_folder -Filter *.usql |
Foreach-Object {
    $job = Submit-AdlJob -Name $_.Name -AccountName $adla_account –ScriptPath $_.FullName -DegreeOfParallelism 100
    Wait-AdlJob -Account $adla_account -JobId $job.JobId
}

Write-Host "Finished processing U-SQL jobs!";
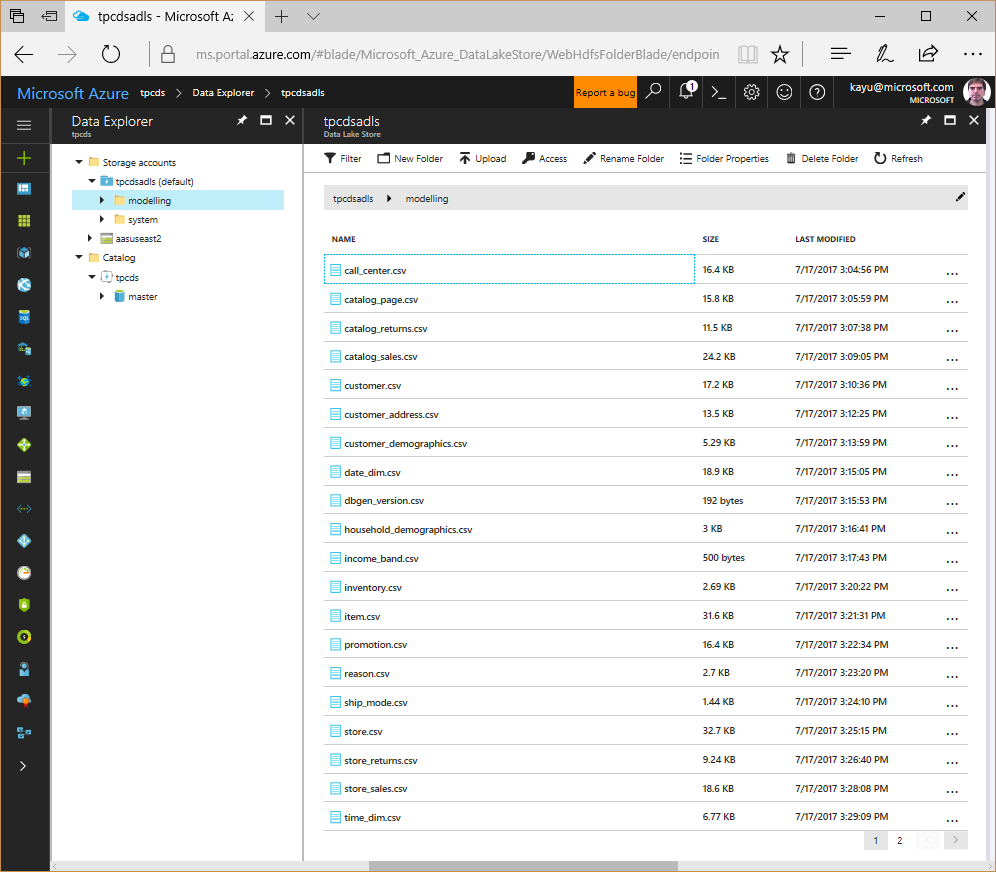
It does not take long for Azure Data Lake to process the requests. You can use the Data Explorer feature in the Azure Portal to double-check that the desired csv files have been generated successfully, as the following screenshot illustrates.
With the modelling data set in place, you can finally switch over to SSDT and create a new Analysis Services Tabular model at the 1400 compatibility level. Make sure you have the latest version of the Microsoft Analysis Services Projects package installed so that you can pick Azure Data Lake Store from the list of available connectors. You will be prompted for the Azure Data Lake Store URL and you must sign in using an organizational account. Currently, the Azure Data Lake Store connector only supports interactive logons, which is an issue for processing the model in an automated way in Azure Analysis Services, as discussed later in this article. For now, let's focus on the modelling aspects.
The Azure Data Lake Store connector does not automatically establish an association between the folders or files in the store and the tables in the Tabular model. In other words, you must create each table individually and select the corresponding csv file in Query Editor. This is a minor inconvenience. It also implies that each table expression specifies the folder path to the desired csv file individually. If you are using a small data set from a modelling folder to create the Tabular model, you would need to modify every table expression during production deployment to point to the desired production data set in another folder. Fortunately, there is a way to centralize the folder navigation by using a shared expression so that only a single expression requires an update on production deployment. The following diagram depicts this design.
To implement this design in a Tabular model, use the following steps:
- Start Visual Studio and check under Tools -> Extensions and Updates that you have the latest version of Microsoft Analysis Services Projects installed.
- Create a new Tabular project at the 1400 compatibility level.
- Open the Model menu and click on Import From Data Source.
- Pick the Azure Data Lake Store connector, provide the storage account URL, and sign in by using an Organizational Account. Click Connect and then OK to create the data source object in the Tabular model.
- Because you chose Import From Data Source, SSDT displays Query Editor automatically. In the Content column, click on the Table link next to the desired folder name (such as modelling) to navigate to the desired root folder where the csv files reside.
- Right-click the Table object in the right Queries pane, and click Create Function. In the No Parameters Found dialog box, click Create.
- In the Create Function dialog box, type GetCsvFileList, and then click OK.
- Make sure the GetCsvFileList function is selected, and then on the View menu, click Advanced Editor.
- In the Edit Function dialog box informing you that updates from the Table object will no longer propagate to the GetCsvFileList function if you continue, click OK.
- In Advanced Editor, note how the GetCsvFileList function navigates to the modelling folder, enter a whitespace character at the end of the last line to modify the expression, and then click Done.
- In the right Queries pane, select the Table object, and then in the left Applied Steps pane, delete the Navigation step, so that Source is the only remaining step.
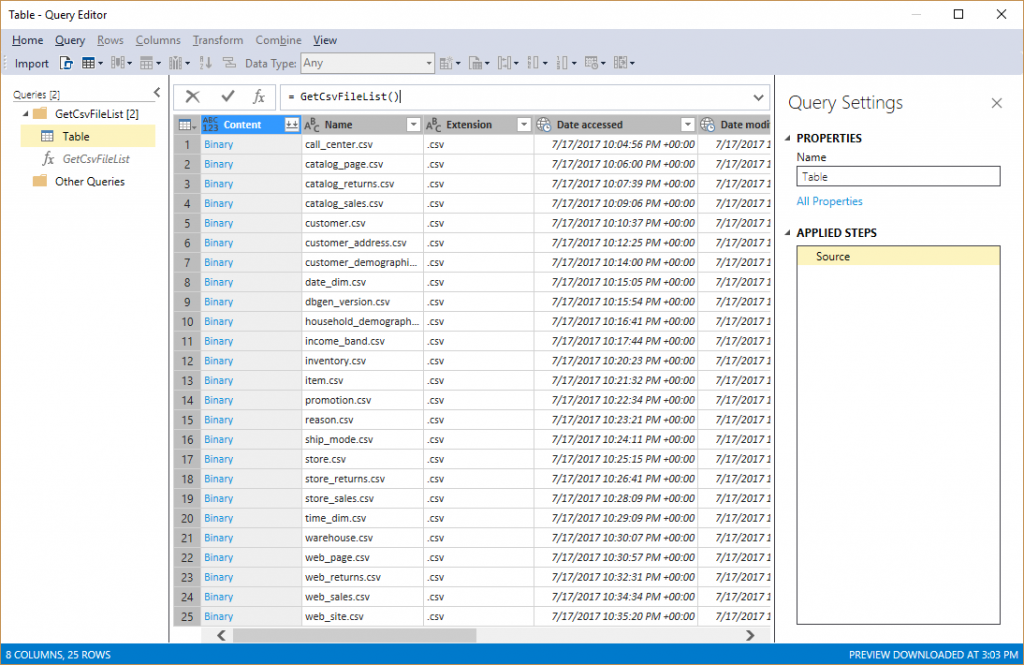
- Make sure the Formula Bar is displayed (View menu -> Formula Bar), and then redefine the Source step as = GetCsvFileList() and press Enter. Verify that the list of csv files is displayed in Query Editor, as in the following screenshot.
- For each table you want to import:
- Right-click the existing Table object and click Duplicate.
- In the Content column, click on the Binary link next to the desired file name (such as call_center) and verify that Query Editor parses the columns and detects the data types correctly.
- Rename the table according to the csv file you selected (such as call_center).
- Right-click the renamed table object (such as call_center) in the Queries pane and click Create New Table.
- Verify that the renamed table object (such as call_center) is no longer displayed in italic, which indicates that the query will now be imported as a table into the Tabular model.
- After you created all desired tables by using the sequence above, delete the original Table object by right-clicking on it and selecting Delete.
- In Query Editor, click Import to add the GetCsvFileList expression and the tables to your Tabular model.
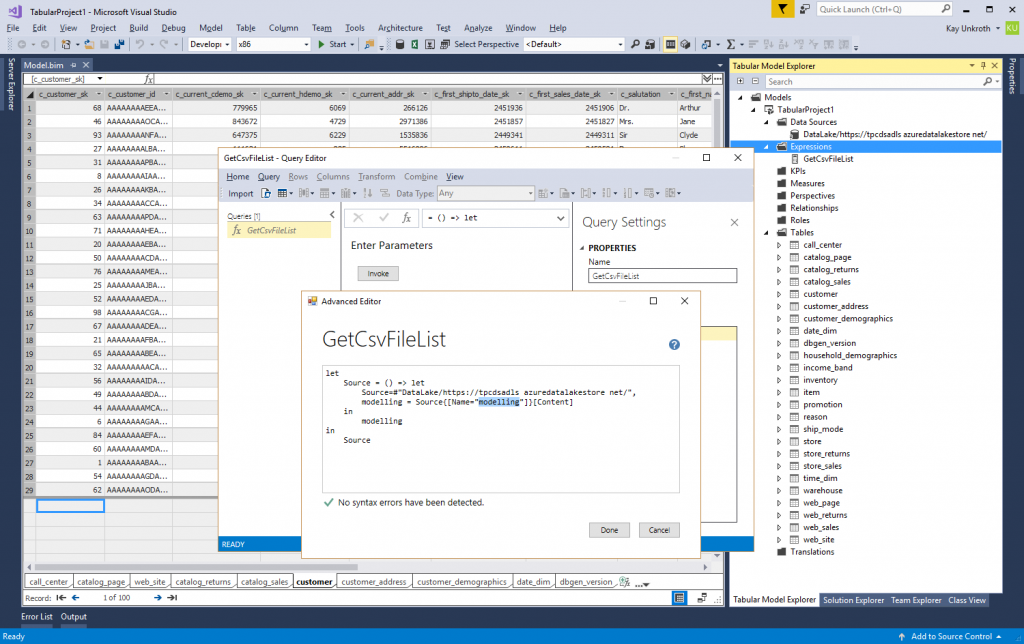
During the import, SSDT Tabular pulls in the small modelling data set. And prior to production deployment, it is now a simple matter of updating the shared expression by right-clicking on the Expressions node in Tabular Model Explorer and selecting Edit Expressions, and then changing the folder name in Advanced Editor. The below screenshot highlights the folder name in the GetCsvFileList expression. And if each table can find its corresponding csv file in the new folder location, deployment and processing can succeed.
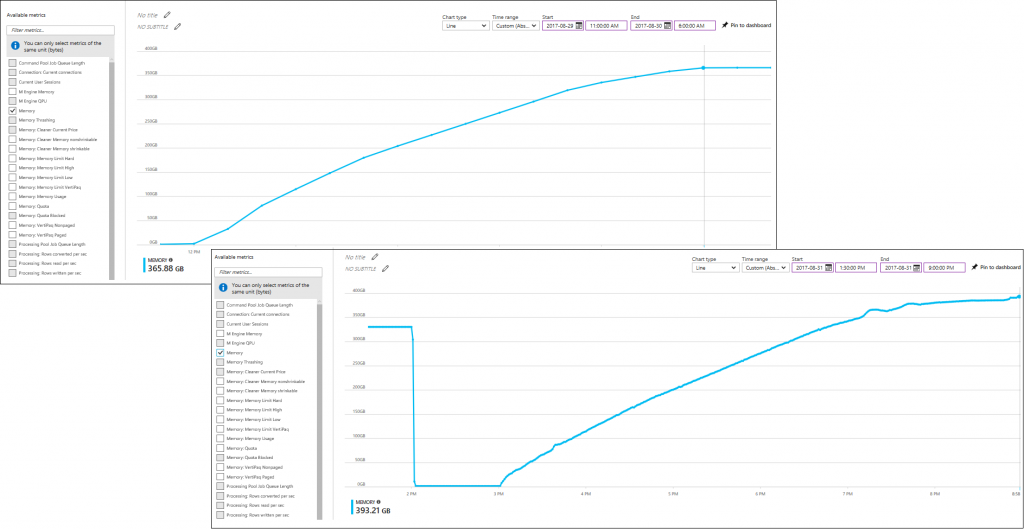
Another option is to deploy the model with the Do Not Process deployment option and use a small TOM application in Azure Functions to process the model on a scheduled basis. Of course, you can also use SSMS to connect to your Azure Analysis Services server and send a processing command, but it might be inconvenient to keep SSDT or SSMS connected for the duration of the processing cycle. Processing against the full 1 TB data set with a single csv file per table took about 15 hours to complete. Processing with four csv files/partitions for the seven large tables and maxActiveConnections on the data source set to 46 concurrent connections took roughly 6 hours. This is remarkably faster in comparison to using general BLOB storage, as in the Building an Azure Analysis Services Model on Top of Azure Blob Storage article, and suggests that there is potential for performance improvements in the Azure BLOB storage connector.
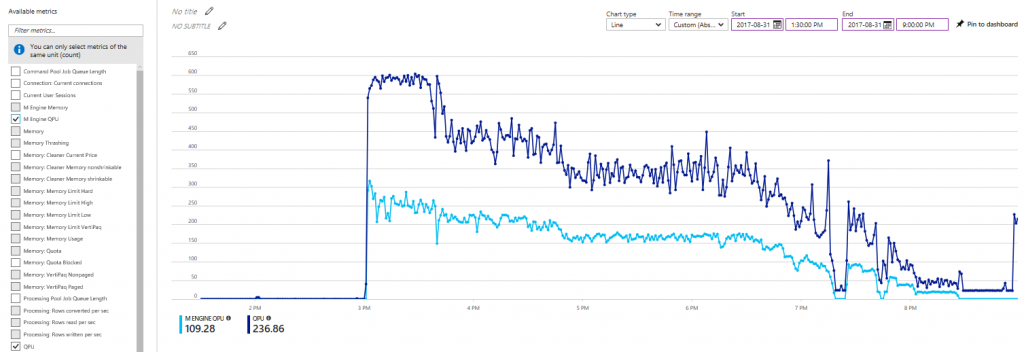
Even the processing performance against Azure Data Lake could possibly be further increased, as the processor utilization on an S9 Azure Analysis Server suggests (see the following screenshot). For the first 30 minutes, processor utilization is close to the maximum and then it decreases as the AS engine finishes more and more partitions and tables. Perhaps with an even higher degree of parallelism, such as with eight or twelve partitions for each large table, Azure AS could keep processor utilization near the maximum for longer and finish the processing work sooner. But processing optimizations through elaborate table partitioning schemes is beyond the scope of this article. The processing performance achieved with four partitions on each large table suffices to conclude that Azure Data Lake is a very suitable big-data backend for Azure Analysis Services.
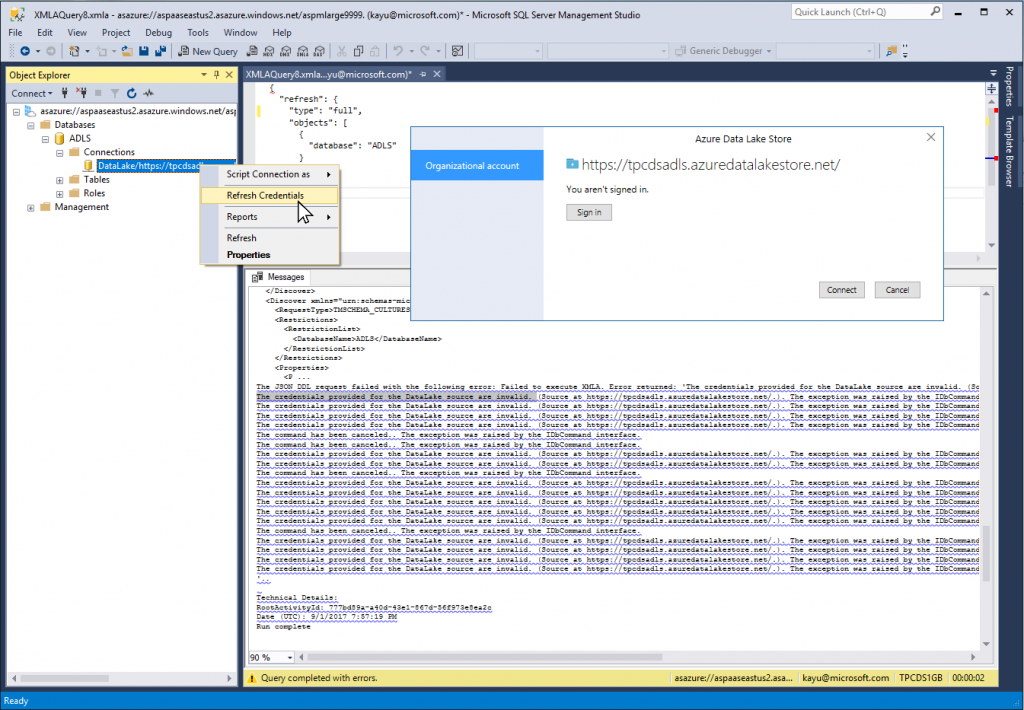
There is currently only one important caveat: The Azure Data Lake Store connector only supports interactive logons. When you define the Azure Data Lake Store data source, SSDT prompts you to log on to Azure Data Lake. The connector performs the logon and then stores the obtained authentication token in the model. However, this token only has a limited lifetime. Chances are fair that processing succeeds after the initial deployment, but when you come back the next day and want to process again, you get an error that "The credentials provided for the DataLake source are invalid. "? See the screenshot below. Either you deploy the model again in SSDT or you right-click the data source in SSMS and select Refresh Credentials to log on to Data Lake again and submit fresh tokens to the model. Note that you must use at least version 15.6 of SSMS to refresh the credentials.
A subsequent article is going to cover how to handle authentication tokens programmatically, so stay tuned for more on connecting to Azure Data Lake and other big data sources on the Analysis Services team blog. And as always, please deploy the latest monthly release of SSDT Tabular and send us your feedback and suggestions by using SSASPrev at Microsoft.com or any other available communication channels such as UserVoice or MSDN forums.
Comments
- Anonymous
September 07, 2017
Please keep the articles coming! There's not many articles, aside from Marco, Chris and Imke, that are technical enough. - Anonymous
September 07, 2017
much needed capability to enable reporting on top of ADL without SQL later in between. - Anonymous
September 14, 2017
What is the plan/roadmap to enable Multi Dimensional Support on top of Azure Data Lake Store.- Anonymous
September 18, 2017
At the moment, the focus is on enabling the new connectors on Tabular only.
- Anonymous
- Anonymous
September 23, 2017
Can you give a hint about to handle the automatic refresh (the subsequent article) you talk about.- Anonymous
October 23, 2017
Working on it. Wanted to wait until some of the gaps are addressed. Well, give me a few days.
- Anonymous
- Anonymous
September 28, 2017
This is simply awesome. We are trying to restructure our business intelligence workflow using USQL / DataFactory and Data Lake and this blog came in at perfect timing. I am still not clear about the part of reissuing tokens. Is there a way to specify a service principle to authenticate SSAS to Data Lake Storage ? I have raised a question about this on Stack Overflow as well https://stackoverflow.com/q/46286908/314763- Anonymous
October 23, 2017
Ameya, the UI doesn't provide the option, but programmatically you could alter the data source and provide a non-expiring token for a service principal.Hope this helps.Cheers,Kay
- Anonymous
