Creating a LAMP Stack (Linux, Apache, MySQL, PHP) from BitNami on Windows Azure
Introduction
In the previous post, I’ve shown you how to create a WIMP stack (Windows, IIS, MySQL, PHP) on a Windows Azure virtual machine. In this post, we’ll be creating a more traditional LAMP server, but we won’t build things from scratch.
I’ll be using the excellent image provided by BitNami which provides a complete PHP, MySQL and Apache environment and comes bundled with phpMyAdmin, SQLite, Varnish, ImageMagick, ModSecurity, XDebug, Xcache, OAuth, Memcache, FastCGI, APC, GD, OpenSSL, CURL, openLDAP, PEAR, PECL and other components and the following frameworks: Zend Framework, Symfony, CodeIgniter, CakePHP, Smarty and Laravel.
Getting the image
Login to the portal and head to Virtual Machines, click on Images then Browse VM Depot
Find the LAMP stack image
Select the datacenter where you will be creating this VM in, then hit the check mark to begin
Go grab a coffee and come back, it will take about 20 minutes to download to your storage account. It is a 30GB image ![]()
Once the image is downloaded, you will have to Register it in order to appear on the list of images you can create a Virtual Machine from.
Creating the Virtual Machine
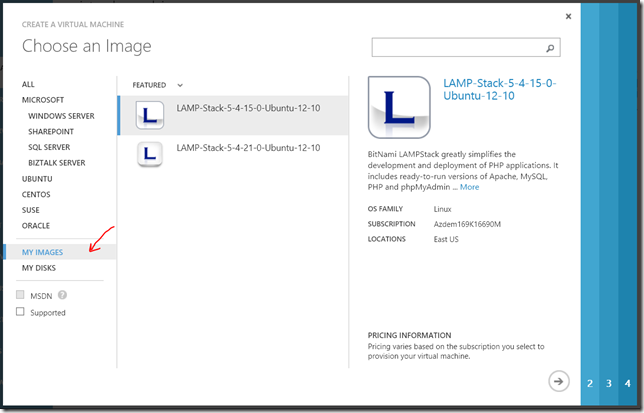
Now that the image is registered, you can now create Virtual Machines out of it. Click on New and choose to create from gallery, click on My Images, then choose your image to proceed
Go through the wizard, and open up the HTTP port 80 endpoint while you’re at it, in order to be able to access whatever we are going to host in there
And you’re done. It should take around 10 minutes to be provisioned. After that, if you open up the DNS name you specified (for example https://lampstacksabbour.cloudapp.net), you should be presented with the welcome screen of the BitNami LAMP stack
Accessing the machine
SSH access
Use your favorite SSH client on Windows/Linux/Mac to connect you your machine. I’m using PuTTy to SSH into the VM at lampstackserver.cloudapp.net. Use the same username and password you specified when provisioning the VM in the previous step.
SFTP access
To upload your stuff, you should connect via Secure FTP (SFTP). I’m using FileZilla to do that.
Open the Site Manager, specify the hostname, choose SFTP as the protocol and put in your username and password for the machine (or not, depending on whether you want to be asked every time), hit Connect.
You will see the structure of the folders. It might be a bit confusing at the start but I’ll take you through it later. You can also check out the documentation at BitNami and they will help you tremendously.
phpMyAdmin access
The image comes preinstalled with some frameworks and tools. One of them is phpMyAdmin. Due to security reasons, the phpMyAdmin app is only accessible through the machine itself. If you try to access it, you will get the following message:
To solve this, we will need to establish an SSH tunnel between our computer and the VM. You can follow the documentation on how to easily do that for Linux and Mac. Below I’ll do it for Windows.
Open up PuTTy like before and specify the hostname
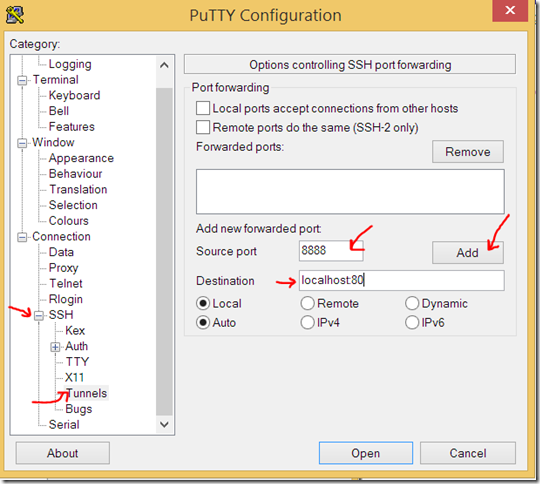
Then expand the SSH node, Tunnels then type in the remote port as 8888 and destination as localhost:80. Click Add.
Go back to the Session node and Save this session, so that you don’t have to redo this every time, then click Open.
Login as usual to the SSH, then you will be able to access phpMyAdmin through https://127.0.0.1:8888/phpmyadmin
The default username of the server is root and the password is bitnami.
Deploying your app
I won’t go into much details about how the BitNami LAMP stack is structured, the docs are excellent, but basically:
- Your main installation directory is /opt/bitnami
- The script that starts and stops everything is located in /opt/bitnami/ctlscript.sh
- Apache is installed in /opt/bitnami/apache2
- To restart a service, Apache for example, run sudo /opt/bitnami/ctlscript.sh restart apache
- Apache configuration files are located here /opt/bitnami/apache2/conf
- PHP is installed in /opt/bitnami/php
- php.ini is located here /opt/bitnami/php/etc/php.ini
There are a couple of PHP frameworks that come preinstalled on this VM:
The links above will take you to how to setup an app based on those frameworks.
If you are not using any framework and want to deploy a “raw” PHP app, you should put it under the /opt/bitnami/apps folder. Follow the documentation for clear directions.
Closing
You might have thought that Windows Azure can’t run the “open source stack”. I hope that with this blog post, I’ve demonstrated that this is indeed not true. We’ve created a fully functional LAMP server out of a preconfigured image from VM Depot. If you prefer to do things from scratch, you can definitely create an empty Ubuntu/OpenSUSE/CentOS/… machine and SSH into it and install whatever you want.
Note: This post is cross posted to my new blog at https://sabbour.me/
Comments
- Anonymous
August 06, 2014
how do you attach a datadisk to this?


