Introducing the Portable Extensible Metadata
Introduction
The Portable Extensible Metadata is a subset of the schema metadata enabled scenarios (the most common ones) built on the Entity Framework Designer extensibility model that enable rich development experience in tools and auto-generation of code. Much in the same way that MIME is a mechanism for extending and annotating media with metadata, schema metadata is about extending and annotating storage elements from different systems with metadata. Amongst other features this will better enable the ability to auto-generate parts of an application.
Looking into the future, we would like to bake these concepts in as core elements into a domain so your feedback is really important. Please give it a try and let us know what you think. The steps below assume basic familiarity with the EDM and uses the AdventureWorks sample database, or any other database you choose, will work as well.
Walkthrough
Install
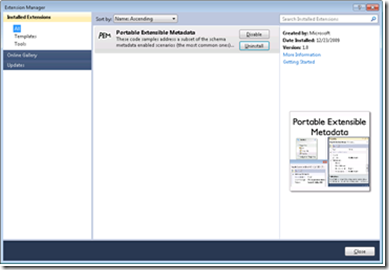
Launch the “Extension Manager” from the Visual Studio “Tools” menu. The download is available from the online gallery, and you can find it quickly by entering “Metadata” into the search field. The samples are available for download from the Visual Studio Gallery here:
https://visualstudiogallery.msdn.microsoft.com/en-us/e6467914-d48d-4075-8885-ce5a0dcb744d
A successful PEM install will display in the “Extension Manager”:
Add metadata to adjust the entity Display
There are scenarios in which the developer needs to adjust the entity display (like order and visibility) without affecting the data in the database.
1. Create a C# solution containing a Windows Form Application project.
2. Add a new, blank ADO.NET Entity Data Model to the web application.
3. If you do not have it already set up, add the AdventureWorks.MDF database to the web application’s App_Data folder.
4. Double-click the model file to open it with the designer.
5. Right click on the designer surface and select “Update Model from Database”.
6. Select the connection to AdventureWorks.MDF, which will be automatically created for you when the MDF file is added to App_Data. If you are using your own database, you may need to create a new connection to it.
7. Proceed through the update wizard, accepting all the defaults, adding no new objects. This process will set up the database connection for you.
8. Select an entity in the designer and note the properties grid displays the metadata items grouped in the Schema Metadata section:
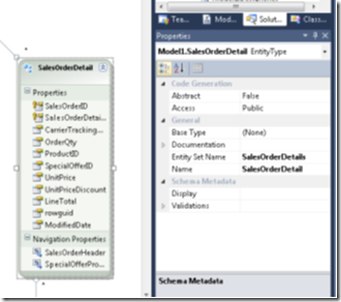
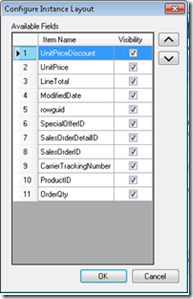
9. Click on the ellipses next to the Display property to open the Configure Instance Layout dialog:
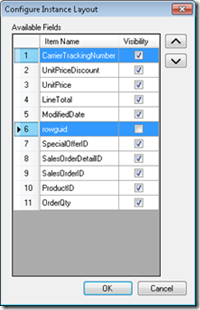
10. This dialog allows changing both the order (by pressing the up and down arrows) and the visibility (by un-checking the button next to affected property).
11. Let’s choose that the application will not display the rowguid and have the CarrierTrackingNumber being display first. Select the CarrierTrackingNumber item and click the up arrow until it is the top of the list. Un-check the visibility checkbox next to rowguid.
12. Click OK and close the designer
13. Open the edmx file using the Open With option and select XML Editor
14. Note that the metadata was persisted in the CSDL section as a new element (Display) created under the CarrierTrackingNumber property with attribute Order set to 0:
 <Property Name="CarrierTrackingNumber" Type="String" MaxLength="25" Unicode="true" FixedLength="false" >
<pem:Display Order="0" Visible="true" xmlns:pem="https://schemas.microsoft.com/PEM/2009/01" />
</Property>
The metadata was persisted in the CSDL section as a new element (Display) created under the rowguid property with Visible attribute set to true:
 <Property Name="rowguid" Type="Guid" Nullable="false" >
       <pem:Display Order="5" Visible="false" xmlns:pem="https://schemas.microsoft.com/PEM/2009/01" />
</Property>
Validating data at the property level
A value constraint restricts the population of a value to a finite set of values specified either in full (enumeration), by start and end values (range), or some combination of both (mixture). The values themselves are primitive data values, typically character strings or numbers. Let’s constraint the UnitPrice to be between $0 and $1000 (products more expensive than $1000 are not allowed) and have it required when entering new data.
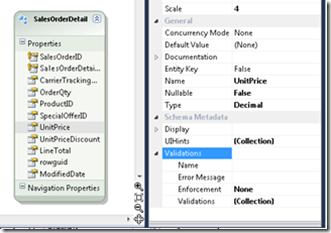
1. In the same SalesOrderDetail entity select the UnitPrice property and in the properties grid, click on the arrow next to the Validations to expand it:
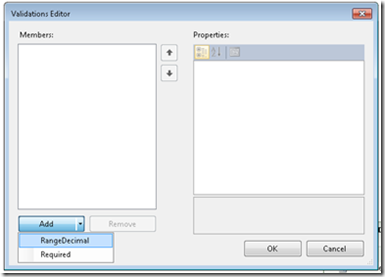
2. Click on the ellipses next to the Validations collection property to open the Validations Editor
3. Click on the arrow on the Add button to display the available vaildators for the property data type (in this case decimal) and select Range:
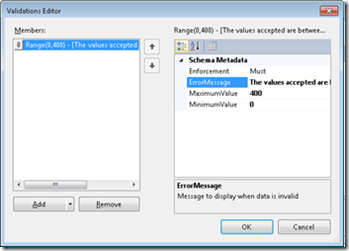
4. Note that once the Range Validator was added to the Members list, the enforcement was automatically set to must. Must means that the definition is an absolute requirement and data violating the constraint will not be entered in the system.
5. Set the MinimumValue and the MaximumValue properties to the minimum and maximum (in this case 0 and 400). In case of violation, the user needs to be notified, so let’s set the ErrorMessage property to the text to be displayed to the user: “The values accepted are between 0 and 400. No change was performed to the database”.
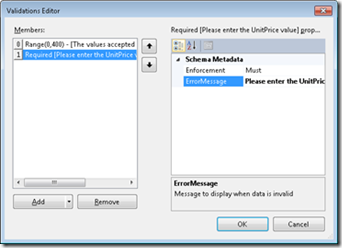
6. Click on the arrow on the Add button to display the available validators and select Required:
7. Note that the enforcement was correctly set to must, so the Validator will be enforced, the only thing left is setting the ErrorMessage to the text to be displayed: “Please enter the UnitPrice value”.
8. Click OK to close the dialog
9. Close the designer and open the edmx file using the XMLEditor. Note that both validators are persisted in the CSDL section under the UnitPrice element:
 <pem:Validations xmlns:pem="https://schemas.microsoft.com/PEM/2009/01">
   <pem:Range MinimumValue="0" MaximumValue="400" ErrorMessage="The values accepted are between 0 and 400"     Enforcement="Must" />
   <pem:Required ErrorMessage="Please enter the UnitPrice value" Enforcement="Must" />
</pem:Validations>
10. Open the designer (double click on the edmx file in the solution explorer)
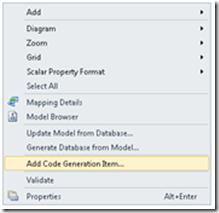
11. Right-click anywhere in the designer and select Add Code Generation Item…
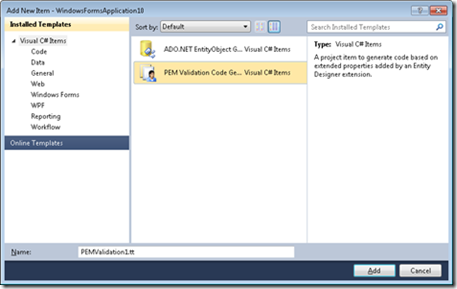
12. Select in the PEM Validation Code Generator option and click Add
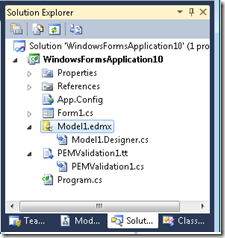
13. Note that in the solution explorer a new template file was created (PEMValidation1.tt) with an associated code file (PEMValidation1.cs).
14. Open the code file (PEMValidation1.cs) and note that code was generated for enforcing both validators set in the designer:
 public bool Validate(out List<string> warnings, out List<string> errors)
        {
         bool isOK = true;
         warnings = new List<string>();
         errors = new List<string>();

//Required
        if((this.ProductID == null))
 {
  errors.Add("ProductID\tError: Field is required");
  isOK = false;
 }

// Range
        if((this.UnitPrice < 0) || (this.UnitPrice > 400))
 {
   errors.Add("UnitPrice\tError: The values accepted are between 0 and 400");
   isOK = false;
 }
Validating data at the entity level
Let’s consider a more advanced validation scenario with the following business rule: if UnitPriceDiscount value is specified then the SpecialOfferID needs to be specified and the other way around (if SpecialOfferID value is specified then the UnitPriceDiscount needs to be specified).
1. Select the SalesOrderDetail entity in the designer:
2. Click on the arrow to the Validations property to expand its items and click on the ellipses next to the Validations collection property to open the Validations Editor
3. Click on the arrow on the Add button to display the available validators for the entity and select Equality:
4. Note that once the Equality Validator was added to the Members list, the enforcement was automatically set to must. Must means that the definition is an absolute requirement and data violating the constraint will not be entered in the system
5. In case of violation, the user needs to be notified, so let’s set the ErrorMessage property to the text to be displayed to the user: “If UnitPriceDiscount value is specified, then the SpecialOfferID needs to be specified and the other way around. No change was performed to the database”.
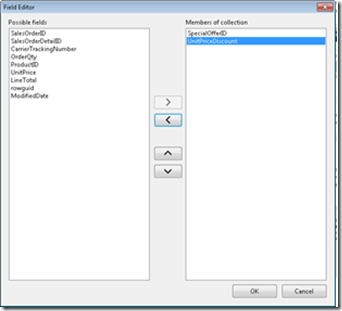
6. Click on the ellipses next to the Fields property to open the Fields Editor.
7.Note that the available fields’ collection was automatically populated to all the fields in the entity. Select from the available fields on the left and add to the list on the right, the two fields participating in the business rule: UnitPriceDiscount and SpecialOfferID:
8. Click OK to close all dialogs
9. Close the designer and open the edmx file using the XMLEditor. Note that the equality validator is persisted in the CSDL section at the entity level:
 <pem:Validations xmlns:pem="https://schemas.microsoft.com/PEM/2009/01">
   <pem:Equality ErrorMessage="If UnitPriceDiscount value …." Enforcement="Must">
            <pem:Field>SpecialOfferID</pem:Field>
            <pem:Field>UnitPriceDiscount</pem:Field>
   </pem:Equality>
 </pem:Validations>
10. Open the designer (double click on the edmx file in the solution explorer)
11. Right-click anywhere in the designer and select Add Code Generation Item…
12. Select in the PEM Validation Code Generator option and click Add
13. Note that in the solution explorer a new template file was created (PEMValidation1.tt) with an associated code file (PEMValidation1.cs).Open the code file (PEMValidation1.cs) and note that code was generated for enforcing the Equality Validator:
 public bool SetValidate(out List<string> warnings, out List<string> errors)
    {
         bool isOK = true;
         warnings = new List<string>();
         errors = new List<string>();

// Equality
if (!((SpecialOfferID == null && UnitPriceDiscount == null) ||
(SpecialOfferID != null && UnitPriceDiscount != null)))
{
       errors.Add("\tError: If UnitPriceDiscount value is specified….");
       isOK = false;
}

          return isOK;
  }
Conclusion
This walkthrough does not touch on some of the additional capabilities and concepts, such as: Subset (the set of instances of the source population must always be a subset of the population of the target population: "If a patient has second given name then the patient has first given name" but not the other way around); all Ring types (the ability to specify that no instance is related to itself: "no patient is treated by itself"); all Mutual (the constraints in which a number of correspondent types are true or false simultaneously: "A patient has aplastic anemia if AtLeast (or "All”, “Exactly” and “AtMost") two of the three mandatory blood tests get a low count") and all mutual derivatives: Exclusive (Mutual with AtMost), InclusiveOR (Mutual with AtLeast), ExclusiveOR (Mutual with Exactly). We will touch on those in the next blogs and releases.
Again, this release is mostly about getting your feedback before baking these concepts in as core elements into a domain, so please let us know what you think.
Irinel Crivat
Program Manager, Microsoft
Comments
Anonymous
January 13, 2010
it seems very good. but i have a little confuse, Self-Tracking Entity is using a .tt; now we have PEMValidation.tt... In the future, will them get combine to one template , just let the developer select the option arguments ?Anonymous
January 13, 2010
this is not quite the right place asking for it, but i would like having the discriminator column used in TablePerHierarchy mapping being mapped, visible, and accessable in the base class, and not completely hidden by the framework.Anonymous
January 13, 2010
Will the validation code be compatible with DataAnnotations in RIA scenarios?Anonymous
January 13, 2010
Great feature ! I've recently extended the edm schema and added each csdl entity type property an additional attribute, but this feature will allow me to extend not only the schema, but also customize the edm designer (assuming I'll understand how you did it). I'd be happy to see a post in the future that will explain more extensively on:
- How you built the designer additions
- How we can use the schema elements in the T4 template to generate code
- How we can use the MetadataWorkspace to look for these elements
Anonymous
January 13, 2010
I've looked at "http://code.msdn.microsoft.com/pem" but found no sources to download in order to learn how you've extended the designer. Will you publish this in the near future? this is the missing part to allow us to build our own extensions ourselfAnonymous
January 14, 2010
Ido, there is already a published project for showing how to build designer extensions here: http://code.msdn.microsoft.com/DesignerExtStartKit/Wiki/View.aspx?title=Home&version=3Anonymous
January 14, 2010
as Oleg asked, would this be compatible with DataAnnotations? I'll rather like to see DataAnnotations Attributes in the generated code, instead of that validation code shown. That would provide much more extensibility, and would work as expected on Asp.Net Mvc, Dynamic Data, Silverlight, etc. Actually, It would be great if on that validation dialog we could get designer suport to any custom ValidationAttributeAnonymous
January 14, 2010
Will you publish an XSD for PEM? I would like to see a compatible structure that can extend Linq to Sql as well, given the XSD we can accomplish this and then migrating from Linq To Sql to the EF would be more compatible since the validation frameworks would be the same.Anonymous
January 15, 2010
It would be nice if it integrated with DataAnnotations and standardize the way of validating our entities. ScottGu just went up an excellent post about Model Validation in ASP.NET MVC2 with DataAnnotations precisely: http://weblogs.asp.net/scottgu/archive/2010/01/15/asp-net-mvc-2-model-validation.aspxAnonymous
January 15, 2010
Same feedback, would be nice to generate a validation using the DataAnotations from DynamicData.Anonymous
January 19, 2010
The section of: Add metadata to adjust the entity Display, The first step says Create new windows app project, all other steps talk about web project.. Its just confused meAnonymous
January 23, 2010
I only see value for CRUD applications. It looks to me to be a very generic solution for a very generic approach. The validations lack business context. Whilst I am happy to use Entity Framework 4.0, I would not use a tool that seeks to collapse validation and business rules into one concept. Entities have business rules, data used to attribute to an entity often requires validation - this approach seems to mix these ideas. Are you targeting only scenarios that bind entities to Windows / WPF Forms in a CRUD fashion and also manages entity state over long running sessions? If so, I suppose it might be useful in very simple data entry forms, but I certainly would not entertain the idea of using such a model in a Service Layer given the lack of business context for business rules (validation is something else).Anonymous
January 29, 2010
Actually I was searching for the information related to the portable devices and got this site. http://forums.techarena.in/portable-devices/ This site has all the solution related to the portable devices. I will suggest you to visit this site for all the queries related to this site.Anonymous
February 10, 2010
The example you link to shows up as "not yet published" and I cannot find the extension in extension manager (VS2010 B2). Should these things be published ?Anonymous
February 11, 2010
I cannot find the extension in extension manager too (VS2010 B2).Anonymous
March 07, 2010
When are the extensions going to be published?Anonymous
March 08, 2010
When will the extension be available for RC build?Anonymous
March 15, 2010
The comment has been removedAnonymous
March 23, 2010
Didier, I have the same problem! I wish this should be fixed and included in the next release!!!Anonymous
March 28, 2010
I have 3 comments to make: - 1 - The error information needs to be stored in a serializable format that facilitates IDataErrorInfo support in the entity, if not supporting it directly. 2 - Localization demands need to be taken into account for n-tier apps. Maybe an error number instead of an error message? 3 - You are never going to successfully support all required forms of validation, so I would hope for a 'custom' validation routine to be supported.Anonymous
March 30, 2010
I'd like to see this on RC....Anonymous
April 23, 2010
First wanted to thank Irinel for working on this and getting it out -- I'm implementing it as my server side validation for an EF4 project. I'll have more questions -- but a couple for now are:
- For a string field, where I setup a DataFieldLength with a length restriction of 2 to 1000 - it generates the following -- which is obviously not correct. // DataFieldLength if((this.Name != null && this.Name.Length > 1000)) { errors.Add("NametError: Name must be between 2 and 1000."); isOK = false; }
- Also for required -- it's checking NULL but would be preferable to check "string.IsNullOrWhiteSpace()" -- or at least make that an option. //Required if((this.Name == null)) { errors.Add("NametError: Name is Required."); isOK = false; }
- Also, aside from parsing it out (which is what I'm doing) - not seeing how to get rid of "NametError:" section of the error message -- I just want to see the custom message. Looking forward to this being expanded upon. ...Lance Larsen (www.lancelarsen.com)
Anonymous
May 03, 2010
Great article but would be better with DataAnnotations. Where can I get more info about PEM.Validations.ValidationsCodeGen.Parse? I'd like to take a shot at creating the attributes myself.Anonymous
May 27, 2010
If someone intends to use PEM for Data Annotation generation, there is a project that I did for this in this site.Anonymous
June 30, 2010
i have followed the process of "Validating data at the property level" but how can this validation works while inserting data.i need some code how to do that. please reply to shailooshini@gmail.comAnonymous
July 15, 2010
Be really cool if you could get this tooling to produce POCOs. I appreciate that this may reduce functionality of the generated entities but I'm struggling to find some tooling to allow me to define these in the EDM design surface. This tooling does this and so much more but it's the "so much more" I'd like the option of turning off. I know I could modify the T4 but I'm hoping this is a common request so you guys do it. :)Anonymous
November 16, 2010
me not found PEM Validation Code GeneratorAnonymous
February 10, 2011
dpblogs - Please help. How can PEM be used with Silverlight 4? How can PEM be used with Visual Web Developer 2010 Express? Please advise. Thank you.
- Mark Kamoski
Anonymous
March 04, 2011
Hi, Interesting idea which can be quite useful. Are you thinking about discussing it with the Patterns & Practices group and see how you could collaborate on this as they are providing a validation application block in the Enterprise Library offering which could be integrated in the story. Simplification should be the key, preventing too much possible choices and difficult integration. Keep the good work and great ideas coming! Kind regards, OlivierAnonymous
March 15, 2011
Two major issues to be fixed for a successful product:
- Option to generate validation either as code (as it does now) or as annotation metadata
- Localization of validation messages: should use keys instead of messages. These keys later can be used to display localized messages.
Anonymous
July 30, 2011
Thanks a lot. I was desperate to have validations like this. Saved a lots of timeAnonymous
January 11, 2012
Hi, is it only used for windows apps ?! cz i have a SilverLight App using EF, i followed the instructions, but when trying to "Add Code Generation Item", i didn't find "PEM Validation Code" option to add it ...Anonymous
May 06, 2012
Can I use it with the POCO entities? If yes then How to do that?Anonymous
June 09, 2012
Is there any way to extend the PEM itself? Can I have the source code of the PEM VSIX?Anonymous
September 19, 2012
I cannot use Vietname for error messagesAnonymous
October 18, 2012
Either get this thing generating Visual Basic (VB) or drop the idea. One can hardly evaluate it if its spitting out squiqqly characters all over my screen.Anonymous
December 12, 2013
Thanks a lot. There is in any place the source code to examine and extend for my needs? Thanks a lot, ArielAnonymous
February 25, 2014
Can I make this work for EF 6 + .NET 4.5 ? Is there an updated vsix?Anonymous
February 03, 2015
Hello. There is source code or a version for VS 2013? Thanks, ariel.laniado at gmail.comAnonymous
June 21, 2015
I have use it in my "old" VS2010 Projects. But now I need it for my "newer" VS2013 Project. Where can I find a way to use it again? I use it for displaying the labels of my application. Please Mail to: michael.kolowicz at km-f.eu Thank you very very much
