How to use Boost.Test for C++ in Visual Studio
Applies to: ![]() Visual Studio
Visual Studio ![]() Visual Studio for Mac
Visual Studio for Mac
Note
This article applies to Visual Studio 2017. If you're looking for the latest Visual Studio documentation, see Visual Studio documentation. We recommend upgrading to the latest version of Visual Studio. Download it here
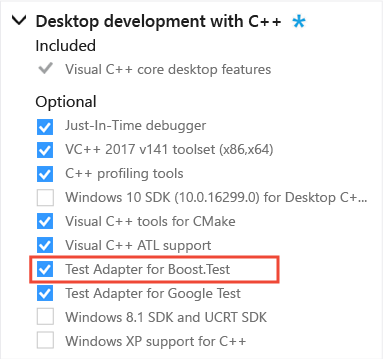
In Visual Studio 2017 and later, the Boost.Test test adapter is integrated into the Visual Studio IDE. It's a component of the Desktop development with C++ workload.

If you don't have the Desktop development with C++ workload installed, open Visual Studio Installer. Select the Desktop development with C++ workload, then choose the Modify button.
Install Boost
Boost.Test requires Boost! If you don't have Boost installed, we recommend that you use the Vcpkg package manager.
Follow the instructions at Vcpkg: a C++ package manager for Windows to install vcpkg (if you don't already have it).
Install the Boost.Test dynamic or static library:
Run
vcpkg install boost-testto install the Boost.Test dynamic library.-OR-
Run
vcpkg install boost-test:x86-windows-staticto install the Boost.Test static library.
Run
vcpkg integrate installto configure Visual Studio with the library and include paths to the Boost headers and binaries.
You have a choice in how to configure your tests within your solution in Visual Studio: You can include your test code in the project under test, or you can create a separate test project for your tests. Both choices have advantages and disadvantages.
Add tests inside your project
In Visual Studio 2017 version 15.6 and later, you can add an item template for tests into your project. Both the tests and your code live in the same project. You'll have to create a separate build configuration to generate a test build. And, you'll need to keep the tests out of your debug and release builds.
In Visual Studio 2017 version 15.5, no pre-configured test project or item templates are available for Boost.Test. Use the instructions to create and configure a separate test project.
Create a Boost.Test item
To create a .cpp file for your tests, right-click on the project node in Solution Explorer and choose Add > New Item.
In the Add New Item dialog, expand Installed > Visual C++ > Test. Select Boost.Test, then choose Add to add Test.cpp to your project.

The new Test.cpp file contains a sample test method. This file is where you can include your own header files and write tests for your app.
The test file also uses macros to define a new main routine for test configurations. If you build your project now, you'll see a LNK2005 error, such as "_main already defined in main.obj."
Create and update build configurations
To create a test configuration, on the menu bar, select Build > Configuration Manager. In the Configuration Manager dialog, open the dropdown under Active solution configuration and choose New. In the New Solution Configuration dialog, enter a name such as "Debug UnitTests". Under Copy settings from select Debug, and then choose OK.
Exclude the test code from your Debug and Release configurations: In Solution Explorer, right-click on Test.cpp and select Properties. In the Property Pages dialog, select All Configurations in the Configuration dropdown. Select Configuration Properties > General and open the dropdown for the Excluded From Build property. Select Yes, then choose Apply to save your changes.
To include the test code in your Debug UnitTests configuration, in the Property Pages dialog, select Debug UnitTests in the Configuration dropdown. Select No in the Excluded From Build property, then choose OK to save your changes.
Exclude the main code from your Debug UnitTests configuration. In Solution Explorer, right-click on the file that contains your
mainfunction and select Properties. In the Property Pages dialog, select Debug UnitTests in the Configuration dropdown. Select Configuration Properties > General and open the dropdown for the Excluded From Build property. Select Yes, then choose OK to save your changes.Set the Solution Configuration to Debug UnitTests, then build your project to enable Test Explorer to discover the method.
As long as the configuration name you create starts with the words "Debug" or "Release", the corresponding Boost.Test libraries get picked up automatically.
The item template uses the single-header variant of Boost.Test, but you can modify the #include path to use the standalone library variant. For more information, see Add include directives.
Create a separate test project
In many cases, it's easier to use a separate project for your tests. You won't have to create a special test configuration for your project. Or, exclude test files from Debug and Release builds.
To create a separate test project
In Solution Explorer, right click on the solution node and choose Add > New Project.
In the Add a new project dialog, choose C++, Windows, and Console in the filter dropdowns. Select the Console App template, then choose Next.
Give the project a name and choose Create.
Delete the
mainfunction in the .cpp file.If you're using the single-header or dynamic library version of Boost.Test, go to Add include directives. If you're using the static library version, then you have to do some additional configuration:
a. To edit the project file, first unload it. In Solution Explorer, right-click the project node and choose Unload Project. Then, right-click the project node and choose Edit <name>.vcxproj.
b. Add two lines to the Globals property group as shown here:
<PropertyGroup Label="Globals">
....
    <VcpkgTriplet>x86-windows-static</VcpkgTriplet>
    <VcpkgEnabled>true</VcpkgEnabled>
</PropertyGroup>
c. Save and close the *.vcxproj file, and then reload the project.
d. To open the Property Pages, right-click on the project node and choose Properties.
e. Expand C/C++ > Code Generation, and then select Runtime Library. Select /MTd for debug static runtime library or /MT for release static runtime library.
f. Expand Linker > System. Verify SubSystem is set to Console.
g. Choose OK to close the property pages.
Add include directives
In your test .cpp file, add any needed
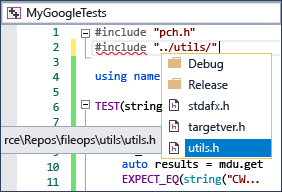
#includedirectives to make your program's types and functions visible to the test code. If you're using a separate test project, typically, the program is on a sibling level in the folder hierarchy. If you type#include "../", an IntelliSense window appears and enables you to select the full path to the header file.
You can use the standalone library with:
#include <boost/test/unit_test.hpp>Or, use the single-header version with:
#include <boost/test/included/unit_test.hpp>Then, define
BOOST_TEST_MODULE.
The following example is sufficient for the test to be discoverable in Test Explorer:
#define BOOST_TEST_MODULE MyTest
#include <boost/test/included/unit_test.hpp> //single-header
#include "../MyProgram/MyClass.h" // project being tested
#include <string>

BOOST_AUTO_TEST_CASE(my_boost_test)
{
    std::string expected_value = "Bill";

    // assume MyClass is defined in MyClass.h
    // and get_value() has public accessibility
    MyClass mc;
    BOOST_CHECK(expected_value == mc.get_value());
}
Write and run tests
You're now ready to write and run Boost tests. See the Boost test library documentation for information about the test macros. See Run unit tests with Test Explorer for information about discovering, running, and grouping your tests by using Test Explorer.