Extending the Properties, Task List, Output, and Options Windows
Note
This article applies to Visual Studio 2015. If you're looking for the latest Visual Studio documentation, see Visual Studio documentation. We recommend upgrading to the latest version of Visual Studio. Download it here
You can access any tool window in Visual Studio. This walkthrough shows how to integrate information about your tool window into a new Options page and a new setting on the Properties page, and also how to write to the Task List and Output windows.
Prerequisites
Starting in Visual Studio 2015, you do not install the Visual Studio SDK from the download center. It is included as an optional feature in Visual Studio setup. You can also install the VS SDK later on. For more information, see Installing the Visual Studio SDK.
Create an Extension with a Tool Window
Create a project named TodoList using the VSIX template, and add a custom tool window item template named TodoWindow.
Note
For more information about creating an extension with a tool window, see Creating an Extension with a Tool Window.
Set Up the Tool Window
Add a TextBox in which to type a new ToDo item, a Button to add the new item to the list, and a ListBox to display the items on the list.
In TodoWindow.xaml, delete the Button, TextBox, and StackPanel controls from the UserControl.
Note
This does not delete the button1_Click event handler, which you will reuse in a later step.
From the All WPF Controls section of the Toolbox, drag a Canvas control to the grid.
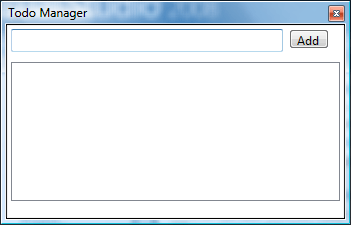
Drag a TextBox, a Button, and a ListBox to the Canvas. Arrange the elements so that the TextBox and the Button are on the same level, and the ListBox fills the rest of the window below them, as in the picture below.

In the XAML pane, find the Button and set its Content property to Add. Reconnect the button event handler to the Button control by adding a
Click="button1_Click"attribute. The Canvas block should look like this:<Canvas HorizontalAlignment="Left" Width="306"> <TextBox x:Name="textBox" HorizontalAlignment="Left" Height="23" Margin="10,10,0,0" TextWrapping="Wrap" Text="TextBox" VerticalAlignment="Top" Width="208"/> <Button x:Name="button" Content="Add" HorizontalAlignment="Left" Margin="236,13,0,0" VerticalAlignment="Top" Width="48" Click="button1_Click"/> <ListBox x:Name="listBox" HorizontalAlignment="Left" Height="222" Margin="10,56,0,0" VerticalAlignment="Top" Width="274"/> </Canvas>
Customize the constructor
In the TodoWindowControl.xaml.cs file, add the following using statement:
using System;Add a public reference to the TodoWindow and have the TodoWindowControl constructor take a TodoWindow parameter. The code should look like this:
public TodoWindow parent;

public TodoWindowControl(TodoWindow window)
{
    InitializeComponent();
    parent = window;
}
In TodoWindow.cs, change TodoWindowControl constructor to include the TodoWindow parameter. The code should look like this:
public TodoWindow() : base(null)
{
    this.Caption = "TodoWindow";
    this.BitmapResourceID = 301;
    this.BitmapIndex = 1;

     this.Content = new TodoWindowControl(this);
}
Create an Options Page
You can provide a page in the Options dialog box so that users can change settings for the tool window. Creating an Options page requires both a class that describes the options and an entry in the TodoListPackage.cs or TodoListPackage.vb file.
Add a class named
ToolsOptions.cs. Make the ToolsOptions class inherit from DialogPage.class ToolsOptions : DialogPage { }Add the following using statement:
using Microsoft.VisualStudio.Shell;The Options page in this walkthrough provides only one option named DaysAhead. Add a private field named daysAhead and a property named DaysAhead to the ToolsOptions class:
private double daysAhead;

public double DaysAhead
{
    get { return daysAhead; }
    set { daysAhead = value; }
}
Now you must make the project aware of this Options page.
Make the Options page available to users
In TodoWindowPackage.cs, add a ProvideOptionPageAttribute to the TodoWindowPackage class:
[ProvideOptionPage(typeof(ToolsOptions), "ToDo", "General", 101, 106, true)]The first parameter to the ProvideOptionPage constructor is the type of the class ToolsOptions, which you created earlier. The second parameter, "ToDo", is the name of the category in the Options dialog box. The third parameter, "General", is the name of the subcategory of the Options dialog box where the Options page will be available. The next two parameters are resource IDs for strings; the first is the name of the category, and the second is the name of the subcategory. The final parameter determines whether this page can be accessed by using automation.
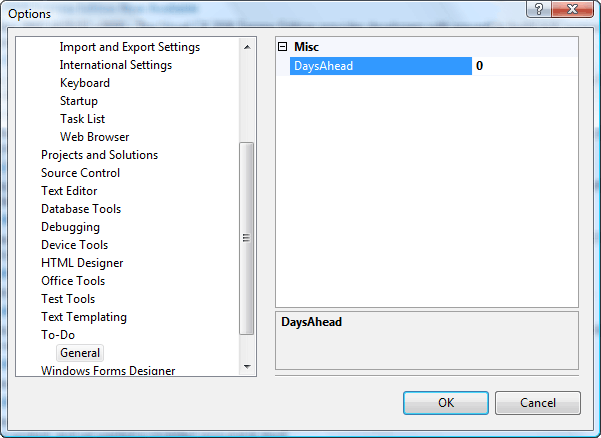
When a user opens your Options page, it should resemble the following picture.

Notice the category ToDo and the subcategory General.
Make Data Available to the Properties Window
You can make To Do list information available by creating a class named TodoItem that stores information about the individual items in the ToDo list.
Add a class named
TodoItem.cs.When the tool window is available to users, the items in the ListBox will be represented by TodoItems. When the user selects one of these items in the ListBox, the Properties window will display information about the item.
To make data available in the Properties window, you turn the data into public properties that have two special attributes,
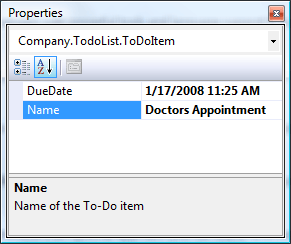
DescriptionandCategory.Descriptionis the text that appears at the bottom of the Properties window.Categorydetermines where the property should appear when the Properties window is displayed in the Categorized view. In the following picture, the Properties window is in Categorized view, the Name property in the ToDo Fields category is selected, and the description of the Name property is displayed at the bottom of the window.
Add the following using statements the TodoItem.cs file.
using System.ComponentModel;
using System.Windows.Forms;
using Microsoft.VisualStudio.Shell.Interop;
Add the
publicaccess modifier to the class declaration.public class TodoItem { }Add the two properties, Name and DueDate. We’ll do the UpdateList() and CheckForErrors() later.
public class TodoItem
{
    private TodoWindowControl parent;
    private string name;
    [Description("Name of the ToDo item")]
    [Category("ToDo Fields")]
    public string Name
    {
        get { return name; }
        set
        {
            name = value;
            parent.UpdateList(this);
        }
    }

    private DateTime dueDate;
    [Description("Due date of the ToDo item")]
    [Category("ToDo Fields")]
    public DateTime DueDate
    {
        get { return dueDate; }
        set
        {
            dueDate = value;
            parent.UpdateList(this);
            parent.CheckForErrors();
        }
    }
}
Add a private reference to the user control. Add a constructor that takes the user control and the name for this ToDo item. To find the value for daysAhead, it gets the Options page property.
private TodoWindowControl parent;

public TodoItem(TodoWindowControl control, string itemName)
{
    parent = control;
    name = itemName;
    dueDate = DateTime.Now;

    double daysAhead = 0;
    IVsPackage package = parent.parent.Package as IVsPackage;
    if (package != null)
    {
        object obj;
        package.GetAutomationObject("ToDo.General", out obj);

        ToolsOptions options = obj as ToolsOptions;
        if (options != null)
        {
            daysAhead = options.DaysAhead;
        }
    }

    dueDate = dueDate.AddDays(daysAhead);
}
Because instances of the
TodoItemclass will be stored in the ListBox and the ListBox will call theToStringfunction, you must overload theToStringfunction. Add the following code to TodoItem.cs, after the constructor and before the end of the class.public override string ToString() { return name + " Due: " + dueDate.ToShortDateString(); }In TodoWindowControl.xaml.cs, add stub methods to the TodoWindowControl class for the
CheckForErrorandUpdateListmethods. Put them after the ProcessDialogChar and before the end of the file.public void CheckForErrors() { } public void UpdateList(TodoItem item) { }The
CheckForErrormethod will call a method that has the same name in the parent object, and that method will check whether any errors have occurred and handle them correctly. TheUpdateListmethod will update the ListBox in the parent control; the method is called when theNameandDueDateproperties in this class change. They will be implemented later.
Integrate into the Properties Window
Now write the code that manages the ListBox, which will be tied to the Properties window.
You must change the button click handler to read the TextBox, create a TodoItem, and adds it to the ListBox.
Replace the existing
button1_Clickfunction with code that creates a new TodoItem and adds it to the ListBox. It calls TrackSelection(), which will be defined later.private void button1_Click(object sender, RoutedEventArgs e) { if (textBox.Text.Length > 0) { var item = new TodoItem(this, textBox.Text); listBox.Items.Add(item); TrackSelection(); CheckForErrors(); } }In the Design view select the ListBox control. In the Properties window click the Event handlers button and find the SelectionChanged event. Fill in the text box with listBox_SelectionChanged. Doing this adds a stub for a SelectionChanged handler and assigns it to the event.
Implement the TrackSelection() method. Since you will need to get the SVsUIShellSTrackSelection services, you need make the GetService accessible by the TodoWindowControl. Add the following method to the TodoWindow class:
internal object GetVsService(Type service)
{
    return GetService(service);
}
Add the following using statements to TodoWindowControl.xaml.cs:
using System.Runtime.InteropServices;
using Microsoft.VisualStudio.Shell.Interop;
using Microsoft.VisualStudio;
using Microsoft.VisualStudio.Shell;
Fill in the SelectionChanged handler as follows:
private void listBox_SelectionChanged(object sender, SelectionChangedEventArgs e)
{
    TrackSelection();
}
Now, fill in the TrackSelection function, which will provide integration with the Properties window. This function is called when the user adds an item to the ListBox or clicks an item in the ListBox. It adds the contents of the ListBox to a SelectionContainer and passes the SelectionContainer to the Properties window’s OnSelectChange event handler. The TrackSelection service tracks selected objects in the user interface (UI) and displays their properties
private SelectionContainer mySelContainer;
private System.Collections.ArrayList mySelItems;
private IVsWindowFrame frame = null;

private void TrackSelection()
{
    if (frame == null)
    {
        var shell = parent.GetVsService(typeof(SVsUIShell)) as IVsUIShell;
        if (shell != null)
        {
            var guidPropertyBrowser = new
            Guid(ToolWindowGuids.PropertyBrowser);
            shell.FindToolWindow((uint)__VSFINDTOOLWIN.FTW_fForceCreate,
            ref guidPropertyBrowser, out frame);
        }
    }
    if (frame != null)
        {
            frame.Show();
        }
    if (mySelContainer == null)
    {
        mySelContainer = new SelectionContainer();
    }

    mySelItems = new System.Collections.ArrayList();

    var selected = listBox.SelectedItem as TodoItem;
    if (selected != null)
    {
        mySelItems.Add(selected);
    }

    mySelContainer.SelectedObjects = mySelItems;

    ITrackSelection track = parent.GetVsService(typeof(STrackSelection))
                            as ITrackSelection;
    if (track != null)
    {
        track.OnSelectChange(mySelContainer);
    }
}
Now that you have a class that the Properties window can use, you can integrate the Properties window with the tool window. When the user clicks an item in the ListBox in the tool window, the Properties window should be updated accordingly. Similarly, when the user changes a ToDo item in the Properties window, the associated item should be updated.
Now, add the rest of the UpdateList function code in TodoWindowControl.xaml.cs. It should drop and re-add the modified TodoItem from the ListBox.
public void UpdateList(TodoItem item)
{
    var index = listBox.SelectedIndex;
    listBox.Items.RemoveAt(index);
    listBox.Items.Insert(index, item);
    listBox.SelectedItem = index;
}
Test your code. Build the project and start debugging. The experimental instance should appear.
Open the Tools / Options pages. You should see the ToDo category in the left pane. Categories are listed in alphabetical, so look under the Ts.
On the Todo options page, you should see the DaysAhead property set to 0. Change it to 2.
On the View / Other Windows menu, open TodoWindow. Type EndDate in the text box and click Add.
In the list box you should see a date two days later than today.
Add Text to the Output Window and Items to the Task List
For the Task List, you create a new object of type Task, and then add that Task object to the Task List by calling its Add method. To write to the Output window, you call its GetPane method to obtain a pane object, and then you call the OutputString method of the pane object.
In TodoWindowControl.xaml.cs, in the
button1_Clickmethod, add code to get the General pane of the Output window (which is the default), and write to it. The method should look like this:private void button1_Click(object sender, EventArgs e) { if (textBox.Text.Length > 0) { var item = new TodoItem(this, textBox.Text); listBox.Items.Add(item); var outputWindow = parent.GetVsService( typeof(SVsOutputWindow)) as IVsOutputWindow; IVsOutputWindowPane pane; Guid guidGeneralPane = VSConstants.GUID_OutWindowGeneralPane; outputWindow.GetPane(ref guidGeneralPane, out pane); if (pane != null) { pane.OutputString(string.Format( "To Do item created: {0}\r\n", item.ToString())); } TrackSelection(); CheckForErrors(); } }In order to add items to the Task List, you need a to add a nested class to the TodoWindowControl class. The nested class needs to derive from TaskProvider. Add the following code to the end of the TodoWindowControl class.
[Guid("72de1eAD-a00c-4f57-bff7-57edb162d0be")]
public class TodoWindowTaskProvider : TaskProvider
{
    public TodoWindowTaskProvider(IServiceProvider sp)
        : base(sp)
    {
    }
}
Next add a private reference to TodoTaskProvider and a CreateProvider() method to the TodoWindowControl class. The code should look like this:
private TodoWindowTaskProvider taskProvider;
private void CreateProvider()
{
    if (taskProvider == null)
    {
        taskProvider = new TodoWindowTaskProvider(parent);
        taskProvider.ProviderName = "To Do";
    }
}
Add ClearError(), which clears the Task List, and ReportError(), which adds an entry to the Task List, to the TodoWindowControl class.
private void ClearError()
{
    CreateProvider();
    taskProvider.Tasks.Clear();
}
private void ReportError(string p)
{
    CreateProvider();
    var errorTask = new Task();
    errorTask.CanDelete = false;
    errorTask.Category = TaskCategory.Comments;
    errorTask.Text = p;

    taskProvider.Tasks.Add(errorTask);

    taskProvider.Show();

    var taskList = parent.GetVsService(typeof(SVsTaskList))
        as IVsTaskList2;
    if (taskList == null)
    {
        return;
    }

    var guidProvider = typeof(TodoWindowTaskProvider).GUID;
     taskList.SetActiveProvider(ref guidProvider);
}
Now implement the CheckForErrors method, as follows.
public void CheckForErrors()
{
    foreach (TodoItem item in listBox.Items)
    {
        if (item.DueDate < DateTime.Now)
        {
            ReportError("To Do Item is out of date: "
                + item.ToString());
        }
    }
}
Trying It Out
Build the project and start debugging. The experimental instance appears.
Open the TodoWindow (View / Other Windows / TodoWindow).
Type something in the text box and then click Add.
A due date 2 days after today is added to the list box. No errors are generated, and the Task List (View / Task List) should have no entries.
Now change the setting on the Tools / Options / ToDo page from 2 back to 0.
Type something else in the TodoWindow and then click Add again. This triggers an error and also an entry in the Task List.
As you add items, the initial date is set to now plus 2 days.
On the View menu, click Output to open the Output window.
Notice that every time that you add an item, a message is displayed in the Task List pane.
Click one of the items in the ListBox.
The Properties window displays the two properties for the item.
Change one of the properties and then press ENTER.
The item is updated in the ListBox.