Animate objects in XAML Designer
Note
This article applies to Visual Studio 2015. If you're looking for the latest Visual Studio documentation, see Visual Studio documentation. We recommend upgrading to the latest version of Visual Studio. Download it here
You can create short animations that move objects, or fade them in and out.
To get started, create a storyboard. A storyboard contains one or more timelines. Set keyframes on a timeline to mark property changes. Then, when you run the animation, Blend interpolates the property changes over the designated period of time. The result is a smooth transition. You can animate any property that belongs to an object, even nonvisual properties.
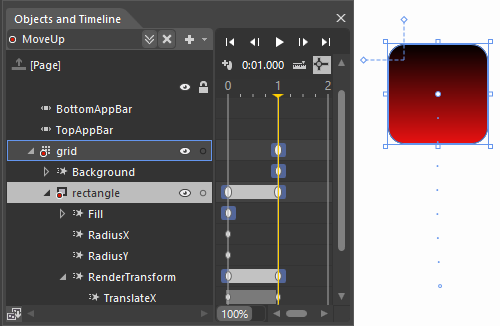
The following illustration shows a storyboard named MoveUp. The timeline contains keyframes that mark the X and Y position of a rectangle. When this animation runs, the rectangle moves from one position to another smoothly.

Learn to create animations by watching these videos.
| Watch a short video: | Learn how to: |
|---|---|
| Create a timeline, and work with objects in the timeline. | |
| Add keyframes and set properties at each keyframe. Then, run the animation and watch objects smoothly transition between them. | |
| Start an animation when an event occurs. For example, start one when the window loads. | |
| Use an animation to change the color of an object. | |
| Animate objects along a path. | |
| Speed up or slow down an animation near the beginning (easing in) or near the end (easing out) of an animation. | |
| Create interesting effects that appear on a button when the user points to it. | |
| Animate effects that appear when a user presses down a button on the image of a calculator. |