Configurar a Comunicação de Rede Segura
A SNC (Comunicação de Rede Segura) aumenta a segurança da integração do SAP com o Power Platform criptografando os dados entre um gateway de dados local e um sistema SAP. Este artigo orienta você durante a configuração da SNC como uma prova de conceito.
Importante
As configurações e recomendações apresentadas neste artigo não se destinam ao uso em produção. Consulte sua equipe de segurança, políticas internas e o Microsoft Partner para obter orientação sobre como configurar a SNC em um ambiente de produção.
Pré-requisitos
- Você tem uma conexão SAP que usa o conector ERP do SAP.
- Você tem acesso a uma instância do SAP que pode reiniciar e administrar.
- A GUI do SAP é instalada e configurada.
- Você também precisa estar familiarizado com as tecnologias de chave pública e privada.
- O OpenSSL é instalado e configurado. Se você tiver o Git para Windows, adicione
C:\Program Files\Git\usr\bin\ao seu sistema PATH para que você possa usar o comandoopenssl.
Instalar o SAP Common Crypto Library
O SAP Common Crypto Library permite que o SAP Connector for Microsoft .NET (NCo) criptografe as comunicações entre o gateway de dados local e o SAP. Para extrair a biblioteca, você precisa de um utilitário de descompactação proprietário chamado SAPCAR.
Obter o SAPCAR
- Vá até o Centro de Download de Software SAP e entre com suas credenciais SAP.
- Procure SAPCAR e selecione a versão não arquivada mais recente.
- Selecione o sistema operacional.
- Baixe o arquivo .EXE em
C:\sap\SAR.
Obter o SAP Common Crypto Library
- No Centro de Download de Software SAP, procure por "COMMONCRYPTOLIB" e selecione a versão mais recente.
- Selecione o sistema operacional.
- Faça o download do arquivo . SAR com a data de lançamento mais recente em
C:\sap\SAR.
Extraia o SAP Common Crypto Library
Abra o PowerShell e acesse
C:\sap\SAR.Digite o seguinte comando, substituindo
xxxxpor seus valores:.\SAPCAR_xxxx.EXE -xvf .\SAPCRYPTOLIBP_xxxx.SAR -R .\..\libs\sapcryptolibConfirme se
sapgenpse.exeestá no diretórioC:\sap\libs\sapcryptolib.
Gerar certificados
Agora que você instalou o SAP Common Crypto Library, pode gerar certificados para estabelecer confiança e criptografia entre o gateway de dados local e o sistema SAP.
Aviso
Este método é apenas para fins de demonstração e não é recomendado para sistemas de produção. Para sistemas de produção, consulte sua equipe interna de orientação ou segurança de PKI.
Neste exemplo, nossos certificados são estruturados conforme mostrado no diagrama a seguir. A autoridade de certificação raiz [O=Contoso, CN=CA raiz] assina o certificado de criptografia SNC [O=Contoso, CN=SNC] e os certificados de usuário [O=Contoso, CN=UserIDs].
Este artigo se concentra na configuração da Autoridade de certificação raiz e dos certificados SNC.
Criar certificados
Configure a estrutura da pasta:
mkdir rootCA
mkdir sncCert

# Create the necessary serial and index files if they don't exist
if (-Not (Test-Path "rootCA\index.txt")) { New-Item -Path "rootCA\index.txt" -ItemType File }
if (-Not (Test-Path "rootCA\serial")) { Set-Content -Path "rootCA\serial" -Value "01" }
Gere uma autoridade de certificação raiz:
openssl genpkey -algorithm RSA -out rootCA/ca.key.pem -pkeyopt rsa_keygen_bits:2048
openssl req -x509 -new -key rootCA/ca.key.pem -days 7305 -sha256 -extensions v3_ca -out rootCA/ca.cert.pem -subj "/O=Contoso/CN=Root CA"
Gere o certificado SNC:
openssl genrsa -out sncCert/snc.key.pem 2048
openssl req -key sncCert/snc.key.pem -new -sha256 -out sncCert/snc.csr.pem -subj "/O=Contoso/CN=SNC"
Crie um arquivo de configuração OpenSSL,
sncCert/extensions.cnf, para assinar:subjectKeyIdentifier = hash authorityKeyIdentifier = keyid,issuer basicConstraints = critical,CA:false keyUsage = critical,digitalSignature,keyEncipherment,dataEncipherment extendedKeyUsage = clientAuth,emailProtectionAssine o certificado SNC com a CA raiz:
openssl x509 -req `
   -in sncCert/snc.csr.pem `
   -CA rootCA/ca.cert.pem `
   -CAkey rootCA/ca.key.pem `
   -CAcreateserial `
   -out sncCert/snc.cert.pem `
   -days 3650 `
   -sha256 `
   -extfile sncCert\extensions.cnf `
   -extensions v3_leaf
Crie um ambiente seguro pessoal
Criar um PSE (Ambiente Seguro Pessoal) para o gateway de dados local. A biblioteca NCo procura o certificado SNC dentro do PSE.
Crie um contêiner PKCS#12:
openssl pkcs12 -export -out snc.p12 -inkey sncCert\snc.key.pem -in sncCert\snc.cert.pem -certfile rootCA\ca.cert.pemCrie a variável do ambiente SECUDIR:
- Abra Propriedades do Sistema: no Explorador de Arquivos, clique com o botão direito do mouse em Este PC e selecione Propriedades>Configurações avançadas do sistema.
- Selecione Variáveis de ambiente.
- Em Variáveis do sistema, selecione Novo.
- Defina o nome da variável como
SECUDIR. - Defina o valor como
C:\sapsecudir. - Selecione OK.
Importe o contêiner PKCS#12 para um PSE:
C:\sap\libs\sapcryptolib\sapgenpse.exe import_p12 -p SAPSNCSKERB.pse C:\pki-certs\snc.p12
Configurar SAP para SNC
Entre na GUI do SAP.
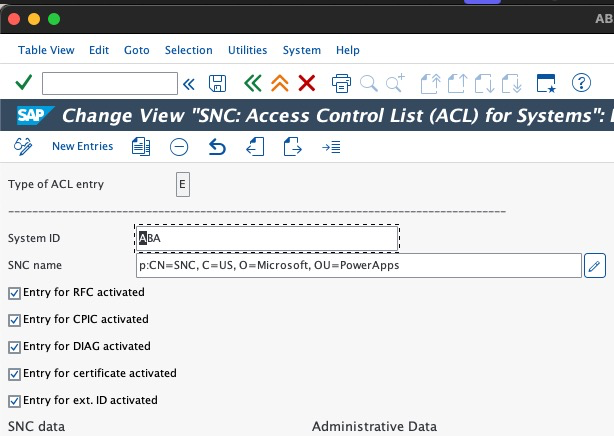
Acesse o código da transação
SNC0.Insira E como a área de trabalho.
Selecione Nova entrada na barra superior e preencha as informações necessárias.

Selecionar o ícone Salvar.
Volte para a tela inicial GUI do SAP.
Acesse o código da transação
RZ10.Defina estes parâmetros de perfil:
snc/accept_insecure_gui: 1
snc/accept_insecure_rfc: 1
snc/enable: 1
snc/extid_login_diag: 1
snc/extid_login_rfc: 1
snc/gssapi_lib: $(SAPCRYPTOLIB)
snc/identity/as: p:CN=ID3, O=Contoso
snc/permit_insecure_start: 1
snc/data_protection/max: 3```
Salve os parâmetros do perfil e reinicie o sistema SAP.
Trocar certificados entre o SAP e o gateway de dados local
Você precisa trocar certificados entre o gateway de dados local e o SAP para estabelecer confiança.
Adicionar o certificado SNC do gateway ao SAP
- Na GUI do SAP, vá para o código de transação
STRUST. - Se SNC SAPCryptolib tiver um X vermelho, clique nele com o botão direito do mouse e selecione Criar.
- Caso contrário, clique duas vezes em SNC SAPCryptolib e clique duas vezes em seu Próprio Certificado.
- Selecione Importar certificado e escolha seu
sncCert\snc.cert.pemcertificado público. - Selecione Adicionar à lista de certificados.
Adicionar o certificado SAP SNC ao gateway de dados local
Na GUI do SAP, vá para o código de transação
STRUST.Clique duas vezes em SNC SAPCryptolib e clique duas vezes em seu Próprio Certificado.
Exporte o certificado público.
Mova o certificado público para sua máquina gateway (por exemplo,
C:\sap\contoso-public-key.crt).Importe o certificado para o PSE do gateway:
C:\sap\libs\sapcryptolib\sapgenpse.exe maintain_pk -p SAPSNCSKERB.pse -v -a C:\pki-certs\sncCert\sapkerb.public.cert
Teste a conexão segura
Siga as etapas para testar a conexão segura. Depois de concluir o teste com êxito, você estará pronto para implementar o SNC em seu ambiente de produção.
Crie um fluxo instantâneo no Power Automate.
Adicione uma ação
SAP ERP Call Function.Adicione os seguintes parâmetros SNC à cadeia de caracteres daConexão SAP:
{
"AppServerHost": "xxx",
"Client": "xx",
"SystemNumber": "xx",
"LogonType": "ApplicationServer",
"SncLibraryPath": "C:\\sap\\libs\\sapcryptolib\\sapcrypto.dll",
"SncMyName": "p:CN=SNC, O=Contoso",
"SncPartnerName": "p:CN=ID3, O=Contoso",
"SncQop": "Default",
"UseSnc": "true",
"SncSso": "Off"
}```
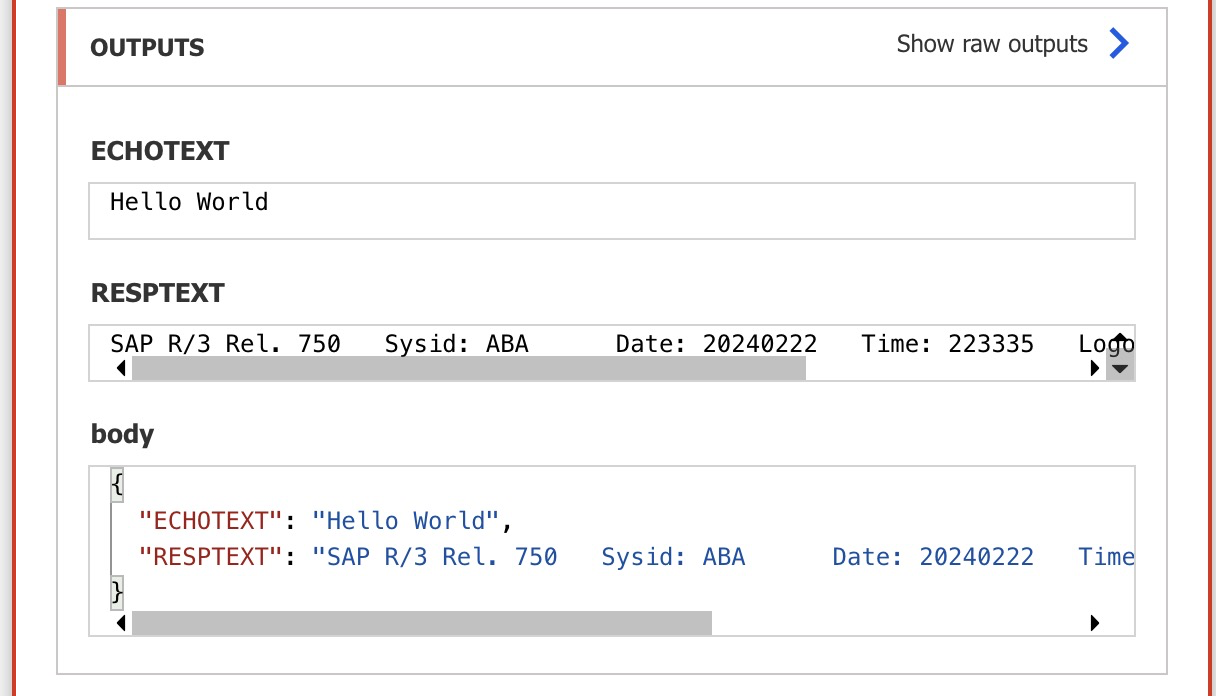
Teste a conexão usando a função RFC
STFC_CONNECTION.
Importante
Certifique-se de tratar as chaves privadas com segurança e elimine-as após a conclusão desta configuração.