Usar json para passar dados de e para scripts do Office
JSON (Notação de Objeto JavaScript) é um formato para armazenar e transferir dados. Cada objeto JSON é uma coleção de pares de nome/valor que pode ser definido quando criado. O JSON é útil com scripts do Office porque pode lidar com a complexidade arbitrária de intervalos, tabelas e outros padrões de dados no Excel. O JSON permite analisar dados de entrada dos serviços Web e passar objetos complexos por meio de fluxos do Power Automate.
Este artigo se concentra no uso do JSON com scripts do Office. Recomendamos que você primeiro saiba mais sobre o formato de artigos como Introdução JSON das Escolas W3.
Analisar dados JSON em um intervalo ou tabela
Matrizes de objetos JSON fornecem uma maneira consistente de passar linhas de dados de tabela entre aplicativos e serviços Web. Nesses casos, cada objeto JSON representa uma linha, enquanto as propriedades representam as colunas. Um Script do Office pode fazer loop sobre uma matriz JSON e remontá-la como uma matriz 2D. Essa matriz é então definida como os valores de um intervalo e armazenada em uma pasta de trabalho. Os nomes da propriedade também podem ser adicionados como cabeçalhos para criar uma tabela.
O script a seguir mostra dados JSON sendo convertidos em uma tabela. Observe que os dados não são retirados de uma fonte externa. Isso é abordado posteriormente neste artigo.
/**
 * Sample JSON data. This would be replaced by external calls or
 * parameters getting data from Power Automate in a production script.
 */
const jsonData = [
  { "Action": "Edit", /* Action property with value of "Edit". */
    "N": 3370, /* N property with value of 3370. */
    "Percent": 17.85 /* Percent property with value of 17.85. */
  },
  // The rest of the object entries follow the same pattern.
  { "Action": "Paste", "N": 1171, "Percent": 6.2 },
  { "Action": "Clear", "N": 599, "Percent": 3.17 },
  { "Action": "Insert", "N": 352, "Percent": 1.86 },
  { "Action": "Delete", "N": 350, "Percent": 1.85 },
  { "Action": "Refresh", "N": 314, "Percent": 1.66 },
  { "Action": "Fill", "N": 286, "Percent": 1.51 },
];

/**
 * This script converts JSON data to an Excel table.
 */
function main(workbook: ExcelScript.Workbook) {
  // Create a new worksheet to store the imported data.
  const newSheet = workbook.addWorksheet();
  newSheet.activate();

  // Determine the data's shape by getting the properties in one object.
  // This assumes all the JSON objects have the same properties.
  const columnNames = getPropertiesFromJson(jsonData[0]);

  // Create the table headers using the property names.
  const headerRange = newSheet.getRangeByIndexes(0, 0, 1, columnNames.length);
  headerRange.setValues([columnNames]);

  // Create a new table with the headers.
  const newTable = newSheet.addTable(headerRange, true);

  // Add each object in the array of JSON objects to the table.
  const tableValues = jsonData.map(row => convertJsonToRow(row));
  newTable.addRows(-1, tableValues);
}

/**
 * This function turns a JSON object into an array to be used as a table row.
 */
function convertJsonToRow(obj: object) {
  const array: (string | number)[] = [];

  // Loop over each property and get the value. Their order will be the same as the column headers.
  for (let value in obj) {
    array.push(obj[value]);
  }
  return array;
}

/**
 * This function gets the property names from a single JSON object.
 */
function getPropertiesFromJson(obj: object) {
  const propertyArray: string[] = [];

  // Loop over each property in the object and store the property name in an array.
  for (let property in obj) {
    propertyArray.push(property);
  }

  return propertyArray;
}
Dica
Se você conhece a estrutura do JSON, pode criar sua própria interface para facilitar a obtenção de propriedades específicas. Você pode substituir as etapas de conversão JSON para matriz por referências de segurança de tipo. O snippet de código a seguir mostra essas etapas (agora comentadas) substituídas por chamadas que usam uma nova ActionRow interface. Observe que isso faz com que a convertJsonToRow função não seja mais necessária.
  // const tableValues = jsonData.map(row => convertJsonToRow(row));
  // newTable.addRows(-1, tableValues);
  // }

     const actionRows: ActionRow[] = jsonData as ActionRow[];
     // Add each object in the array of JSON objects to the table.
     const tableValues = actionRows.map(row => [row.Action, row.N, row.Percent]);
     newTable.addRows(-1, tableValues);
   }

   interface ActionRow {
     Action: string;
     N: number;
     Percent: number;
   }
Obter dados JSON de fontes externas
Há duas maneiras de importar dados JSON para sua pasta de trabalho por meio de um Script do Office.
- Como um parâmetro com um fluxo do Power Automate.
- Com uma
fetchchamada para um serviço Web externo.
Modificar o exemplo para trabalhar com o Power Automate
Os dados JSON no Power Automate podem ser passados como uma matriz de objeto genérico. Adicione uma object[] propriedade ao script para aceitar esses dados.
// For Power Automate, replace the main signature in the previous sample with this one
// and remove the sample data.
function main(workbook: ExcelScript.Workbook, jsonData: object[]) {
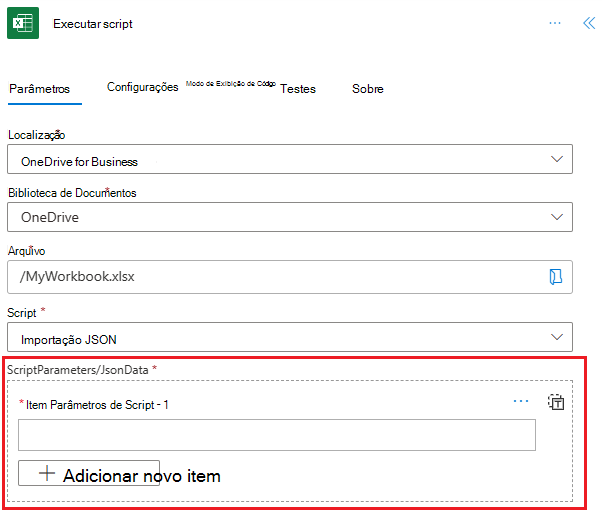
Em seguida, você verá uma opção no conector do Power Automate para adicionar jsonData à ação Executar script .

Modificar o exemplo para usar uma fetch chamada
Os serviços Web podem responder a fetch chamadas com dados JSON. Isso fornece ao script os dados necessários ao mantê-lo no Excel. Saiba mais sobre fetch e chamadas externas lendo suporte a chamadas de API externa em Scripts do Office.
// For external services, replace the main signature in the previous sample with this one,
// add the fetch call, and remove the sample data.
async function main(workbook: ExcelScript.Workbook) {
  // Replace WEB_SERVICE_URL with the URL of whatever service you need to call.
  const response = await fetch('WEB_SERVICE_URL');
  const jsonData: object[] = await response.json();
Criar JSON de um intervalo
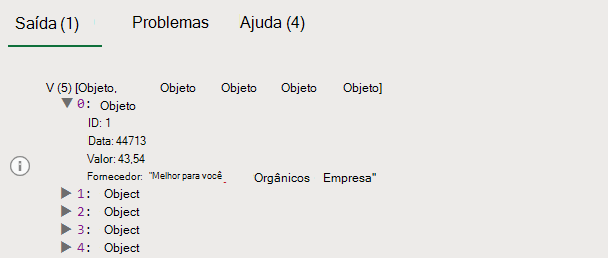
As linhas e colunas de uma planilha geralmente implicam relações entre seus valores de dados. Uma linha de uma tabela mapeia conceitualmente para um objeto de programação, com cada coluna sendo uma propriedade desse objeto. Considere a tabela de dados a seguir. Cada linha representa uma transação registrada na planilha.
| ID | Data | Valor | Fornecedor |
|---|---|---|---|
| 1 | 6/1/2022 | $43.54 | Melhor para você Organics Company |
| 2 | 6/3/2022 | $67.23 | Liberty Bakery and Cafe |
| 3 | 6/3/2022 | $37.12 | Melhor para você Organics Company |
| 4 | 6/6/2022 | $86.95 | Vinícola Coho |
| 5 | 6/7/2022 | $13.64 | Liberty Bakery and Cafe |
Cada transação (cada linha) tem um conjunto de propriedades associadas a ela: "ID", "Date", "Amount" e "Vendor". Isso pode ser modelado em um Script do Office como um objeto.
// An interface that wraps transaction details as JSON.
interface Transaction {
  "ID": string;
  "Date": number;
  "Amount": number;
  "Vendor": string;
}
As linhas na tabela de exemplo correspondem às propriedades na interface, de modo que um script pode converter facilmente cada linha em um Transaction objeto. Isso é útil ao gerar os dados para o Power Automate. O script a seguir itera em cada linha da tabela e o adiciona a um Transaction[].
function main(workbook: ExcelScript.Workbook) {
  // Get the table on the current worksheet.
  const table = workbook.getActiveWorksheet().getTables()[0];

  // Create an array of Transactions and add each row to it.
  let transactions: Transaction[] = [];
  const dataValues = table.getRangeBetweenHeaderAndTotal().getValues();
  for (let i = 0; i < dataValues.length; i++) {
    let row = dataValues[i];
    let currentTransaction: Transaction = {
      ID: row[table.getColumnByName("ID").getIndex()] as string,
      Date: row[table.getColumnByName("Date").getIndex()] as number,
      Amount: row[table.getColumnByName("Amount").getIndex()] as number,
      Vendor: row[table.getColumnByName("Vendor").getIndex()] as string
    };
    transactions.push(currentTransaction);
  }

  // Do something with the Transaction objects, such as return them to a Power Automate flow.
  console.log(transactions);
}

// An interface that wraps transaction details as JSON.
interface Transaction {
  "ID": string;
  "Date": number;
  "Amount": number;
  "Vendor": string;
}

Exportar JSON com fetch
Assim como importar dados com fetch, você pode enviar dados de sua pasta de trabalho com um comando semelhante. Um POST comando usa todos os dados JSON com cadeia de caracteres e os envia para o ponto de extremidade especificado.
Para ver isso em ação, substitua a console.log(transactions); linha no exemplo anterior pelo código a seguir. Isso emite um POST comando para um servidor de teste e, em seguida, lê os dados de volta.
  const response = await fetch('https://jsonplaceholder.typicode.com/posts', {
    method: 'POST',
    body: JSON.stringify(transactions),
    headers: {
      'Content-type': 'application/json; charset=UTF-8',
    },
  });
  const jsonData: object[] = await response.json();
  console.log(jsonData);
Usar um objeto genérico
O exemplo anterior pressupõe que os valores de cabeçalho da tabela sejam consistentes. Se sua tabela tiver colunas variáveis, você precisará criar um objeto JSON genérico. O script a seguir mostra um script que registra qualquer tabela como JSON.
function main(workbook: ExcelScript.Workbook) {
  // Get the table on the current worksheet.
  const table = workbook.getActiveWorksheet().getTables()[0];

  // Use the table header names as JSON properties.
  const tableHeaders = table.getHeaderRowRange().getValues()[0] as string[];

  // Get each data row in the table.
  const dataValues = table.getRangeBetweenHeaderAndTotal().getValues();
  let jsonArray: object[] = [];

  // For each row, create a JSON object and assign each property to it based on the table headers.
  for (let i = 0; i < dataValues.length; i++) {
    // Create a blank generic JSON object.
    let jsonObject: { [key: string]: string } = {};
    for (let j = 0; j < dataValues[i].length; j++) {
      jsonObject[tableHeaders[j]] = dataValues[i][j] as string;
    }

    jsonArray.push(jsonObject);
  }

  // Do something with the objects, such as return them to a Power Automate flow.
  console.log(jsonArray);
}