Crie aplicativos React Native com o Microsoft Graph
Este tutorial ensina como criar um aplicativo React Native que usa a API do Microsoft Graph para recuperar informações de calendário para um usuário.
Dica
Se você preferir apenas baixar o tutorial concluído, poderá baixar ou clonar o GitHub repositório.
Pré-requisitos
Antes de iniciar este tutorial, você deve ter o seguinte instalado em sua máquina de desenvolvimento.
- Pelo menos um dos seguintes:
- Android Studio e Java Kit de Desenvolvimento (necessário para executar o exemplo no Android)
- Xcode (necessário para executar o exemplo no iOS)
- Node.js
Você também deve ter uma conta pessoal da Microsoft com uma caixa de correio em Outlook.com, ou uma conta de trabalho ou de estudante da Microsoft. Se você não tiver uma conta da Microsoft, há algumas opções para obter uma conta gratuita:
- Você pode se inscrever em uma nova conta pessoal da Microsoft.
- Você pode se inscrever no programa Microsoft 365 desenvolvedor para obter uma assinatura Microsoft 365 gratuita.
Observação
Este tutorial foi escrito usando o React Native CLI, que tem pré-requisitos específicos, dependendo do sistema operacional e das plataformas de destino. Consulte React Native Instruções sobre como configurar o computador de desenvolvimento. As versões usadas para este tutorial estão listadas abaixo. As etapas neste guia podem funcionar com outras versões, mas que não foram testadas.
- Android Studio versão 4.1 com o SDK do Android 9.0
- Java kit de desenvolvimento versão 12.0.2
- Xcode versão 12.5.1
- Node.js versão 14.15.0
Comentários
Forneça qualquer comentário sobre este tutorial no repositório GitHub.
Criar um aplicativo React Native
Comece criando um novo React Native projeto.
Abra a interface de linha de comando (CLI) em um diretório onde você deseja criar o projeto. Execute o seguinte comando para executar a ferramenta react-native-cli e criar um novo React Native projeto.
npx react-native init GraphTutorial --template react-native-template-typescriptOpcional: Verifique se seu ambiente de desenvolvimento está configurado corretamente executando o projeto. Em sua CLI, altere o diretório para o diretório GraphTutorial que você acabou de criar e execute um dos seguintes comandos.
- Para iOS:
npx react-native run-ios - Para Android: iniciar uma instância do emulador do Android e executar
npx react-native run-android
- Para iOS:
Instalar dependências
Antes de continuar, instale algumas dependências adicionais que você usará mais tarde.
- react-navigation para manipular a navegação entre exibições no aplicativo.
- react-native-gesture-handler, react-native-safe-area-context, react-native-screens, react-native-reanimate e masked-view exigidos pela navegação reagido.
- react-native-elements e react-native-vector-icons para fornecer ícones para a interface do usuário.
- react-native-app-auth para lidar com autenticação e gerenciamento de tokens.
- armazenamento assíncrono para fornecer armazenamento para tokens.
- datetimepicker para adicionar seladores de data e hora à interface do usuário.
- momento para lidar com análise e comparação de datas e horas.
- windows-iana para traduzir Windows fusos horário para o formato IANA.
- microsoft-graph-client para fazer chamadas para o microsoft Graph.
Abra sua CLI no diretório raiz do seu React Native projeto.
Execute o seguinte comando:
npm install @react-navigation/native@5.9.6 @react-navigation/drawer@5.12.7 @react-navigation/stack@5.14.7
npm install @react-native-community/masked-view@0.1.11 react-native-safe-area-context@3.3.0 windows-iana
npm install react-native-reanimated@2.2.0 react-native-screens@3.5.0 @react-native-async-storage/async-storage@1.15.5
npm install react-native-elements@3.4.2 react-native-vector-icons@8.1.0 react-native-gesture-handler@1.10.3
npm install react-native-app-auth@6.4.0 moment@2.29.1 moment-timezone @microsoft/microsoft-graph-client@3.0.0
npm install @react-native-community/datetimepicker@3.5.2
npm install @microsoft/microsoft-graph-types --save-dev
Vincular e configurar dependências para iOS
Observação
Se você não estiver direcionando o iOS, ignore esta seção.
Abra sua CLI no diretório GraphTutorial/ios .
Execute o seguinte comando:
pod installAbra o arquivo GraphTutorial/ios/GraphTutorial/Info.plist em um editor de texto. Adicione o seguinte pouco antes da última
</dict>linha no arquivo.<key>UIAppFonts</key> <array> <string>AntDesign.ttf</string> <string>Entypo.ttf</string> <string>EvilIcons.ttf</string> <string>Feather.ttf</string> <string>FontAwesome.ttf</string> <string>FontAwesome5_Brands.ttf</string> <string>FontAwesome5_Regular.ttf</string> <string>FontAwesome5_Solid.ttf</string> <string>Foundation.ttf</string> <string>Ionicons.ttf</string> <string>MaterialIcons.ttf</string> <string>MaterialCommunityIcons.ttf</string> <string>SimpleLineIcons.ttf</string> <string>Octicons.ttf</string> <string>Zocial.ttf</string> </array>Abra o arquivo GraphTutorial/ios/GraphTutorial/AppDelegate.h em um editor de texto. Substitua seu conteúdo pelo seguinte.
#import <React/RCTBridgeDelegate.h>
#import <UIKit/UIKit.h>
#import "RNAppAuthAuthorizationFlowManager.h"

@interface AppDelegate : UIResponder <UIApplicationDelegate, RCTBridgeDelegate, RNAppAuthAuthorizationFlowManager>

@property (nonatomic, strong) UIWindow *window;
@property (nonatomic, weak) id<RNAppAuthAuthorizationFlowManagerDelegate> authorizationFlowManagerDelegate;

@end
Configurar dependências para Android
Observação
Se você não estiver direcionando o Android, ignore esta seção.
Abra o arquivo GraphTutorial/android/app/build.gradle em um editor.
Localize a
defaultConfigentrada e adicione a seguinte propriedade dentrodefaultConfig.manifestPlaceholders = [ appAuthRedirectScheme: 'graph-tutorial' ]A
defaultConfigentrada deve ser semelhante ao seguinte.defaultConfig { applicationId "com.graphtutorial" minSdkVersion rootProject.ext.minSdkVersion targetSdkVersion rootProject.ext.targetSdkVersion versionCode 1 versionName "1.0" manifestPlaceholders = [ appAuthRedirectScheme: 'graph-tutorial' ] }Adicione a seguinte linha ao final do arquivo.
apply from: "../../node_modules/react-native-vector-icons/fonts.gradle"Salve o arquivo.
Design do aplicativo
O aplicativo usará uma gaveta de navegação para navegar entre diferentes exibições. Nesta etapa, você criará as exibições básicas usadas pelo aplicativo e implementará a gaveta de navegação.
Criar exibições
Nesta seção, você criará as exibições do aplicativo para dar suporte a um fluxo de autenticação.
Abra GraphTutorial/index.js e adicione o seguinte à parte superior do arquivo, antes de quaisquer outras instruções
import.import 'react-native-gesture-handler';Crie um novo arquivo no diretório GraphTutorial chamado AuthContext.tsx e adicione o código a seguir.
import * as React from 'react';

type AuthContextType = {
  signIn: () => Promise<void>;
  signOut: () => void;
}

export const AuthContext = React.createContext<AuthContextType>({
  signIn: async () => {},
  signOut: () => {}
});
Crie um novo arquivo no diretório GraphTutorial chamado UserContext.tsx e adicione o código a seguir.
import * as React from 'react';
import { ImageSourcePropType } from 'react-native';

type UserContextType = {
  userLoading: boolean;
  userFirstName: string;
  userFullName: string;
  userEmail: string;
  userTimeZone: string;
  userPhoto: ImageSourcePropType;
}

export const UserContext = React.createContext<UserContextType>({
  userLoading: true,
  userFirstName: '',
  userFullName: '',
  userEmail: '',
  userTimeZone: '',
  userPhoto: require('./images/no-profile-pic.png')
});
Crie um novo diretório no diretório GraphTutorial denominado telas.
Crie um novo arquivo no diretório GraphTutorial/screens chamado HomeScreen.tsx. Adicione o código a seguir a esse arquivo.
import React from 'react';
import {
  ActivityIndicator,
  Platform,
  StyleSheet,
  Text,
  View,
} from 'react-native';
import { createStackNavigator } from '@react-navigation/stack';

import { UserContext } from '../UserContext';

const Stack = createStackNavigator();

const HomeComponent = () => {
  const userContext = React.useContext(UserContext);

  return (
    <View style={styles.container}>
      <ActivityIndicator
        color={Platform.OS === 'android' ? '#276b80' : undefined}
        animating={userContext.userLoading}
        size='large' />
      {userContext.userLoading ? null: <Text>Hello {userContext.userFirstName}!</Text>}
    </View>
  );
}

export default class HomeScreen extends React.Component {
  render() {
    return (
      <Stack.Navigator>
        <Stack.Screen name='Home'
          component={HomeComponent}
          options={{
            headerShown: false
          }} />
      </Stack.Navigator>
    );
  }
}

const styles = StyleSheet.create({
  container: {
    flex: 1,
    alignItems: 'center',
    justifyContent: 'center'
  }
});
Crie um novo arquivo no diretório GraphTutorial/screens chamado CalendarScreen.tsx. Adicione o código a seguir a esse arquivo.
import React from 'react';
import {StyleSheet, Text, View} from 'react-native';
import {createStackNavigator} from '@react-navigation/stack';

const Stack = createStackNavigator();

// Temporary placeholder view
const CalendarComponent = () => (
  <View style={styles.container}>
    <Text>Calendar</Text>
  </View>
);

export default class CalendarScreen extends React.Component {
  render() {
    return (
      <Stack.Navigator>
        <Stack.Screen
          name='Calendar'
          component={CalendarComponent}
          options={{
            headerShown: false,
          }}
        />
      </Stack.Navigator>
    );
  }
}

const styles = StyleSheet.create({
  container: {
    flex: 1,
    alignItems: 'center',
    justifyContent: 'center',
  },
});
Crie um novo arquivo no diretório GraphTutorial/screens chamado SignInScreen.tsx. Adicione o código a seguir a esse arquivo.
// Adapted from https://reactnavigation.org/docs/auth-flow
import React from 'react';
import {Alert, Button, StyleSheet, View} from 'react-native';
import {ParamListBase} from '@react-navigation/native';
import {StackNavigationProp} from '@react-navigation/stack';

import {AuthContext} from '../AuthContext';

type SignInProps = {
  navigation: StackNavigationProp<ParamListBase>;
};

export default class SignInScreen extends React.Component<SignInProps> {
  static contextType = AuthContext;

  _signInAsync = async () => {
    await this.context.signIn();
  };

  componentDidMount() {
    this.props.navigation.setOptions({
      title: 'Please sign in',
      headerShown: true,
    });
  }

  render() {
    return (
      <View style={styles.container}>
        <Button title='Sign In' onPress={this._signInAsync} />
      </View>
    );
  }
}

const styles = StyleSheet.create({
  container: {
    flex: 1,
    alignItems: 'center',
    justifyContent: 'center',
  },
});
Crie um novo arquivo no diretório GraphTutorial/screens chamado AuthLoadingScreen.tsx. Adicione o código a seguir a esse arquivo.
// Adapted from https://reactnavigation.org/docs/auth-flow
import React from 'react';
import {
  ActivityIndicator,
  Platform,
  Text,
  StyleSheet,
  View,
} from 'react-native';

export default class AuthLoadingScreen extends React.Component {
  render() {
    return (
      <View style={styles.container}>
        <ActivityIndicator
          color={Platform.OS === 'android' ? '#276b80' : undefined}
          size='large' />
        <Text style={styles.statusText}>Logging in...</Text>
      </View>
    );
  }
}

const styles = StyleSheet.create({
  container: {
    flex: 1,
    alignItems: 'center',
    justifyContent: 'center'
  },
  statusText: {
    marginTop: 10
  }
});
Criar uma gaveta de navegação
Nesta seção, você criará um menu para o aplicativo e atualizará o aplicativo para usar a navegação de reação para se mover entre as telas.
Crie um novo diretório no diretório GraphTutorial denominado menus.
Crie um novo arquivo no diretório GraphTutorial/menus chamado DrawerMenu.tsx. Adicione o código a seguir a esse arquivo.
import React, {FC} from 'react';
import {
  Alert,
  Image,
  StyleSheet,
  Text,
  View,
  ImageSourcePropType,
} from 'react-native';
import {
  createDrawerNavigator,
  DrawerContentScrollView,
  DrawerItem,
  DrawerItemList,
  DrawerContentComponentProps,
} from '@react-navigation/drawer';
import {ParamListBase} from '@react-navigation/native';
import {StackNavigationProp} from '@react-navigation/stack';

import {AuthContext} from '../AuthContext';
import {UserContext} from '../UserContext';
import HomeScreen from '../screens/HomeScreen';
import CalendarScreen from '../screens/CalendarScreen';

const Drawer = createDrawerNavigator();

type CustomDrawerContentProps = DrawerContentComponentProps & {
  userName: string;
  userEmail: string;
  userPhoto: ImageSourcePropType;
  signOut: () => void;
};

type DrawerMenuProps = {
  navigation: StackNavigationProp<ParamListBase>;
};

const CustomDrawerContent: FC<CustomDrawerContentProps> = props => (
  <DrawerContentScrollView {...props}>
    <View style={styles.profileView}>
      <Image
        source={props.userPhoto}
        resizeMode='contain'
        style={styles.profilePhoto}
      />
      <Text style={styles.profileUserName}>{props.userName}</Text>
      <Text style={styles.profileEmail}>{props.userEmail}</Text>
    </View>
    <DrawerItemList {...props} />
    <DrawerItem label='Sign Out' onPress={props.signOut} />
  </DrawerContentScrollView>
);

export default class DrawerMenuContent extends React.Component<DrawerMenuProps> {
  static contextType = AuthContext;

  state = {
    // TEMPORARY
    userLoading: true,
    userFirstName: 'Adele',
    userFullName: 'Adele Vance',
    userEmail: 'adelev@contoso.com',
    userTimeZone: 'UTC',
    userPhoto: require('../images/no-profile-pic.png'),
  };

  _signOut = async () => {
    this.context.signOut();
  };

  async componentDidMount() {
    this.props.navigation.setOptions({
      headerShown: false,
    });
  }

  render() {
    const userLoaded = !this.state.userLoading;

    return (
      <UserContext.Provider value={this.state}>
        <Drawer.Navigator
          drawerType='front'
          screenOptions={{
            headerShown: true,
            headerStyle: {
              backgroundColor: '#276b80',
            },
            headerTintColor: 'white',
          }}
          drawerContent={props => (
            <CustomDrawerContent
              {...props}
              userName={this.state.userFullName}
              userEmail={this.state.userEmail}
              userPhoto={this.state.userPhoto}
              signOut={this._signOut}
            />
          )}>
          <Drawer.Screen
            name='Home'
            component={HomeScreen}
            options={{drawerLabel: 'Home', headerTitle: 'Welcome'}}
          />
          {userLoaded && (
            <Drawer.Screen
              name='Calendar'
              component={CalendarScreen}
              options={{drawerLabel: 'Calendar'}}
            />
          )}
        </Drawer.Navigator>
      </UserContext.Provider>
    );
  }
}

const styles = StyleSheet.create({
  container: {
    flex: 1,
  },
  profileView: {
    alignItems: 'center',
    padding: 10,
  },
  profilePhoto: {
    width: 80,
    height: 80,
    borderRadius: 40,
  },
  profileUserName: {
    fontWeight: '700',
  },
  profileEmail: {
    fontWeight: '200',
    fontSize: 10,
  },
});
Crie um novo diretório no diretório GraphTutorial chamado images.
Adicione uma imagem de perfil padrão chamada no-profile-pic.png neste diretório. Você pode usar qualquer imagem que quiser ou usar a deste exemplo.
Abra o arquivo GraphTutorial/App.tsx e substitua todo o conteúdo pelo seguinte.
// Adapted from https://reactnavigation.org/docs/auth-flow
import * as React from 'react';
import {NavigationContainer, ParamListBase} from '@react-navigation/native';
import {
  createStackNavigator,
  StackNavigationProp,
} from '@react-navigation/stack';

import {AuthContext} from './AuthContext';
import SignInScreen from './screens/SignInScreen';
import DrawerMenuContent from './menus/DrawerMenu';
import AuthLoadingScreen from './screens/AuthLoadingScreen';

const Stack = createStackNavigator();

type Props = {
  navigation: StackNavigationProp<ParamListBase>;
};

export default function App({navigation}: Props) {
  const [state, dispatch] = React.useReducer(
    (prevState: any, action: any) => {
      switch (action.type) {
        case 'RESTORE_TOKEN':
          return {
            ...prevState,
            userToken: action.token,
            isLoading: false,
          };
        case 'SIGN_IN':
          return {
            ...prevState,
            isSignOut: false,
            userToken: action.token,
          };
        case 'SIGN_OUT':
          return {
            ...prevState,
            isSignOut: true,
            userToken: null,
          };
      }
    },
    {
      isLoading: true,
      isSignOut: false,
      userToken: null,
    },
  );

  React.useEffect(() => {
    const bootstrapAsync = async () => {
      let userToken = null;
      // TEMPORARY
      dispatch({type: 'RESTORE_TOKEN', token: userToken});
    };

    bootstrapAsync();
  }, []);

  const authContext = React.useMemo(
    () => ({
      signIn: async () => {
        dispatch({type: 'SIGN_IN', token: 'placeholder-token'});
      },
      signOut: async () => {
        dispatch({type: 'SIGN_OUT'});
      },
    }),
    [],
  );

  return (
    <AuthContext.Provider value={authContext}>
      <NavigationContainer>
        <Stack.Navigator>
          {state.isLoading ? (
            <Stack.Screen name='Loading' component={AuthLoadingScreen} />
          ) : state.userToken == null ? (
            <Stack.Screen name='SignIn' component={SignInScreen} />
          ) : (
            <Stack.Screen name='Main' component={DrawerMenuContent} />
          )}
        </Stack.Navigator>
      </NavigationContainer>
    </AuthContext.Provider>
  );
}
Salve todas as alterações.
Recarregue o aplicativo no emulador.
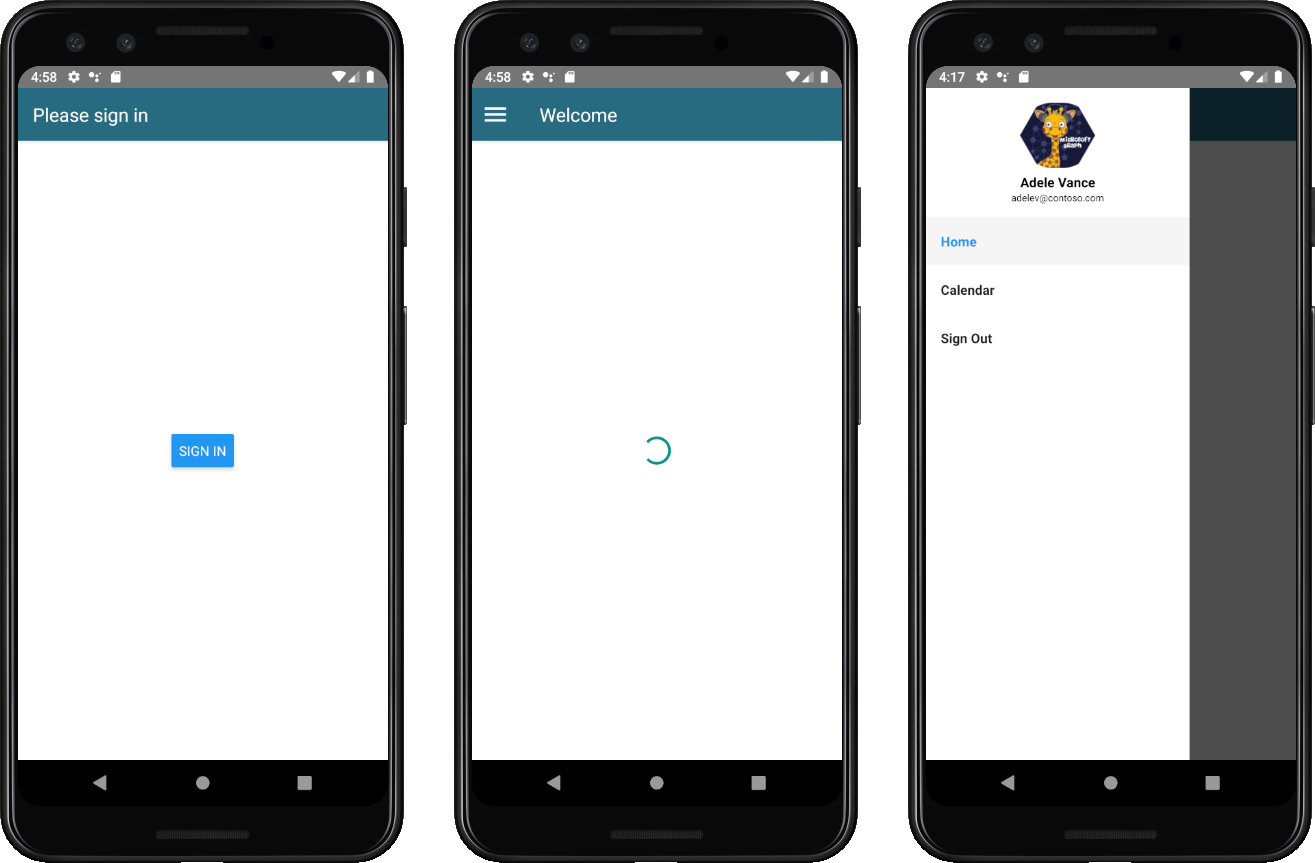
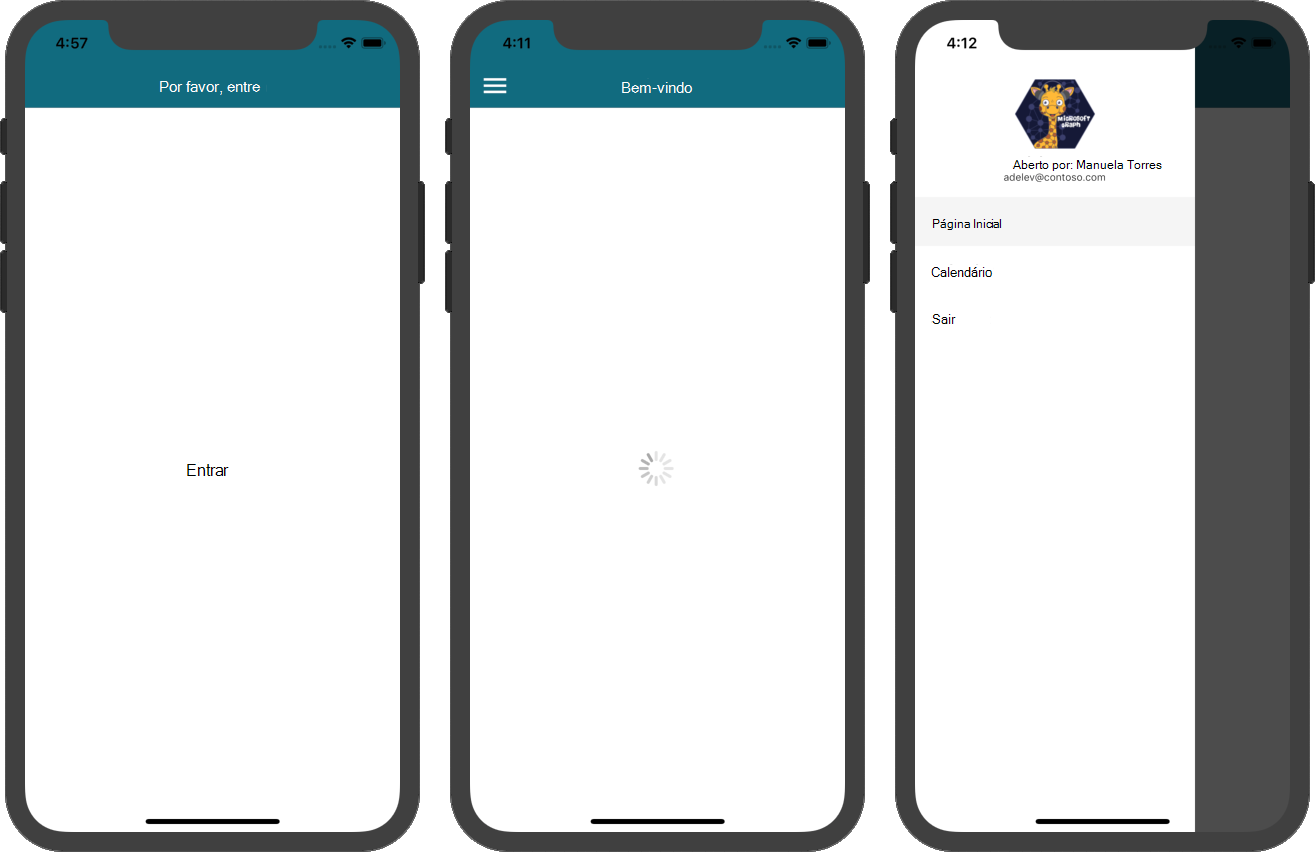
O menu do aplicativo deve funcionar para navegar entre os dois fragmentos e alterar quando você tocar nos botões Entrar ou Sair.
Registrar o aplicativo no portal
Neste exercício, você criará um novo aplicativo nativo do Azure AD usando o Azure Active Directory de administração.
Abra um navegador, navegue até o centro de administração do Azure Active Directory e faça logon usando uma conta pessoal (também conhecida como conta da Microsoft) ou Conta Corporativa ou de Estudante.
Selecione Azure Active Directory na navegação esquerda e selecione Registros de aplicativos em Gerenciar.

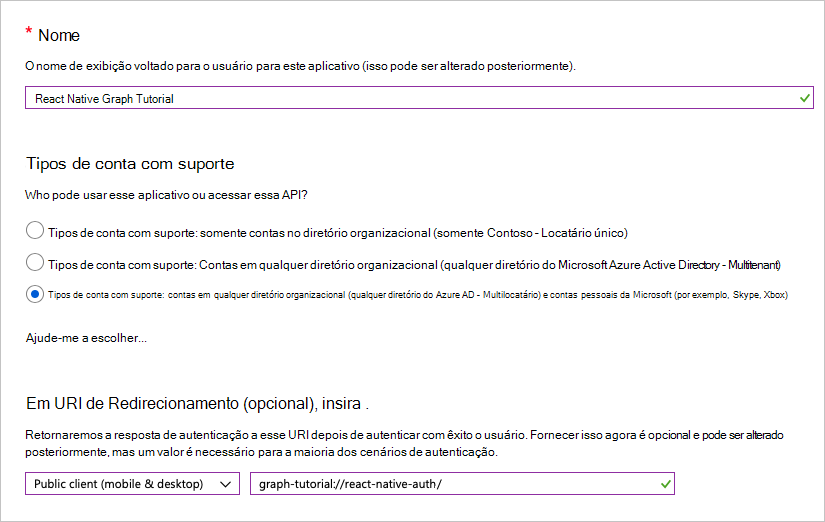
Selecione Novo registro. Na página Registrar um aplicativo, defina os valores da seguinte forma.
- Defina Nome para
React Native Graph Tutorial. - Defina Tipos de conta com suporte para Contas em qualquer diretório organizacional e contas pessoais da Microsoft.
- Em URI de redirecionamento, altere o menu suspenso para Cliente Público (área de trabalho móvel &) e de definir o valor como
graph-tutorial://react-native-auth/.
- Defina Nome para
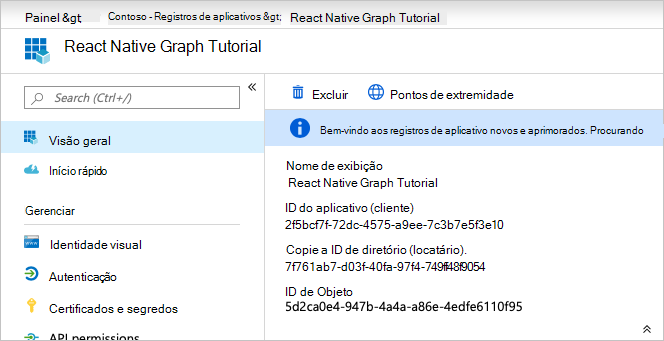
Selecione Registrar. Na página React Native Graph Tutorial, copie o valor da ID do Aplicativo (cliente) e salve-a, você precisará dela na próxima etapa.
Adicionar autenticação do Azure AD
Neste exercício, você estenderá o aplicativo do exercício anterior para dar suporte à autenticação com o Azure AD. Isso é necessário para obter o token de acesso OAuth necessário para chamar o microsoft Graph. Para fazer isso, você integrará a biblioteca react-native-app-auth ao aplicativo.
Crie um novo diretório no diretório GraphTutorial chamado auth.
Crie um novo arquivo no diretório GraphTutorial/auth chamado AuthConfig.ts. Adicione o código a seguir a esse arquivo.
export const AuthConfig = {
  appId: 'YOUR_APP_ID_HERE',
  appScopes: [
    'openid',
    'offline_access',
    'profile',
    'User.Read',
    'MailboxSettings.Read',
    'Calendars.ReadWrite'
  ]
};
Substitua
YOUR_APP_ID_HEREpela ID do aplicativo do registro do aplicativo.
Importante
Se você estiver usando o controle de origem, como git, agora seria um bom momento para excluir o arquivo AuthConfig.ts do controle de origem para evitar o vazamento inadvertida da ID do aplicativo.
Implementar login
Nesta seção, você criará uma classe auxiliar de autenticação e atualizará o aplicativo para entrar e sair.
Crie um novo arquivo no diretório GraphTutorial/auth chamado AuthManager.ts. Adicione o código a seguir a esse arquivo.
import AsyncStorage from '@react-native-async-storage/async-storage';
import { authorize, refresh, AuthConfiguration } from 'react-native-app-auth';
import { Platform } from 'react-native';
import moment from 'moment';

import { AuthConfig } from './AuthConfig';

const config: AuthConfiguration = {
  clientId: AuthConfig.appId,
  redirectUrl: 'graph-tutorial://react-native-auth/',
  scopes: AuthConfig.appScopes,
  additionalParameters: { prompt: 'select_account' },
  serviceConfiguration: {
    authorizationEndpoint: 'https://login.microsoftonline.com/common/oauth2/v2.0/authorize',
    tokenEndpoint: 'https://login.microsoftonline.com/common/oauth2/v2.0/token',
  }
};

export class AuthManager {

  static signInAsync = async () => {
    const result = await authorize(config);

    console.log(result.accessToken);

    // Store the access token, refresh token, and expiration time in storage
    await AsyncStorage.setItem('userToken', result.accessToken);
    await AsyncStorage.setItem('refreshToken', result.refreshToken);
    await AsyncStorage.setItem('expireTime', result.accessTokenExpirationDate);
  }

  static signOutAsync = async () => {
    // Clear storage
    await AsyncStorage.removeItem('userToken');
    await AsyncStorage.removeItem('refreshToken');
    await AsyncStorage.removeItem('expireTime');
  }

  static getAccessTokenAsync = async() => {
    const expireTime = await AsyncStorage.getItem('expireTime');

    if (expireTime !== null) {
      // Get expiration time - 5 minutes
      // If it's <= 5 minutes before expiration, then refresh
      const expire = moment(expireTime).subtract(5, 'minutes');
      const now = moment();

      if (now.isSameOrAfter(expire)) {
        // Expired, refresh
        console.log('Refreshing token');
        const refreshToken = await AsyncStorage.getItem('refreshToken');
        console.log(`Refresh token: ${refreshToken}`);
        const result = await refresh(config, { refreshToken: refreshToken || '' });

        // Store the new access token, refresh token, and expiration time in storage
        await AsyncStorage.setItem('userToken', result.accessToken);
        await AsyncStorage.setItem('refreshToken', result.refreshToken || '');
        await AsyncStorage.setItem('expireTime', result.accessTokenExpirationDate);

        return result.accessToken;
      }

      // Not expired, just return saved access token
      const accessToken = await AsyncStorage.getItem('userToken');
      return accessToken;
    }

    return null;
  }
}
Abra o arquivo GraphTutorial/App.tsx e adicione a seguinte
importinstrução à parte superior do arquivo.import {AuthManager} from './auth/AuthManager';Substitua a declaração existente
authContextpelo seguinte.const authContext = React.useMemo( () => ({ signIn: async () => { await AuthManager.signInAsync(); const token = await AuthManager.getAccessTokenAsync(); dispatch({ type: 'SIGN_IN', token: token }); }, signOut: async () => { await AuthManager.signOutAsync(); dispatch({ type: 'SIGN_OUT' }); } }), [] );Abra o arquivo GraphTutorial/menus/DrawerMenu.tsx
importe adicione a seguinte instrução à parte superior do arquivo.import {AuthManager} from '../auth/AuthManager';Adicione o código a seguir à
componentDidMountfunção.try { const accessToken = await AuthManager.getAccessTokenAsync(); // TEMPORARY this.setState({userFirstName: accessToken, userLoading: false}); } catch (error) { Alert.alert( 'Error getting token', JSON.stringify(error), [ { text: 'OK' } ], { cancelable: false } ); }Salve suas alterações e recarregue o aplicativo em seu emulador.
Se você entrar no aplicativo, verá um token de acesso exibido na tela De boas-vindas .
Obter detalhes do usuário
Nesta seção, você criará um provedor de autenticação personalizado para a biblioteca de clientes Graph, criará uma classe auxiliar para manter todas as chamadas para o Microsoft Graph e atualizará a DrawerMenuContent classe para usar essa nova classe para obter o usuário conectado.
Crie um novo diretório no diretório GraphTutorial chamado graph.
Crie um novo arquivo no diretório GraphTutorial/graph chamado GraphAuthProvider.ts. Adicione o código a seguir a esse arquivo.
import { AuthManager } from '../auth/AuthManager';

// Used by Graph client to get access tokens
// See https://github.com/microsoftgraph/msgraph-sdk-javascript/blob/dev/docs/CustomAuthenticationProvider.md
export class GraphAuthProvider {
  getAccessToken = async() => {
    const token = await AuthManager.getAccessTokenAsync();
    return token || '';
  }
}
Crie um novo arquivo no diretório GraphTutorial/graph chamado GraphManager.ts. Adicione o código a seguir a esse arquivo.
import {Client} from '@microsoft/microsoft-graph-client';
import {GraphAuthProvider} from './GraphAuthProvider';

// Set the authProvider to an instance
// of GraphAuthProvider
const clientOptions = {
  authProvider: new GraphAuthProvider(),
};

// Initialize the client
const graphClient = Client.initWithMiddleware(clientOptions);

export class GraphManager {
  static getUserAsync = async () => {
    // GET /me
    return await graphClient
      .api('/me')
      .select('displayName,givenName,mail,mailboxSettings,userPrincipalName')
      .get();
  };
}
Abra o arquivo GraphTutorial/views/DrawerMenu.tsx
importe adicione as instruções a seguir à parte superior do arquivo.import {GraphManager} from '../graph/GraphManager'; import * as MicrosoftGraph from '@microsoft/microsoft-graph-types';Substitua o
componentDidMountmétodo pelo seguinte.async componentDidMount() { this.props.navigation.setOptions({ headerShown: false, }); try { // Get the signed-in user from Graph const user: MicrosoftGraph.User = await GraphManager.getUserAsync(); // Update UI with display name and email this.setState({ userLoading: false, userFirstName: user.givenName!, userFullName: user.displayName!, // Work/School accounts have email address in mail attribute // Personal accounts have it in userPrincipalName userEmail: user.mail! || user.userPrincipalName!, userTimeZone: user.mailboxSettings?.timeZone! }); } catch(error) { Alert.alert( 'Error getting user', JSON.stringify(error), [ { text: 'OK' } ], { cancelable: false } ); } }
Se você salvar suas alterações e recarregar o aplicativo agora, depois de entrar na interface do usuário é atualizado com o nome de exibição do usuário e o endereço de email.
Obter uma exibição de calendário
Neste exercício, você incorporará o microsoft Graph no aplicativo. Para este aplicativo, você usará a Biblioteca de Clientes JavaScript do Microsoft Graph para fazer chamadas para o Microsoft Graph.
Obtenha eventos de calendário do Outlook
Nesta seção, você estenderá GraphManager a classe para adicionar uma função para obter os eventos do CalendarScreen usuário para a semana atual e atualizar para usar essas novas funções.
Abra o arquivo GraphTutorial/graph/GraphManager.tsx e adicione o método a seguir à
GraphManagerclasse.static getCalendarView = async(start: string, end: string, timezone: string) => { // GET /me/calendarview return await graphClient.api('/me/calendarview') .header('Prefer', `outlook.timezone="${timezone}"`) .query({ startDateTime: start, endDateTime: end}) // $select='subject,organizer,start,end' // Only return these fields in results .select('subject,organizer,start,end') // $orderby=createdDateTime DESC // Sort results by when they were created, newest first .orderby('start/dateTime') .top(50) .get(); }Observação
Considere o que o código está
getCalendarViewfazendo.- O URL que será chamado é
/v1.0/me/calendarView. - A
headerfunção adiciona oPrefer: outlook.timezoneheader à solicitação, fazendo com que os horários na resposta sejam no fuso horário preferencial do usuário. - A
queryfunção adiciona osstartDateTimeparâmetros eendDateTime, definindo a janela de tempo para o exibição de calendário. - A
selectfunção limita os campos retornados para cada evento para apenas aqueles que o aplicativo realmente usará. - A
orderbyfunção classifica os resultados pela hora de início. - A
topfunção limita os resultados aos primeiros 50 eventos.
- O URL que será chamado é
Abra GraphTutorial/views/CalendarScreen.tsx e substitua todo o conteúdo pelo código a seguir.
import React from 'react';
import {
  ActivityIndicator,
  Alert,
  FlatList,
  Modal,
  Platform,
  ScrollView,
  StyleSheet,
  Text,
  View,
} from 'react-native';
import {createStackNavigator} from '@react-navigation/stack';
import * as MicrosoftGraph from '@microsoft/microsoft-graph-types';
import moment from 'moment-timezone';
import {findIana} from 'windows-iana';

import {UserContext} from '../UserContext';
import {GraphManager} from '../graph/GraphManager';

const Stack = createStackNavigator();
const CalendarState = React.createContext<CalendarScreenState>({
  loadingEvents: true,
  events: [],
});

type CalendarScreenState = {
  loadingEvents: boolean;
  events: MicrosoftGraph.Event[];
};

// Temporary JSON view
const CalendarComponent = () => {
  const calendarState = React.useContext(CalendarState);

  return (
    <View style={styles.container}>
      <Modal visible={calendarState.loadingEvents}>
        <View style={styles.loading}>
          <ActivityIndicator
            color={Platform.OS === 'android' ? '#276b80' : undefined}
            animating={calendarState.loadingEvents}
            size='large'
          />
        </View>
      </Modal>
      <ScrollView>
        <Text>{JSON.stringify(calendarState.events, null, 2)}</Text>
      </ScrollView>
    </View>
  );
};

export default class CalendarScreen extends React.Component {
  static contextType = UserContext;

  state: CalendarScreenState = {
    loadingEvents: true,
    events: [],
  };

  async componentDidMount() {
    try {
      const tz = this.context.userTimeZone || 'UTC';
      // Convert user's Windows time zone ("Pacific Standard Time")
      // to IANA format ("America/Los_Angeles")
      // Moment.js needs IANA format
      const ianaTimeZone = findIana(tz)[0];

      // Get midnight on the start of the current week in the user's
      // time zone, but in UTC. For example, for PST, the time value
      // would be 07:00:00Z
      const startOfWeek = moment
        .tz(ianaTimeZone!.valueOf())
        .startOf('week')
        .utc();

      const endOfWeek = moment(startOfWeek).add(7, 'day');

      const events = await GraphManager.getCalendarView(
        startOfWeek.format(),
        endOfWeek.format(),
        tz,
      );

      this.setState({
        loadingEvents: false,
        events: events.value,
      });
    } catch (error) {
      Alert.alert(
        'Error getting events',
        JSON.stringify(error),
        [
          {
            text: 'OK',
          },
        ],
        {cancelable: false},
      );
    }
  }

  render() {
    return (
      <CalendarState.Provider value={this.state}>
        <Stack.Navigator>
          <Stack.Screen
            name='Calendar'
            component={CalendarComponent}
            options={{
              headerShown: false,
            }}
          />
        </Stack.Navigator>
      </CalendarState.Provider>
    );
  }
}

const styles = StyleSheet.create({
  container: {
    flex: 1,
  },
  loading: {
    flex: 1,
    justifyContent: 'center',
    alignItems: 'center',
  },
  eventItem: {
    padding: 10,
  },
  eventSubject: {
    fontWeight: '700',
    fontSize: 18,
  },
  eventOrganizer: {
    fontWeight: '200',
  },
  eventDuration: {
    fontWeight: '200',
  },
});
Agora você pode executar o aplicativo, entrar e tocar no item de navegação Calendário no menu. Você deve ver um despejo JSON dos eventos no aplicativo.
Exibir os resultados
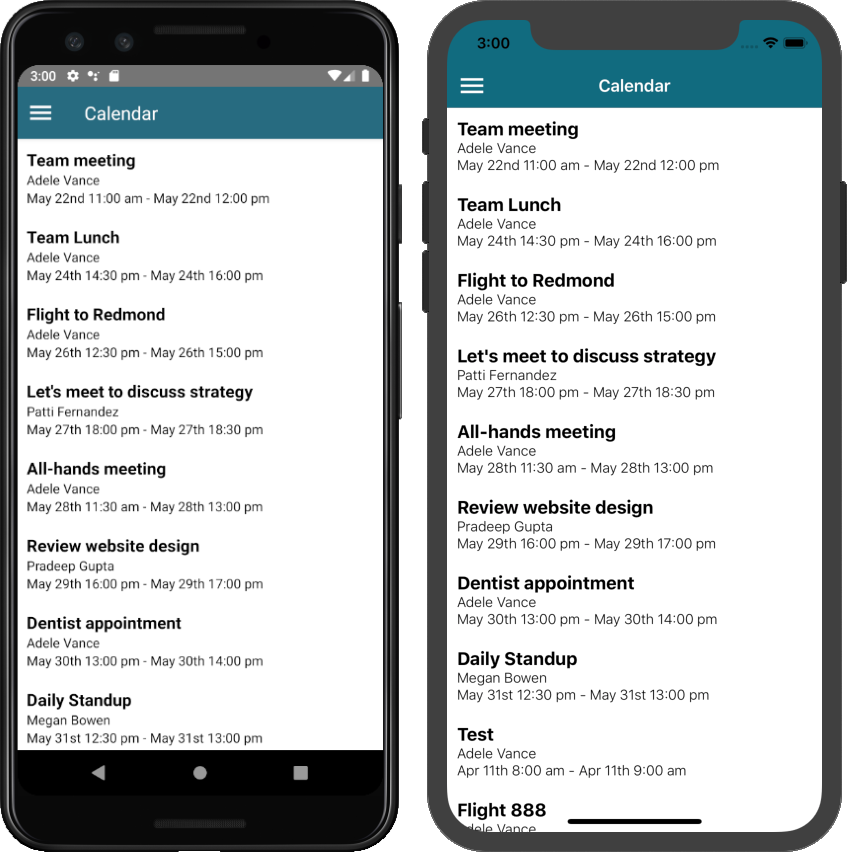
Agora você pode substituir o despejo JSON por algo para exibir os resultados de maneira amigável. Nesta seção, você adicionará um à FlatList tela de calendário para renderizar os eventos.
Adicione o seguinte método acima da declaração
CalendarScreende classe.const convertDateTime = (dateTime: string): string => { return moment(dateTime).format('MMM Do H:mm a'); };Substitua o
ScrollViewno métodoCalendarComponentpelo seguinte.<FlatList data={calendarState.events} renderItem={({item}) => ( <View style={styles.eventItem}> <Text style={styles.eventSubject}>{item.subject}</Text> <Text style={styles.eventOrganizer}> {item.organizer!.emailAddress!.name} </Text> <Text style={styles.eventDuration}> {convertDateTime(item.start!.dateTime!)} -{' '} {convertDateTime(item.end!.dateTime!)} </Text> </View> )} />Execute o aplicativo, entre e toque no item de navegação Calendário. Você deve ver a lista de eventos.
Criar um novo evento
Nesta seção, você adicionará a capacidade de criar eventos no calendário do usuário.
Criar a nova tela de evento
Abra ./graph/GraphManager.ts e adicione a seguinte função à
GraphManagerclasse.static createEvent = async(newEvent: any) => { // POST /me/events await graphClient.api('/me/events') .post(newEvent); }Essa função usa o Graph SDK para criar um novo evento.
Crie um novo arquivo nas telas ./screens denominadas NewEventScreen.tsx e adicione o código a seguir.
import React from 'react';
import {
  ActivityIndicator,
  Alert,
  Button,
  Modal,
  Platform,
  ScrollView,
  StyleSheet,
  Text,
  View,
} from 'react-native';
import DateTimePicker from '@react-native-community/datetimepicker';
import { createStackNavigator } from '@react-navigation/stack';
import * as MicrosoftGraph from '@microsoft/microsoft-graph-types';
import moment from 'moment-timezone';

import { UserContext } from '../UserContext';
import { GraphManager } from '../graph/GraphManager';
import { TextInput } from 'react-native-gesture-handler';

const Stack = createStackNavigator();
const NewEventState = React.createContext<NewEventState>({
  isCreating: false,
  subject: '',
  attendees: '',
  body: '',
  timeZone: '',
  startDate: new Date(),
  endDate: new Date(),
  disableCreate: () => { return true },
  updateValue: () => {}
});

type NewEventState = {
  isCreating: boolean;
  subject: string;
  attendees: string;
  body: string;
  timeZone: string;
  startDate: Date;
  endDate: Date;
  disableCreate: () => boolean;
  updateValue: (newValue: string | Date | boolean, fieldName: string) => void;
}

type DateTimeInputProps = {
  value: Date;
  onChange: (event: Event, newValue: Date | undefined) => void;
}

// The picker acts very differently on Android and iOS
// iOS can use a single picker for both date and time,
// where Android requires two. Also the iOS version can
// be displayed all the time, while the Android version is a
// modal pop-up. Encapsulating this into a reusable component
const DateTimeInput = (props: DateTimeInputProps) => {
  const [showDatePicker, setShowDatePicker] = React.useState(false);
  const [showTimePicker, setShowTimePicker] = React.useState(Platform.OS === 'ios');

  return (
    <View style={Platform.OS === 'android' ? styles.dateTime : null}>
      { Platform.OS === 'android' &&
        <Text
          style={styles.time}
          onPress={()=>{setShowTimePicker(true)}}>
          {formatTime(props.value)}
        </Text>
      }
      { showTimePicker &&
        <DateTimePicker
          mode={Platform.OS === 'ios' ? 'datetime' : 'time'}
          value={props.value}
          onChange={(e, d) => {
            setShowTimePicker(Platform.OS === 'ios');
            if (d)
              props.onChange(e,d);
          }}
          />
      }
      { Platform.OS === 'android' &&
        <Text
          style={styles.date}
          onPress={()=>{setShowDatePicker(true)}}>
          {formatDate(props.value)}
        </Text>
      }
      { showDatePicker &&
        Platform.OS === 'android' &&
        <DateTimePicker
          mode='date'
          value={props.value}
          onChange={(e, d) => {
            setShowDatePicker(Platform.OS === 'ios');
            if (d)
              props.onChange(e,d);
          }}
          />
      }
    </View>
  )
}

const NewEventComponent = () => {
  const newEventState = React.useContext(NewEventState);

  const createEvent = async () => {
    newEventState.updateValue(true, 'isCreating');

    // Create a new Event object with the
    // required fields
    const newEvent: MicrosoftGraph.Event = {
      subject: newEventState.subject,
      start: {
        dateTime: moment(newEventState.startDate).format('YYYY-MM-DDTHH:mm:ss'),
        timeZone: newEventState.timeZone
      },
      end: {
        dateTime: moment(newEventState.endDate).format('YYYY-MM-DDTHH:mm:ss'),
        timeZone: newEventState.timeZone
      }
    };

    // Only add attendees if the user specified them
    if (newEventState.attendees.length > 0) {
      newEvent.attendees = [];

      // Value should be a ;-delimited list of email addresses
      // NOTE: The app does no validation of this
      const emails = newEventState.attendees.split(';')

      emails.forEach((email) => {
        newEvent.attendees!.push({
          emailAddress: { address: email }
        });
      });
    }

    // Only add body if the user specified one
    if (newEventState.body.length > 0) {
      newEvent.body = {
        content: newEventState.body,
        // For simplicity, add it as a plain-text body
        contentType: 'text'
      };
    }

    await GraphManager.createEvent(newEvent);

    Alert.alert('Success',
      'Event created',
      [
        {
          text: 'OK',
          onPress: () => {
            newEventState.updateValue(false, 'isCreating');
          }
        }
      ]
    );
  }

  return (
    <ScrollView style={styles.container}>
      <Modal visible={newEventState.isCreating}>
        <View style={styles.loading}>
          <ActivityIndicator
            color={Platform.OS === 'android' ? '#276b80' : undefined}
            animating={newEventState.isCreating}
            size='large' />
        </View>
      </Modal>
        <View style={styles.formField}>
          <Text style={styles.fieldLabel}>Subject</Text>
          <TextInput style={styles.textInput}
            value={newEventState.subject}
            onChangeText={(text) => newEventState.updateValue(text, 'subject')} />
        </View>
        <View style={styles.formField}>
          <Text style={styles.fieldLabel}>Attendees</Text>
          <TextInput style={styles.textInput}
            placeholder="Email (separate multiple with ';')"
            value={newEventState.attendees}
            onChangeText={(text) => newEventState.updateValue(text, 'attendees')} />
        </View>
        <View style={styles.formField}>
          <Text style={styles.fieldLabel}>Start</Text>
          <DateTimeInput
            value={newEventState.startDate}
            onChange={(e, date) => newEventState.updateValue(date!, 'startDate')} />
        </View>
        <View style={styles.formField}>
          <Text style={styles.fieldLabel}>End</Text>
          <DateTimeInput
            value={newEventState.endDate}
            onChange={(e, date) => newEventState.updateValue(date!, 'endDate')} />
        </View>
        <View style={styles.formField}>
          <TextInput style={styles.multiLineTextInput}
            multiline={true}
            textAlignVertical='top'
            placeholder='Body'
            value={newEventState.body}
            onChangeText={(text) => newEventState.updateValue(text, 'body')} />
        </View>
        <View style={styles.formField}>
          <Button title="Create"
            disabled={newEventState.disableCreate()}
            onPress={createEvent}/>
        </View>
    </ScrollView>
  );
}

const formatTime = (dateTime: Date): string => {
  return moment(dateTime).format('h:mm A');
}

const formatDate = (dateTime: Date): string => {
  return moment(dateTime).format('MMM D, YYYY');
}

// When first loading the form, set the start time
// to the nearest hour or half-hour
const getDefaultStart = (): Date => {
  const now = moment().startOf('minute');
  const offset = 30 - (now.minute() % 30);

  return now.add(offset, 'minutes').toDate();
}

// When first loading the form, set the end time
// to start + 30 min
const getDefaultEnd = (): Date => {
  return moment(getDefaultStart()).add(30, 'minutes').toDate();
}

export default class NewEventScreen extends React.Component {
  static contextType = UserContext;

  // Disable the create button if:
  // - App is waiting for the result of create request
  // - Subject is empty
  // - Start time is after end time
  disableCreate = () => {
    return this.state.isCreating ||
      this.state.subject.length <= 0 ||
      moment(this.state.startDate).isAfter(this.state.endDate);
  }

  onStateValueChange = (newValue: string | Date | boolean, fieldName: string) => {
    this.setState({ [fieldName]: newValue });
  }

  state: NewEventState = {
    isCreating: false,
    subject: '',
    attendees: '',
    body: '',
    timeZone: this.context.userTimeZone,
    startDate: getDefaultStart(),
    endDate: getDefaultEnd(),
    disableCreate: this.disableCreate,
    updateValue: this.onStateValueChange
  };

  render() {
    return (
      <NewEventState.Provider value={this.state}>
        <Stack.Navigator>
          <Stack.Screen name='NewEvent'
            component={ NewEventComponent }
            options={{
              headerShown: false
            }} />
        </Stack.Navigator>
      </NewEventState.Provider>
    );
  }
}

const styles = StyleSheet.create({
  container: {
    flex: 1
  },
  loading: {
    flex: 1,
    justifyContent: 'center',
    alignItems: 'center'
  },
  formField: {
    paddingHorizontal: 10,
    paddingVertical: 5
  },
  fieldLabel: {
    fontWeight: '700',
    marginBottom: 10
  },
  textInput: {
    borderColor: 'gray',
    borderWidth: 1,
    height: 40,
    padding: 10
  },
  multiLineTextInput: {
    borderColor: 'gray',
    borderWidth: 1,
    height: 200,
    padding: 10
  },
  time: {
    padding: 10,
    backgroundColor: '#e6e6e6',
    color: '#147efb',
    marginRight: 10
  },
  date: {
    padding: 10,
    backgroundColor: '#e6e6e6',
    color: '#147efb'
  },
  dateTime: {
    flexDirection: 'row'
  }
});
Considere o que a
createEventfunção faz. Ele cria umMicrosoftGraph.Eventobjeto usando os valores do formulário e, em seguida, passa esse objeto para aGraphManager.createEventfunção.Abra ./menus/DrawerMenu.tsx e adicione a seguinte
importinstrução na parte superior do arquivo.import NewEventScreen from '../screens/NewEventScreen';Adicione o seguinte código dentro do
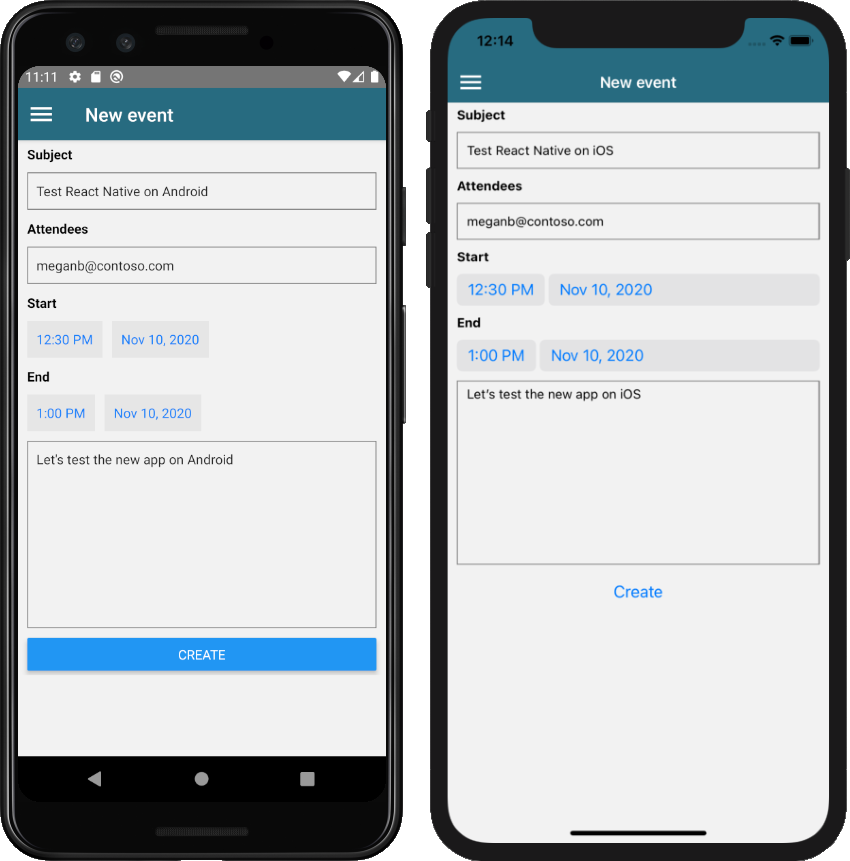
<Drawer.Navigator>elemento, logo acima da</Drawer.Navigator>linha.{userLoaded && ( <Drawer.Screen name='NewEvent' component={NewEventScreen} options={{drawerLabel: 'New event'}} /> )}Salve suas alterações e reinicie ou atualize o aplicativo. Selecione a opção Novo evento no menu para chegar ao novo formulário de evento.
Preencha o formulário e selecione Criar.
Parabéns!
Você concluiu o tutorial React Native microsoft Graph. Agora que você tem um aplicativo de trabalho que chama a Microsoft Graph, você pode experimentar e adicionar novos recursos. Visite a visão geral do microsoft Graph para ver todos os dados que você pode acessar com o Microsoft Graph.
Comentários
Forneça qualquer comentário sobre este tutorial no repositório GitHub .
Tem algum problema com essa seção? Se tiver, envie seus comentários para que possamos melhorar esta seção.