Step 2: Configure a WCF-Custom One-way Receive Port

Time to complete: 10 minutes
Objective: In this step, you configure a WCF-Custom port to receive a flat-file IDOC from an SAP system. After configuring the port, you configure the BizTalk application to use the WCF-Custom receive port.
Prerequisites
You must have built and deployed your vPrev BizTalk project to receive IDOCs from an SAP system.
To configure a WCF-Custom one-way receive port
Start the BizTalk Server Administration console.
In the console tree, expand BizTalk Group, and then expand Applications.
Expand the application under which you want create the receive port.
Right-click Receive Ports, point to New, and click One-way Receive Port.
In the Receive Port Properties dialog box, on the General tab, type a name for the receive port.
On the Receive Locations tab, click New. The Receive Location Properties dialog box appears.
In the Receive Location Properties dialog box, do the following:
Specify a name for the receive location.
From the Type drop-down list, select WCF-Custom, and then click Configure.
In the WCF-Custom Transport Properties dialog box, do the following:
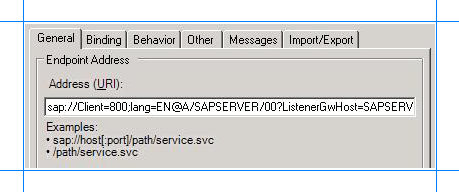
Click the General tab, and in the Address (URI) field, specify the connection URI to receive messages from the SAP system. The connection URI to receive messages from the SAP system must be in the following format:
sap://Client=800;lang=EN@A/YourSAPHOST/00?ListenerGwHost=YourSAPHOST&ListenerGwServ=SAPGW00&ListenerProgramId=MyProgramIdThe following figure shows the port properties dialog box with the URI specified:

For more information about the connection URI, see Create a connection to the SAP system.
Click the Binding tab, and from the Binding Type drop-down list, select sapBinding. Make sure you specify the following binding properties for the receive port.
Binding property Set value to flatFileSegmentIndicator SegmentType. This indicates that the flat files should contain the segment type for each segment in the IDOC. padReceivedIdocWithSpaces True. Specifies whether each line in the IDOC is padded with spaces to the correct length. receiveIDocFormat String. This specifies that the IDOC message should be represented as a single string field. For more information about binding properties, see Read about BizTalk Adapter for mySAP Business Suite Binding Properties.
Click the Others tab, and specify the credentials to connect to an SAP system.
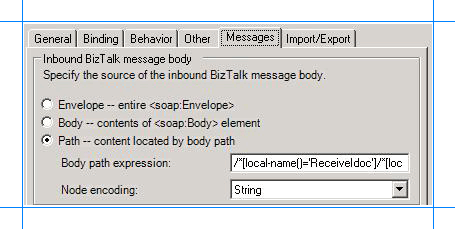
Click the Messages tab, and in the Inbound BizTalk message body section, choose the Path option.
In the Body path expression text box, specify the XPath query to extract the flat-file IDOC from the XML message. By doing so, the receive port extracts the data from the IDOC and trims the XML tag that is part of the ReceiveIdoc operation for the WCF-based SAP adapter. For more information about the message schema for the ReceiveIdoc operation, see Message Schemas for IDOC Operations.

You must specify the following XPath query:
/*[local-name()='ReceiveIdoc']/*[local-name()='idocData']From the Node encoding drop-down list, select String.
Click Apply, and then click OK.
In the Receive Location Properties dialog box, from the Receive handler drop-down list, select BizTalkServerApplication.
From the Receive pipeline drop-down list, select ConvertToXML. This flat-file disassembler pipeline is already a part of the vPrev BizTalk project to convert a flat-file IDOC to an XML IDOC.
Click OK.
To configure the BizTalk application
In the BizTalk Server Administration console, expand BizTalk Group, expand Applications, and expand the BizTalk Application where the orchestration is deployed.
Right-click the BizTalk application, and then select Configure.
From the left pane, click the orchestration to configure. From the right pane, from the Host drop-down list, select a BizTalk host instance.
Under the Bindings box, map the logical ports of the BizTalk orchestration to the physical ports in the BizTalk Server Administration console.
Select the WCF-Custom receive port you created earlier in this topic.
Select a file port where you will receive the flat-file IDOC.
Click OK.
For more information on configuring apps in BizTalk Server, see How to Configure an Application.
Next Steps
You have now completed migration of your vPrev BizTalk project to a BizTalk project that receives IDOCs from an SAP system using the WCF-based SAP adapter. You must now test the migrated BizTalk application by receiving a flat-file IDOC, as described in Step 3: Test the Migrated Application.