Início Rápido: Assistente Criar uma voz personalizada
Neste guia de início rápido, você usará o SDK de Fala para criar um aplicativo de assistente de voz personalizado que se conecta a um bot que você já criou e configurou. Se você precisar criar um bot, confira o tutorial relacionado para ver orientações mais abrangentes.
Depois de atender a alguns pré-requisitos, conectar o assistente de voz personalizado leva apenas algumas etapas:
- Criar um objeto
BotFrameworkConfigna chave de assinatura e na região. - Criar um objeto
DialogServiceConnectorusando o objetoBotFrameworkConfigacima. - Com o objeto
DialogServiceConnector, inicie o processo de escuta para um único enunciado. - Inspecione o
ActivityReceivedEventArgsretornado.
Observação
O SDK de Fala para C++, JavaScript, Objective-C, Python e Swift dá suporte a assistentes de voz personalizados, mas ainda não incluímos um guia a respeito.
Veja ou baixe todas as Amostras em C# do SDK de Fala no GitHub.
Pré-requisitos
Antes de começar, é preciso:
- Criar um recurso de Fala
- Configurar seu ambiente de desenvolvimento e criar um projeto vazio
- Criar um bot conectado ao canal de Fala do Direct Line
- Verificar se você tem acesso a um microfone para captura de áudio
Observação
Confira a lista de regiões compatíveis com assistentes de voz e implante seus recursos em uma dessas regiões.
Abra o projeto no Visual Studio
A primeira etapa é verificar se o projeto está aberto no Visual Studio.
Comece com código de texto clichê
Vamos adicionar um código que funciona como um esqueleto para o projeto.
No Gerenciador de Soluções, abra
MainPage.xaml.Na exibição XAML do designer, substitua todo o conteúdo pelo seguinte snippet que define uma interface do usuário rudimentar:
<Page
    x:Class="helloworld.MainPage"
    xmlns="http://schemas.microsoft.com/winfx/2006/xaml/presentation"
    xmlns:x="http://schemas.microsoft.com/winfx/2006/xaml"
    xmlns:local="using:helloworld"
    xmlns:d="http://schemas.microsoft.com/expression/blend/2008"
    xmlns:mc="http://schemas.openxmlformats.org/markup-compatibility/2006"
    mc:Ignorable="d"
    Background="{ThemeResource ApplicationPageBackgroundThemeBrush}">

    <Grid>
        <StackPanel Orientation="Vertical" HorizontalAlignment="Center"
                    Margin="20,50,0,0" VerticalAlignment="Center" Width="800">
            <Button x:Name="EnableMicrophoneButton" Content="Enable Microphone"
                    Margin="0,0,10,0" Click="EnableMicrophone_ButtonClicked"
                    Height="35"/>
            <Button x:Name="ListenButton" Content="Talk to your bot"
                    Margin="0,10,10,0" Click="ListenButton_ButtonClicked"
                    Height="35"/>
            <StackPanel x:Name="StatusPanel" Orientation="Vertical"
                        RelativePanel.AlignBottomWithPanel="True"
                        RelativePanel.AlignRightWithPanel="True"
                        RelativePanel.AlignLeftWithPanel="True">
                <TextBlock x:Name="StatusLabel" Margin="0,10,10,0"
                           TextWrapping="Wrap" Text="Status:" FontSize="20"/>
                <Border x:Name="StatusBorder" Margin="0,0,0,0">
                    <ScrollViewer VerticalScrollMode="Auto"
                                  VerticalScrollBarVisibility="Auto" MaxHeight="200">
                        <!-- Use LiveSetting to enable screen readers to announce
                             the status update. -->
                        <TextBlock
                            x:Name="StatusBlock" FontWeight="Bold"
                            AutomationProperties.LiveSetting="Assertive"
                            MaxWidth="{Binding ElementName=Splitter, Path=ActualWidth}"
                            Margin="10,10,10,20" TextWrapping="Wrap"  />
                    </ScrollViewer>
                </Border>
            </StackPanel>
        </StackPanel>
        <MediaElement x:Name="mediaElement"/>
    </Grid>
</Page>
O modo de exibição de Design é atualizado para mostrar a interface do usuário do aplicativo.
- No Gerenciador de Soluções, abra o arquivo de origem code-behind
MainPage.xaml.cs. (Ele está agrupado emMainPage.xaml.) Substitua o conteúdo deste arquivo pelo seguinte, que inclui:
usinginstruções para os namespacesSpeecheSpeech.DialogUma implementação simples para garantir o acesso ao microfone, conectado a um manipulador de botão
Auxiliares básicos de interface do usuário para apresentar erros e mensagens no aplicativo
Um ponto inicial para o caminho do código de inicialização que será populado posteriormente
Um auxiliar para executar a conversão de texto em fala (sem suporte para streaming)
Um manipulador de botão vazio para iniciar a escuta que será populado mais tarde
using Microsoft.CognitiveServices.Speech;
using Microsoft.CognitiveServices.Speech.Audio;
using Microsoft.CognitiveServices.Speech.Dialog;
using System;
using System.Diagnostics;
using System.IO;
using System.Text;
using Windows.Foundation;
using Windows.Storage.Streams;
using Windows.UI.Xaml;
using Windows.UI.Xaml.Controls;
using Windows.UI.Xaml.Media;

namespace helloworld
{
    public sealed partial class MainPage : Page
    {
        private DialogServiceConnector connector;

        private enum NotifyType
        {
            StatusMessage,
            ErrorMessage
        };

        public MainPage()
        {
            this.InitializeComponent();
        }

        private async void EnableMicrophone_ButtonClicked(
            object sender, RoutedEventArgs e)
        {
            bool isMicAvailable = true;
            try
            {
                var mediaCapture = new Windows.Media.Capture.MediaCapture();
                var settings =
                    new Windows.Media.Capture.MediaCaptureInitializationSettings();
                settings.StreamingCaptureMode =
                    Windows.Media.Capture.StreamingCaptureMode.Audio;
                await mediaCapture.InitializeAsync(settings);
            }
            catch (Exception)
            {
                isMicAvailable = false;
            }
            if (!isMicAvailable)
            {
                await Windows.System.Launcher.LaunchUriAsync(
                    new Uri("ms-settings:privacy-microphone"));
            }
            else
            {
                NotifyUser("Microphone was enabled", NotifyType.StatusMessage);
            }
        }

        private void NotifyUser(
            string strMessage, NotifyType type = NotifyType.StatusMessage)
        {
            // If called from the UI thread, then update immediately.
            // Otherwise, schedule a task on the UI thread to perform the update.
            if (Dispatcher.HasThreadAccess)
            {
                UpdateStatus(strMessage, type);
            }
            else
            {
                var task = Dispatcher.RunAsync(
                    Windows.UI.Core.CoreDispatcherPriority.Normal,
                    () => UpdateStatus(strMessage, type));
            }
        }

        private void UpdateStatus(string strMessage, NotifyType type)
        {
            switch (type)
            {
                case NotifyType.StatusMessage:
                    StatusBorder.Background = new SolidColorBrush(
                        Windows.UI.Colors.Green);
                    break;
                case NotifyType.ErrorMessage:
                    StatusBorder.Background = new SolidColorBrush(
                        Windows.UI.Colors.Red);
                    break;
            }
            StatusBlock.Text += string.IsNullOrEmpty(StatusBlock.Text)
                ? strMessage : "\n" + strMessage;

            if (!string.IsNullOrEmpty(StatusBlock.Text))
            {
                StatusBorder.Visibility = Visibility.Visible;
                StatusPanel.Visibility = Visibility.Visible;
            }
            else
            {
                StatusBorder.Visibility = Visibility.Collapsed;
                StatusPanel.Visibility = Visibility.Collapsed;
            }
            // Raise an event if necessary to enable a screen reader
            // to announce the status update.
            var peer = Windows.UI.Xaml.Automation.Peers.FrameworkElementAutomationPeer.FromElement(StatusBlock);
            if (peer != null)
            {
                peer.RaiseAutomationEvent(
                    Windows.UI.Xaml.Automation.Peers.AutomationEvents.LiveRegionChanged);
            }
        }

        // Waits for and accumulates all audio associated with a given
        // PullAudioOutputStream and then plays it to the MediaElement. Long spoken
        // audio will create extra latency and a streaming playback solution
        // (that plays audio while it continues to be received) should be used --
        // see the samples for examples of this.
        private void SynchronouslyPlayActivityAudio(
            PullAudioOutputStream activityAudio)
        {
            var playbackStreamWithHeader = new MemoryStream();
            playbackStreamWithHeader.Write(Encoding.ASCII.GetBytes("RIFF"), 0, 4); // ChunkID
            playbackStreamWithHeader.Write(BitConverter.GetBytes(UInt32.MaxValue), 0, 4); // ChunkSize: max
            playbackStreamWithHeader.Write(Encoding.ASCII.GetBytes("WAVE"), 0, 4); // Format
            playbackStreamWithHeader.Write(Encoding.ASCII.GetBytes("fmt "), 0, 4); // Subchunk1ID
            playbackStreamWithHeader.Write(BitConverter.GetBytes(16), 0, 4); // Subchunk1Size: PCM
            playbackStreamWithHeader.Write(BitConverter.GetBytes(1), 0, 2); // AudioFormat: PCM
            playbackStreamWithHeader.Write(BitConverter.GetBytes(1), 0, 2); // NumChannels: mono
            playbackStreamWithHeader.Write(BitConverter.GetBytes(16000), 0, 4); // SampleRate: 16kHz
            playbackStreamWithHeader.Write(BitConverter.GetBytes(32000), 0, 4); // ByteRate
            playbackStreamWithHeader.Write(BitConverter.GetBytes(2), 0, 2); // BlockAlign
            playbackStreamWithHeader.Write(BitConverter.GetBytes(16), 0, 2); // BitsPerSample: 16-bit
            playbackStreamWithHeader.Write(Encoding.ASCII.GetBytes("data"), 0, 4); // Subchunk2ID
            playbackStreamWithHeader.Write(BitConverter.GetBytes(UInt32.MaxValue), 0, 4); // Subchunk2Size

            byte[] pullBuffer = new byte[2056];

            uint lastRead = 0;
            do
            {
                lastRead = activityAudio.Read(pullBuffer);
                playbackStreamWithHeader.Write(pullBuffer, 0, (int)lastRead);
            }
            while (lastRead == pullBuffer.Length);

            var task = Dispatcher.RunAsync(
                Windows.UI.Core.CoreDispatcherPriority.Normal, () =>
            {
                mediaElement.SetSource(
                    playbackStreamWithHeader.AsRandomAccessStream(), "audio/wav");
                mediaElement.Play();
            });
        }

        private void InitializeDialogServiceConnector()
        {
            // New code will go here
        }

        private async void ListenButton_ButtonClicked(
            object sender, RoutedEventArgs e)
        {
            // New code will go here
        }
    }
}
Adicione o snippet de código a seguir ao corpo do método de
InitializeDialogServiceConnector. Esse código criar oDialogServiceConnectorcom as informações de assinatura.// Create a BotFrameworkConfig by providing a Speech service subscription key // the botConfig.Language property is optional (default en-US) const string speechSubscriptionKey = "YourSpeechSubscriptionKey"; // Your subscription key const string region = "YourServiceRegion"; // Your subscription service region. var botConfig = BotFrameworkConfig.FromSubscription(speechSubscriptionKey, region); botConfig.Language = "en-US"; connector = new DialogServiceConnector(botConfig);Observação
Confira a lista de regiões compatíveis com assistentes de voz e implante seus recursos em uma dessas regiões.
Observação
Para saber mais sobre como configurar, confira a documentação do Bot Framework para o canal de Fala do Direct Line.
Substitua as cadeias de caracteres
YourSpeechSubscriptionKeyeYourServiceRegionpor seus próprios valores da assinatura de fala e pela região.Acrescente o snippet de código a seguir ao final do corpo do método de
InitializeDialogServiceConnector. Esse código define manipuladores de eventos utilizados porDialogServiceConnectorpara comunicar suas atividades de bot, resultados de reconhecimento de fala e outras informações.// ActivityReceived is the main way your bot will communicate with the client // and uses bot framework activities connector.ActivityReceived += (sender, activityReceivedEventArgs) => { NotifyUser( $"Activity received, hasAudio={activityReceivedEventArgs.HasAudio} activity={activityReceivedEventArgs.Activity}"); if (activityReceivedEventArgs.HasAudio) { SynchronouslyPlayActivityAudio(activityReceivedEventArgs.Audio); } }; // Canceled will be signaled when a turn is aborted or experiences an error condition connector.Canceled += (sender, canceledEventArgs) => { NotifyUser($"Canceled, reason={canceledEventArgs.Reason}"); if (canceledEventArgs.Reason == CancellationReason.Error) { NotifyUser( $"Error: code={canceledEventArgs.ErrorCode}, details={canceledEventArgs.ErrorDetails}"); } }; // Recognizing (not 'Recognized') will provide the intermediate recognized text // while an audio stream is being processed connector.Recognizing += (sender, recognitionEventArgs) => { NotifyUser($"Recognizing! in-progress text={recognitionEventArgs.Result.Text}"); }; // Recognized (not 'Recognizing') will provide the final recognized text // once audio capture is completed connector.Recognized += (sender, recognitionEventArgs) => { NotifyUser($"Final speech to text result: '{recognitionEventArgs.Result.Text}'"); }; // SessionStarted will notify when audio begins flowing to the service for a turn connector.SessionStarted += (sender, sessionEventArgs) => { NotifyUser($"Now Listening! Session started, id={sessionEventArgs.SessionId}"); }; // SessionStopped will notify when a turn is complete and // it's safe to begin listening again connector.SessionStopped += (sender, sessionEventArgs) => { NotifyUser($"Listening complete. Session ended, id={sessionEventArgs.SessionId}"); };Adicione o snippet de código a seguir ao corpo do método
ListenButton_ButtonClickedna classeMainPage. Esse código configuraDialogServiceConnectorpara escutar, pois você já estabeleceu a configuração e registrou os manipuladores de eventos.if (connector == null) { InitializeDialogServiceConnector(); // Optional step to speed up first interaction: if not called, // connection happens automatically on first use var connectTask = connector.ConnectAsync(); } try { // Start sending audio to your speech-enabled bot var listenTask = connector.ListenOnceAsync(); // You can also send activities to your bot as JSON strings -- // Microsoft.Bot.Schema can simplify this string speakActivity = @"{""type"":""message"",""text"":""Greeting Message"", ""speak"":""Hello there!""}"; await connector.SendActivityAsync(speakActivity); } catch (Exception ex) { NotifyUser($"Exception: {ex.ToString()}", NotifyType.ErrorMessage); }
Compilar e executar o aplicativo
Agora está tudo pronto para você compilar o aplicativo e testar o assistente de voz personalizado usando o serviço de Fala.
Na barra de menus, escolha Compilar>Compilar Solução para compilar o aplicativo. Agora, o código deve compilar sem erros.
Escolha Depurar>Iniciar Depuração (ou pressione F5) para iniciar o aplicativo. A janela helloworld é exibida.
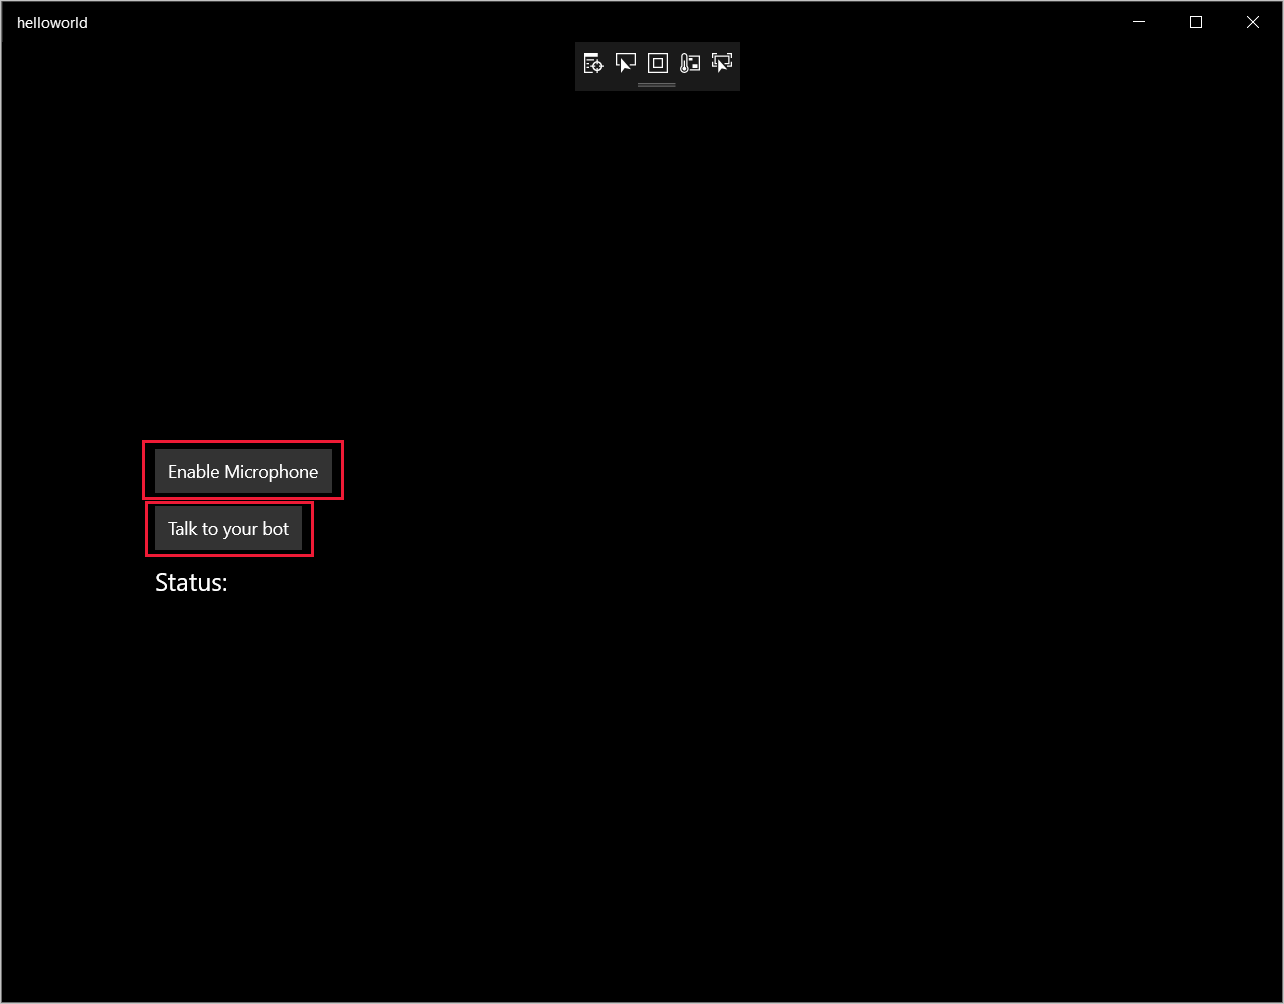
Selecione Habilitar Microfone e, quando a solicitação de permissão de acesso for exibida, selecione Sim.

Selecione Falar com o bot e fale uma frase ou uma sentença em inglês no microfone do dispositivo. Sua fala será transmitida para o canal de Fala do Direct Line e transcrita em texto, que será exibida na janela.
Próximas etapas
Veja ou baixe todas as Amostras em Java do SDK de Fala no GitHub.
Escolha o ambiente de destino
Pré-requisitos
Antes de começar, é preciso:
- Criar um recurso de Fala
- Configurar seu ambiente de desenvolvimento e criar um projeto vazio
- Criar um bot conectado ao canal de Fala do Direct Line
- Verificar se você tem acesso a um microfone para captura de áudio
Observação
Confira a lista de regiões compatíveis com assistentes de voz e implante seus recursos em uma dessas regiões.
Criar e configurar o projeto
Criar um projeto do Eclipse e instalar o SDK de Fala.
Além disso, para habilitar o log, atualize o arquivo pom.xml para incluir a seguinte dependência:
 <dependency>
     <groupId>org.slf4j</groupId>
     <artifactId>slf4j-simple</artifactId>
     <version>1.7.5</version>
 </dependency>
Adicionar código de exemplo
Para adicionar uma nova classe vazia ao projeto Java, selecione Arquivo>Novo>Classe.
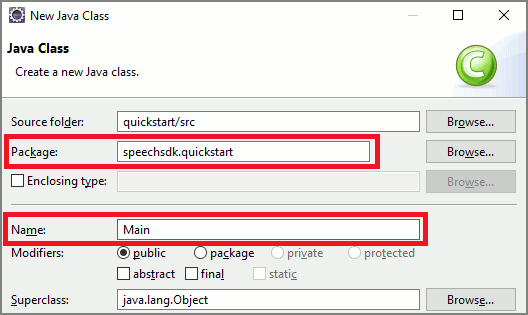
Na janela Nova Classe Java, insira speechsdk.quickstart no campo Pacote e Principal no campo Nome.
Abra a classe
Mainrecém-criada e substitua o conteúdo do arquivoMain.javapelo seguinte código inicial:package speechsdk.quickstart; import com.microsoft.cognitiveservices.speech.audio.AudioConfig; import com.microsoft.cognitiveservices.speech.audio.PullAudioOutputStream; import com.microsoft.cognitiveservices.speech.dialog.BotFrameworkConfig; import com.microsoft.cognitiveservices.speech.dialog.DialogServiceConnector; import org.slf4j.Logger; import org.slf4j.LoggerFactory; import javax.sound.sampled.AudioFormat; import javax.sound.sampled.AudioSystem; import javax.sound.sampled.DataLine; import javax.sound.sampled.SourceDataLine; import java.io.InputStream; public class Main { final Logger log = LoggerFactory.getLogger(Main.class); public static void main(String[] args) { // New code will go here } private void playAudioStream(PullAudioOutputStream audio) { ActivityAudioStream stream = new ActivityAudioStream(audio); final ActivityAudioStream.ActivityAudioFormat audioFormat = stream.getActivityAudioFormat(); final AudioFormat format = new AudioFormat( AudioFormat.Encoding.PCM_SIGNED, audioFormat.getSamplesPerSecond(), audioFormat.getBitsPerSample(), audioFormat.getChannels(), audioFormat.getFrameSize(), audioFormat.getSamplesPerSecond(), false); try { int bufferSize = format.getFrameSize(); final byte[] data = new byte[bufferSize]; SourceDataLine.Info info = new DataLine.Info(SourceDataLine.class, format); SourceDataLine line = (SourceDataLine) AudioSystem.getLine(info); line.open(format); if (line != null) { line.start(); int nBytesRead = 0; while (nBytesRead != -1) { nBytesRead = stream.read(data); if (nBytesRead != -1) { line.write(data, 0, nBytesRead); } } line.drain(); line.stop(); line.close(); } stream.close(); } catch (Exception e) { e.printStackTrace(); } } }No método
main, primeiro você configurará oDialogServiceConfige o usará para criar uma instância doDialogServiceConnector. Essa instância se conecta ao canal de Fala do Direct Line para interagir com o bot. Uma instância deAudioConfigtambém é usada para especificar a origem da entrada de áudio. Neste exemplo, o microfone padrão é usado comAudioConfig.fromDefaultMicrophoneInput().- Substitua a cadeia de caracteres
YourSubscriptionKeypela chave de recurso do Serviço Cognitivo do Azure para Fala, que você pode obter do portal do Azure. - Substitua a cadeia de caracteres
YourServiceRegionpela região associada ao seu recurso do Serviço Cognitivo do Azure para Fala.
Observação
Confira a lista de regiões compatíveis com assistentes de voz e implante seus recursos em uma dessas regiões.
final String subscriptionKey = "YourSubscriptionKey"; // Your subscription key final String region = "YourServiceRegion"; // Your speech subscription service region final BotFrameworkConfig botConfig = BotFrameworkConfig.fromSubscription(subscriptionKey, region); // Configure audio input from a microphone. final AudioConfig audioConfig = AudioConfig.fromDefaultMicrophoneInput(); // Create a DialogServiceConnector instance. final DialogServiceConnector connector = new DialogServiceConnector(botConfig, audioConfig);- Substitua a cadeia de caracteres
O conector
DialogServiceConnectordepende de vários eventos para comunicar as atividades do bot, os resultados de reconhecimento de fala e outras informações. Adicione esses ouvintes de eventos em seguida.// Recognizing will provide the intermediate recognized text while an audio stream is being processed. connector.recognizing.addEventListener((o, speechRecognitionResultEventArgs) -> { log.info("Recognizing speech event text: {}", speechRecognitionResultEventArgs.getResult().getText()); }); // Recognized will provide the final recognized text once audio capture is completed. connector.recognized.addEventListener((o, speechRecognitionResultEventArgs) -> { log.info("Recognized speech event reason text: {}", speechRecognitionResultEventArgs.getResult().getText()); }); // SessionStarted will notify when audio begins flowing to the service for a turn. connector.sessionStarted.addEventListener((o, sessionEventArgs) -> { log.info("Session Started event id: {} ", sessionEventArgs.getSessionId()); }); // SessionStopped will notify when a turn is complete and it's safe to begin listening again. connector.sessionStopped.addEventListener((o, sessionEventArgs) -> { log.info("Session stopped event id: {}", sessionEventArgs.getSessionId()); }); // Canceled will be signaled when a turn is aborted or experiences an error condition. connector.canceled.addEventListener((o, canceledEventArgs) -> { log.info("Canceled event details: {}", canceledEventArgs.getErrorDetails()); connector.disconnectAsync(); }); // ActivityReceived is the main way your bot will communicate with the client and uses Bot Framework activities. connector.activityReceived.addEventListener((o, activityEventArgs) -> { final String act = activityEventArgs.getActivity().serialize(); log.info("Received activity {} audio", activityEventArgs.hasAudio() ? "with" : "without"); if (activityEventArgs.hasAudio()) { playAudioStream(activityEventArgs.getAudio()); } });Conecte
DialogServiceConnectorà Fala do Direct Line invocando o métodoconnectAsync(). Para testar seu bot, invoque o métodolistenOnceAsyncpara enviar a entrada de áudio do microfone. Além disso, use também o métodosendActivityAsyncpara enviar uma atividade personalizada como uma cadeia de caracteres serializada. Essas atividades personalizadas podem fornecer dados adicionais que o bot usa na conversa.connector.connectAsync(); // Start listening. System.out.println("Say something ..."); connector.listenOnceAsync(); // connector.sendActivityAsync(...)Salve as alterações no arquivo
Main.Para dar suporte à reprodução de resposta, adicione uma classe extra que transforma o objeto PullAudioOutputStream retornado da API getAudio() em um InputStream Java para facilitar a manipulação. Este
ActivityAudioStreamé uma classe especializada que manipula a resposta de áudio do canal de Fala do Direct Line. Ele fornece acessadores para efetuar fetch das informações de formato de áudio necessárias para manipular a reprodução. Para fazer isso, selecione Arquivo>Novo>Classe.Na janela Nova Classe Java, insira speechsdk.quickstart no campo Pacote e ActivityAudioStream no campo Nome.
Abra a classe
ActivityAudioStreamrecém-criada e substitua-a pelo seguinte código:package com.speechsdk.quickstart; import com.microsoft.cognitiveservices.speech.audio.PullAudioOutputStream; import java.io.IOException; import java.io.InputStream; public final class ActivityAudioStream extends InputStream { /** * The number of samples played per second (16 kHz). */ public static final long SAMPLE_RATE = 16000; /** * The number of bits in each sample of a sound that has this format (16 bits). */ public static final int BITS_PER_SECOND = 16; /** * The number of audio channels in this format (1 for mono). */ public static final int CHANNELS = 1; /** * The number of bytes in each frame of a sound that has this format (2). */ public static final int FRAME_SIZE = 2; /** * Reads up to a specified maximum number of bytes of data from the audio * stream, putting them into the given byte array. * * @param b the buffer into which the data is read * @param off the offset, from the beginning of array <code>b</code>, at which * the data will be written * @param len the maximum number of bytes to read * @return the total number of bytes read into the buffer, or -1 if there * is no more data because the end of the stream has been reached */ @Override public int read(byte[] b, int off, int len) { byte[] tempBuffer = new byte[len]; int n = (int) this.pullStreamImpl.read(tempBuffer); for (int i = 0; i < n; i++) { if (off + i > b.length) { throw new ArrayIndexOutOfBoundsException(b.length); } b[off + i] = tempBuffer[i]; } if (n == 0) { return -1; } return n; } /** * Reads the next byte of data from the activity audio stream if available. * * @return the next byte of data, or -1 if the end of the stream is reached * @see #read(byte[], int, int) * @see #read(byte[]) * @see #available * <p> */ @Override public int read() { byte[] data = new byte[1]; int temp = read(data); if (temp <= 0) { // we have a weird situation if read(byte[]) returns 0! return -1; } return data[0] & 0xFF; } /** * Reads up to a specified maximum number of bytes of data from the activity audio stream, * putting them into the given byte array. * * @param b the buffer into which the data is read * @return the total number of bytes read into the buffer, or -1 if there * is no more data because the end of the stream has been reached */ @Override public int read(byte[] b) { int n = (int) pullStreamImpl.read(b); if (n == 0) { return -1; } return n; } /** * Skips over and discards a specified number of bytes from this * audio input stream. * * @param n the requested number of bytes to be skipped * @return the actual number of bytes skipped * @throws IOException if an input or output error occurs * @see #read * @see #available */ @Override public long skip(long n) { if (n <= 0) { return 0; } if (n <= Integer.MAX_VALUE) { byte[] tempBuffer = new byte[(int) n]; return read(tempBuffer); } long count = 0; for (long i = n; i > 0; i -= Integer.MAX_VALUE) { int size = (int) Math.min(Integer.MAX_VALUE, i); byte[] tempBuffer = new byte[size]; count += read(tempBuffer); } return count; } /** * Closes this audio input stream and releases any system resources associated * with the stream. */ @Override public void close() { this.pullStreamImpl.close(); } /** * Fetch the audio format for the ActivityAudioStream. The ActivityAudioFormat defines the sample rate, bits per sample, and the # channels. * * @return instance of the ActivityAudioFormat associated with the stream */ public ActivityAudioStream.ActivityAudioFormat getActivityAudioFormat() { return activityAudioFormat; } /** * Returns the maximum number of bytes that can be read (or skipped over) from this * audio input stream without blocking. * * @return the number of bytes that can be read from this audio input stream without blocking. * As this implementation does not buffer, this will be defaulted to 0 */ @Override public int available() { return 0; } public ActivityAudioStream(final PullAudioOutputStream stream) { pullStreamImpl = stream; this.activityAudioFormat = new ActivityAudioStream.ActivityAudioFormat(SAMPLE_RATE, BITS_PER_SECOND, CHANNELS, FRAME_SIZE, AudioEncoding.PCM_SIGNED); } private PullAudioOutputStream pullStreamImpl; private ActivityAudioFormat activityAudioFormat; /** * ActivityAudioFormat is an internal format which contains metadata regarding the type of arrangement of * audio bits in this activity audio stream. */ static class ActivityAudioFormat { private long samplesPerSecond; private int bitsPerSample; private int channels; private int frameSize; private AudioEncoding encoding; public ActivityAudioFormat(long samplesPerSecond, int bitsPerSample, int channels, int frameSize, AudioEncoding encoding) { this.samplesPerSecond = samplesPerSecond; this.bitsPerSample = bitsPerSample; this.channels = channels; this.encoding = encoding; this.frameSize = frameSize; } /** * Fetch the number of samples played per second for the associated audio stream format. * * @return the number of samples played per second */ public long getSamplesPerSecond() { return samplesPerSecond; } /** * Fetch the number of bits in each sample of a sound that has this audio stream format. * * @return the number of bits per sample */ public int getBitsPerSample() { return bitsPerSample; } /** * Fetch the number of audio channels used by this audio stream format. * * @return the number of channels */ public int getChannels() { return channels; } /** * Fetch the default number of bytes in a frame required by this audio stream format. * * @return the number of bytes */ public int getFrameSize() { return frameSize; } /** * Fetch the audio encoding type associated with this audio stream format. * * @return the encoding associated */ public AudioEncoding getEncoding() { return encoding; } } /** * Enum defining the types of audio encoding supported by this stream. */ public enum AudioEncoding { PCM_SIGNED("PCM_SIGNED"); String value; AudioEncoding(String value) { this.value = value; } } }Salve as alterações no arquivo
ActivityAudioStream.
Compilar e executar o aplicativo
Selecione F11 ou Executar>Depurar.
O console exibe a mensagem "Diga algo". Nesse momento, fale uma frase ou uma sentença em inglês que o bot possa entender. Sua fala é transmitida para o bot por meio do canal de Fala do Direct Line, no qual é reconhecido e processado pelo bot. A resposta é retornada como uma atividade. Se o bot retornar uma fala como resposta, o áudio será reproduzido usando a classe AudioPlayer.

Próximas etapas
Veja ou baixe todas as Amostras em Go do SDK de Fala no GitHub.
Pré-requisitos
Antes de começar:
- Criar um recurso de Fala
- Configurar seu ambiente de desenvolvimento e criar um projeto vazio
- Criar um bot conectado ao canal de Fala do Direct Line
- Verificar se você tem acesso a um microfone para captura de áudio
Observação
Confira a lista de regiões compatíveis com assistentes de voz e implante seus recursos em uma dessas regiões.
Configure seu ambiente
Atualize o arquivo go.mod com a versão mais recente do SDK adicionando esta linha
require (
    github.com/Microsoft/cognitive-services-speech-sdk-go v1.15.0
)
Comece com código de texto clichê
Substitua o conteúdo do arquivo de origem (por exemplo, quickstart.go) pelo seguinte, que inclui:
- definição do pacote "principal"
- importar os módulos necessários do SDK de Fala
- variáveis para armazenar as informações de bot que serão substituídas posteriormente neste início rápido
- uma implementação simples usando o microfone para entrada de áudio
- manipuladores de eventos para vários eventos que ocorrem durante a interação de fala
package main

import (
    "fmt"
    "time"

    "github.com/Microsoft/cognitive-services-speech-sdk-go/audio"
    "github.com/Microsoft/cognitive-services-speech-sdk-go/dialog"
    "github.com/Microsoft/cognitive-services-speech-sdk-go/speech"
)

func main() {
    subscription :=  "YOUR_SUBSCRIPTION_KEY"
    region := "YOUR_BOT_REGION"

    audioConfig, err := audio.NewAudioConfigFromDefaultMicrophoneInput()
    if err != nil {
        fmt.Println("Got an error: ", err)
        return
    }
    defer audioConfig.Close()
    config, err := dialog.NewBotFrameworkConfigFromSubscription(subscription, region)
    if err != nil {
        fmt.Println("Got an error: ", err)
        return
    }
    defer config.Close()
    connector, err := dialog.NewDialogServiceConnectorFromConfig(config, audioConfig)
    if err != nil {
        fmt.Println("Got an error: ", err)
        return
    }
    defer connector.Close()
    activityReceivedHandler := func(event dialog.ActivityReceivedEventArgs) {
        defer event.Close()
        fmt.Println("Received an activity.")
    }
    connector.ActivityReceived(activityReceivedHandler)
    recognizedHandle := func(event speech.SpeechRecognitionEventArgs) {
        defer event.Close()
        fmt.Println("Recognized ", event.Result.Text)
    }
    connector.Recognized(recognizedHandle)
    recognizingHandler := func(event speech.SpeechRecognitionEventArgs) {
        defer event.Close()
        fmt.Println("Recognizing ", event.Result.Text)
    }
    connector.Recognizing(recognizingHandler)
    connector.ListenOnceAsync()
    <-time.After(10 * time.Second)
}
Substitua os valores YOUR_SUBSCRIPTION_KEY e YOUR_BOT_REGION pelos valores reais do recurso de Fala.
Navegue até o portal do Azure e abra o recurso de Fala
Em Chaves e Ponto de Extremidade à esquerda, há duas chaves de assinatura disponíveis
- Use qualquer uma das duas como a substituição do valor
YOUR_SUBSCRIPTION_KEY
- Use qualquer uma das duas como a substituição do valor
Na Visão Geral à esquerda, observe a região e mapeie-a para o identificador da região
- Use o Identificador da região como a substituição do valor
YOUR_BOT_REGION, por exemplo:"westus"para Oeste dos EUA
Observação
Confira a lista de regiões compatíveis com assistentes de voz e implante seus recursos em uma dessas regiões.
Observação
Para saber mais sobre como configurar, confira a documentação do Bot Framework para o canal de Fala do Direct Line.
- Use o Identificador da região como a substituição do valor
Explicação de código
A região e a chave de assinatura da Fala são necessárias para criar um objeto de configuração de fala. O objeto de configuração é necessário para criar uma instância de um objeto de reconhecedor de fala.
A instância do reconhecedor expõe várias maneiras de reconhecer a fala. Neste exemplo, a fala é reconhecida continuamente. Essa funcionalidade informa ao serviço de Fala que você está enviando várias frases para reconhecimento e quando o programa é encerrado para interromper o reconhecimento de fala. Conforme os resultados são gerados, o código os grava no console.
Criar e executar
Agora está tudo pronto para você compilar o projeto e testar o assistente de voz personalizado usando o serviço de Fala.
- Crie seu projeto, por exemplo, "go build"
- Execute o módulo e fale uma frase ou uma sentença no microfone do dispositivo. Sua fala será transmitida para o canal de Fala do Direct Line e transcrita em texto, que aparecerá como a saída.
Observação
O SDK de Fala usa como padrão o reconhecimento do uso de en-us como idioma; confira Como reconhecer a fala para obter informações sobre como escolher o idioma de origem.
Próximas etapas
Compatibilidade com outros idiomas e plataformas
Se você clicou nessa guia, provavelmente não viu um início rápido em sua linguagem de programação favorita. Não se preocupe, temos outros materiais de início rápido e exemplos de código disponíveis no GitHub. Use a tabela para encontrar o exemplo correto para a sua linguagem de programação e combinação de plataforma/sistema operacional.
| Linguagem | Exemplos de código |
|---|---|
| C# | .NET Framework, .NET Core, UWP, Unity |
| C++ | Windows, Linux, macOS |
| Java | Android, JRE |
| JavaScript | Browser, Node.js |
| Objective-C | iOS, macOS |
| Python | Windows, Linux, macOS |
| Swift | iOS, macOS |
