Configure WAP for KCD with Web App
This article will help you configure the WAP to do Kerberos Constrained Delegation to the Back end Web-app.
Before we start, I would like to add some prerequisites and here they are:
* Access to AD Objects( WAP Computer object)
* WAP Configured in Domain
* Access to ADFS to add the Relying party trust
* Web application in the Back end compatible with KCD
Configuring Back-end Server
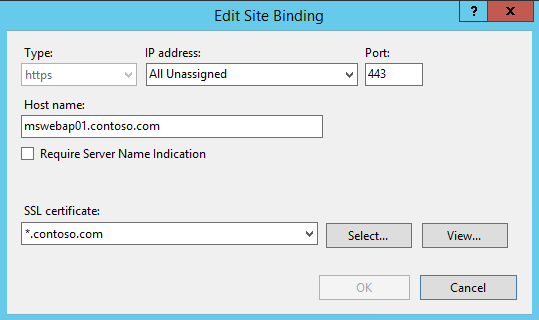
In my Case, I am keeping it very simple by using IIS on a Windows 2012 R2 server & I use the Default web site. To run the site over SSL, you will also need to bind the certificate to the Default web Site. Go
to Bindings on the Default Web Site under IIS and add the desired certificate as shown below.
Now you need to reset your IIS to make sure that the changes take effect.
Configuring Relying Party Trust in ADFS
We will now add the Relying party Trust for the Site under ADFS. To do so, open ADFS Management and Click on Relying Party Trusts as below:
In the Right hand Side Pane, Click on Add Non-Claims-Aware Relying Party Trust
A new Wizard will start, Click Next and Specify the name of this Trust
In the next screen, add the Identifier as below [ you would have to change this as per the desired configuration in your environment]
Keep the default selection in the next screen
Click Close and an Issuance Authorization Rules will automatically open. If not, open up Edit Issuance Authorization Rules for the Relying
Party that you have just added
Click Add Rule, and select Permit All Users from the drop down
Click Next, Finish and Apply. Now, that completes the Relying Party configuration on ADFS
Adding Delegation to the WAP Computer Object on AD
we will now add the required delegation on the WAP computer object. In my case, the WAP Server name is MSWAP01. So, locate the computer object.
Right click and Properties
Click on Delegation Tab and select Use any authentication Protocol.
Click on Add and select the back-end web application server for the service Type http ( in my case it will be MSWEBAP01)
Click Apply.
Please refer the article https://technet.microsoft.com/en-in/library/cc731241.aspx to set SPN.
Publishing the Web Application on WAP
Now, on the Web Application Proxy configuration Console, Click on Publish
Click Next in the Wizard and select Preauthentication method as ADFS & Click Next.
You should now see the Relying party that you have added on the ADFS ( in this case it would webapkcd). Select the same and click Next
In the next screen, provide the URL details and select the certificate that has desired CN along with the SPN
Click Next & click on Publish, that completes the Publishing part.
Testing the published application
In order to test the application, make sure your ADFS service name and
Externally published application names are resolvable from the DNS
Standpoint.
Try to access the site https://portal.contoso.com and you would be redirected to ADFS Authentication page
If everything is working as expected, you should see the default IIS Page as below.
I hope this helps.
Author: Shashanka Haritsa
Technical Lead
Microsoft CSS
Comments
Anonymous
March 31, 2015
Awesome Post!!! BINGO!!!Anonymous
March 31, 2015
The comment has been removed


