Supporting Applications with Unified Write Filter
Posted By J.T. Kimbell
Program Manager
Hey everyone. You may have noticed posts were a bit sparser during the month of September as I was out on paternity leave spending time with my new little boy. However, I’m back and we’re ready to get the content flowing again.
We’ve had the privilege this summer of having quite a few interns in Windows Embedded and you’ve heard from five of them including Jordan Goldberg, the author of this post. In Jordan’s first post, he told us about his summer and his work on a Windows Debugger extension for Unified Write Filter (UWF). This time, he gets technical and explains the work needed to ensure your application functions correctly on a system with UWF enabled. To see any of the previous posts from our interns, click one of the links below.
Greetings from Redmond! Today I want to take some time to talk about a new feature in Windows Embedded Standard 8, Unified Write Filters (UWF), and the best way for adding support for applications. UWF takes the best of Enhanced Write Filter (EWF) and File-Based Write Filter (FBWF) and bundles in a few more features to create a complete Write Filter solution. As a quick overview, a Write Filter is a virtual overlay that can be applied to a volume and transparently capture all disk I/O. The overlay is then wiped each time a machine is rebooted. This can be useful in a scenario such as a public kiosk where all user data needs to be wiped after use. For more information on Unified Write Filters, check out this post.
The issue with supporting applications with Write Filters is that by default, all I/O is redirected to an overlay and wiped after reboot. This can be problematic for applications storing information in the registry and file system since the data will be lost regularly. In UWF, the way to prevent this is to set exclusions on the registry and file locations of where this information is being stored. This will cause the data to bypasses the overlay and get written directly to disk. However, applying these exclusions is not always user friendly since it can only be done through WMI, the Embedded Lockdown Manager (ELM) or the command line utility uwfmgr.exe.
 As an example, let’s focus on solving the scenario of allowing Windows Defender to function correctly with UWF. The remainder of this post will outline the steps of building the user friend solution of creating a Module that can be installed through Image Configuration Editor (ICE), Image Builder Wizard (IBW) or Deployment Image Servicing and Management (DISM) to apply the necessary UWF registry and file exclusions for Defender to work with UWF. The steps that will be taken are:
- Finding file/registry dependencies
- Applying UWF exclusions
- Building a module to apply the exclusions
So let’s get started!
How to Find File and Registry Dependencies
So what are file and registry dependencies for an application anyways? These dependencies are the locations of where an application is storing information such as: user data, software updates and application states. The inherent problem with using applications that have these dependencies on a UWF protected system is that the information gets wiped each time the system is rebooted.
 The easiest way to find dependencies of an application is to go right to the source and ask the people who built it. This is especially easy if you work within the company that built the application or have direct communication. However, if the goal is to support a third party application, you might not have access to the development team. In this case, you are best off looking for documentation outlining these dependencies or using a Sysinternals tool like Process Explorer to try and find the dependencies yourself.
Jumping back to the scenario of supporting Windows Defender with UWF. The main dependency for Defender is the updates to the anti-virus signature file. Signature-based detection is a method used by anti-virus applications to detect known malware on a system by looking for a specific signature that it leaves behind. These signature files are updated frequently and if UWF wipes the file every time the machine reboots, Windows Defender would not be able to properly protect the system.
Lucky for us, we have direct access to the Windows Defender team and have found out which file and registry locations are used to keep track of the signatures.
File Locations:
%SystemDrive%:\Program Files\Windows Defender
%SystemDrive%:\Windows\WindowsUpdate.log
%SystemDrive%:\Windows\Temp\MpCmdRun.log
%SystemDrive%:\ProgramData\Microsoft\Windows Defender
Registry Location:
HKEY_LOCAL_MACHINE\SOFTWARE\Microsoft\Windows Defender
Applying UWF Exclusions
So, now that we know which file and registry exclusions need to be applied for Windows Defender, we can go ahead and add them to the UWF exclusion list.
The uwfmgr.exe utility provides two great commands for adding these exclusions:
  1: uwfmgr.exe file add-exclusion <file-path>
  2: uwfmgr.exe registry add-exclusion <registry-key>
With these two commands, we can go ahead and put together a CMD file which will add the exclusions. We can then test Defender out with UWF to ensure it is working correctly and updates to the signature file are persisting after reboot.
Note: File exclusions cannot be applied to a volume that is not protected by UWF. Ensure that the CMD file starts by protecting the volume.
InstallDefenderUWFSupport.cmd
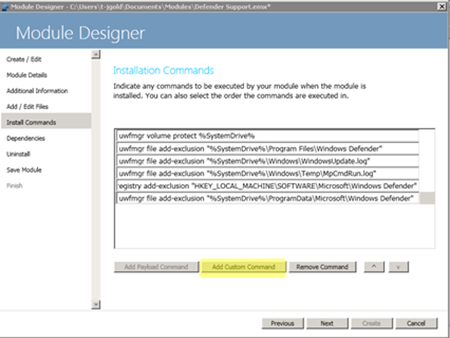
  1: uwfmgr volume protect %SystemDrive%
  2:
  3: uwfmgr file add-exclusion "%SystemDrive%\Program Files\Windows Defender"
  4: uwfmgr file add-exclusion "%SystemDrive%\Windows\WindowsUpdate.log"
  5: uwfmgr file add-exclusion "%SystemDrive%\Windows\Temp\MpCmdRun.log"
  6: uwfmgr file add-exclusion "%SystemDrive%\ProgramData\Microsoft\Windows Defender"
  7:
  8: uwfmgr registry add-exclusion "HKEY_LOCAL_MACHINE\SOFTWARE\Microsoft\Windows Defender"
UninstallDefenderUWFSupport.cmd
  1: uwfmgr file remove-exclusion "%SystemDrive%\Program Files\Windows Defender"
  2: uwfmgr file remove-exclusion "%SystemDrive%\Windows\WindowsUpdate.log"
  3: uwfmgr file remove-exclusion "%SystemDrive%\Windows\Temp\MpCmdRun.log"
  4: uwfmgr file remove-exclusion "%SystemDrive%\ProgramData\Microsoft\Windows Defender"
  5: uwfmgr registry remove-exclusion "HKEY_LOCAL_MACHINE\SOFTWARE\Microsoft\Windows Defender"
The two above CMD files will add and remove the necessary file and registry exclusions for Defender to work with UWF and we will use these same commands later when building a module.
Building the Module
In the above solution we created CMD files to add and remove the necessary file and registry exclusions for Windows Defender to work with UWF. This section will talk about how you can bundle the commands above into a Windows Embedded Module. Windows Embedded Modules are great because they can be installed three ways:
- Including in an image prior to installation with the ICE
- Installing along with an image using IBW
- Applying after the image has been installed using the DISM tool
To build a Module, Windows Embedded Tools comes with a great application called Module Designer. Module Designer is an easy to use wizard that will allow us to bundle the uwfmgr.exe exclusion commands into a user-friendly module.
Let’s go through the steps of creating a module for adding support for Windows Defender.
Step 1 – Creating the module
When you first start Module Designer, you’ll be presented with two options: “Create new module” or
“Edit existing module”. Make sure to choose the first and select next.
Step 2 – Module Details
In the next section, you will need to fill in some details about the module:
Notes:
- Catalog should be the path to the location of the Windows Embedded Catalog on your system
- The module should be architecture agnostic, so select both AMD64 and x86
- Choose the appropriate minimum OS version
- Place all UWF Application Support Modules under: \Lockdown\UWF Application Support
Step 3 – Additional Information
In this section, fill in the appropriate information for Description, Author, Version Number, etc.
Step 4 – Add/Edit Files
This section can be skipped since we are only applying uwfmgr.exe commands and no files need to be bundled with the module.
Step 5 – Install Commands
For this step, simply copy the contents from the InstallDefenderUWFSupport.cmd script above into the wizard by clicking the “Add Custom Command” button.
Step 6 – Setting Dependencies
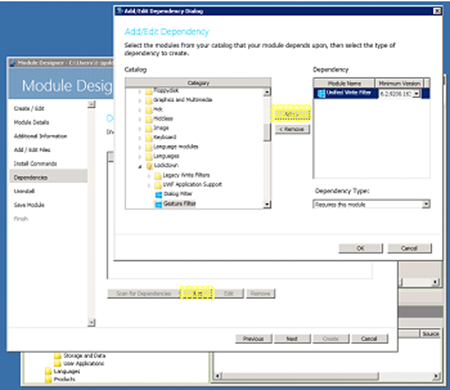
In this next section of the wizard, other modules can be added as dependencies to a module. Since uwfmgr.exe commands cannot be executed without UWF being on the system, add a “required” dependency for Unified Write Filters.
Step 7 – Uninstall Commands
In Step 5 we added Install Commands to add the exclusions. Now we must do the opposite and specify the commands needed for removing the exclusions. Simply copy the commands from the above UninstallDefenderUWFSupport.cmd.
Step 8 – Save the Module
The final step in the wizard is to simply save the module. It can then be distributed to users of the Application to be included in their Windows Embedded Catalog.
Conclusion
With the creation of your new module you should now have an EMX and EMD file located in “%SystemDrive%\Users\user-name\Documents\Modules”. These files can be included in the Windows Embedded Catalog so that users can easily apply the UWF exclusions that allow an application to work.
Here is a quick example of how a module can be applied through DISM:
1: DISM.exe /online /Add-Module:”<catalog-path>/Defender Support.emd”
And as stated above, the module can also be included in a Windows Embedded image through the Image Configuration Editor (ICE) and Image Builder Wizard (IBW).
Well, that wraps it up for this blog post. I hope you have enjoyed reading about how applications can be supported with UWF and you are ready to go build your own modules to provide support! If you need more information on creating Windows Embedded Modules, check out the help documents in Module Designer.


