The Data Source Window Support in WCF RIA Services
WCF RIA Services Beta was announced at PDC09 one week ago. It contains a lot of runtime support to make the experience of building a web business application much easier using Silverlight. Besides, there are also some tooling supports to help developers write less trivial code but to make the application work as expected. The Data Source Window support is one of them to help setting business objects data binding onto UI controls in a second. Actually, it is not a new concept in other technologies. The Data Source Window support for data-binding has been working for different technologies in VS2010, including WPF and WinForms. This article will use a simple application to show you how to leverage the Data Source Window support to do data-binding through a couple of drag-and-drops in WCF RIA Services scenarios.
Get ready to the project
To try it out, you need to install the WCF RIA Services Preview on VS2010 Beta2, which works on Silverlight 4. Then follow the steps below to display your business objects into the Data Source Window:
- 1. Create a new Silverlight 4 Application, and check “Enable .NET RIA Services” in the New Silverlight Application Wizard. The project template and wizard will create a client project and a server project with WCF RIA Services enabled.
- 2. On the Server project, add ADO.NET Entity Data Model item. Here the example uses Employee and EmployeeAddress tables in the AdventureWorks database.
- 3. Build the solution and add a new DomainService class into the Server project. Let’s call it EmployeeService and add the following code into the file:
public IQueryable<Employee> GetEmployees()
{
return this.ObjectContext.Employees.Include("EmployeeAddresses").OrderBy(e=>e.EmployeeID);
}
Also add [Include] attribute on the EmployeeAddresses property in Employee object in the metadata file like below:
[Include]
public EntityCollection<EmployeeAddress> EmployeeAddresses;
- 4. Build the solution. And now let’s open the MainPage.xaml and the Data Source Window through DataàShow Data Source Window. You will see that the business objects added into the solution has been displayed in the Data Source Window now like below:
Generate Employee details and EmployeeAddress data grid view
Suppose we want our UI to look like below to display Employee data and their EmployeeAddress information in a data grid view:
Let’s go through each of control one by one:
- 1. Adding an Employee details view with data-binding
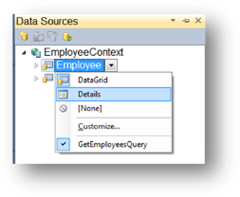
In the tree view of the Data Source Window, we can see the business objects and data fields are displayed together with control icons. The icons indicate which control will be generated after drag and drop to a container control (such as Grid, ScrollView, etc.) in the Silverlight designer surface. The Data Source Window set default controls based on the data type. From the picture above, we can see the default control for Employee is a DataGrid. But we definitely can change that by clicking the arrow button next to Employee:
Here, let’s choose Details in the drop-down list. We’ll see the icon has changed after clicking that:
The Data Source Window also allows us to add more control associations (including user custom controls) with a type through Customize Control Browser:
Now let’s drag the Employee node and drop it to the designer surface of MainPage.xaml. We will see the details view is generated for the Employee. Check the code in XAML, we’ll see the code is generated like below:
<Grid x:Name="LayoutRoot" Background="White">
<riaControls:DomainDataSource AutoLoad="True" Height="0" LoadedData="employeeDomainDataSource_LoadedData" Name="employeeDomainDataSource" QueryName="GetEmployeesQuery" Width="0">
<riaControls:DomainDataSource.DomainContext>
<my:EmployeeContext />
</riaControls:DomainDataSource.DomainContext>
</riaControls:DomainDataSource>
<Grid DataContext="{Binding ElementName=employeeDomainDataSource, Path=Data}" ....>
....
<TextBlock Text="Birth Date:" .... />
<TextBox Text="{Binding Path=BirthDate, Mode=TwoWay, ValidatesOnExceptions=true, NotifyOnValidationError=true}" .... />
....
</Grid>
</Grid>
The DomainDataSource is generated, and the generated input controls set the binding path to the DomainDataSource so as to load data. The validation is also enabled in the binding path.
Run the application, we will see Employee data is loaded into the details view without writing any code.
- 2. Associate a DataPager with the Employee details
To achieve this, you can follow the steps below:
a) Drag and drop a DataPager from the Toolbox (if you don’t find it, you can add that by right-click the Toolbox and select Choose Items…) to the designer surface.
b) Drag and drop Employee node to the DataPager that is just dropped on the designer.
c) In the property window, set PageSize of the DataPager to 1.
Now we can run the application and see how the DataPager works with the Employee details.
- 3. Add EmployeeAddress data grid view which is corresponding to what is selected in the Employee details view
To do so is pretty simple. The tree view also displays the relationships between business objects. For example, here we can see Employee has relationship with itself, as well as EmployeeAddress. Let’s drag and drop the EmployeeAddresses in the Employee tree to the designer surface. We will see a DataGrid is generated with columns customized through the Data Source Window.
Run the application. Now with each selected Employee, the DataGrid will display corresponding EmployeeAddress data.
As a matter of fact, the Data Source Window supports more scenarios than this. It will save a lot of coding time on some trivial data-binding work if it’s fully made use of. To get more information about it, check the walkthrough on MSDN, which will help you get full understanding about this feature. Enjoy!


