Developing a minimal STS with ADFS "2" Identity Framework (Part I: the STS itself)
I promised it, and I'm doing it. In this post I will give a simple walkthrough of developing an STS with the ADFS "2" Identity Framework. If you went to my breakout session at TechEd Europe, you can safely skip this post. I am not going to reveal anything more than I've already shown in that session, so if you're searching for new sneak peeks I've to disappoint you :-) Also. Please, PLEASE take into account that the API this is built on are not even CTP level. I am looking forward to your feedback, but please do not consider this final by any mean.
Now that things are simpler the audience can grow geometrically, hence I am going to relax my usual assumption that the reader knows what the heck an STS is; I'll spend few lines for explaining what it is all about, at least from the functional perspective. I still maintain the assumption that you know what is CardSpace and you are familiar with the Identity Metasystem roles: subject, RP & IP.
Loyal reader, you already know that stuff: feel free to jump to the "Let's write one STS" section.
What is an STS?
STS is an acronym that stands for Security Token Service. An STS is a special kind of web service, which has the hobby of issuing security tokens. Tokens are small artifacts, fragments of data that can be used for carrying cryptographic material (keys) and/or plain information (the famous claims); the tokens can also be used for performing cryptographic operations on messages, such as signatures or encryption. Clients send to the STS requests for issuing a certain security token type, and if the STS likes the request it will return the requested token. "the STS likes the request" can mean a number of different things: usually the request contains a security token to begin with, and the STS uses that token for understanding if the client really deserves to receive what it asked for. A client communicates with an STS using a predetermined set of messages, described in the WS-Trust specification. The most important messages are the Request for Security Token (RST), with which the client requests a security token; and the Request For Security Token Response (RSTR), with which the STS sends back the requested toke to the client. Using standard messages is especially important, because it allows the STS to process requests from any requestor, regardless of the platform or the technology it is implemented in: it's enough that all parties stick with the standard.
That's a lot to absorb in just few lines, but my purpose is not to give you a full explanation of what an STS is (for that there are the specs and some books (full disclosure: the link points to a book I coauthored)): here I am happy if I managed to convince you that an STS A) is a web service, albeit of special kind B) it spits tokens.
What is it useful for?
If I answer "to issue tokens" you are probably going to call me names, and I'd pretty much deserve it, though that's exactly the point.
Let's back off a bit from the STS, and let's spend a minute to reflect on the job of being an identity provider. What does it take to be an IP? First of all, you must know something about a certain set of subjects. This "something" can be as simple as knowing who belongs to that set and who doesn't, and can be as complex as knowing a lot of information. Who knows, maybe you're a bus driver and the only thing you can say is if somebody is on board of your bus or he is not; on the other end of the spectrum, you could be a medical facility that has a full database of the complete genetic profile of a number of people. In both cases, businesswise you have what it takes for being an IP. For being of any practical use, you also need somebody (an RP) that hold you in enough esteem to believe you when you express in a statement about the subjects you know (in our jargon we like to say that there's somebody who trusts you). Let's assume that both conditions are met: fantastic! We can start our career as IP. After all, it sounds simple. We equip our subjects with managed cards, which describe all the information we can state about them (for example we have a claim that states if we are albino); when a subject lands on the RP that trusts us and requires info we can provide ("are you albino?"), the subject can send our card and everybody is happy (all privacy considerations aside, for the sake of keeping this conversation simple).
This is exactly what happens, with one small detail to be addressed: despite what the CardSpace UI tells you, the card is not actually "sent". In fact, the card is just part of a handy metaphor that protects the common user from the desert of the real: the card represents the ability of obtaining a security token. Every time the subject selects your managed card and "sends" it, what really happens is that the selector shoots at you a RST; your job as IP is listening for such RSTs, and once you receive one you have to manufacture a suitable token and send it back. That token is what is really sent to the RP. See where I'm getting at? If you are an IP, you need an STS for making your cards work. When an STS is used by an IP, it has to perform the tasks in the (oversimplified) list below:
- listen for requests
- understand the incoming RST; formats, signatures, claims requested, audiences, security requirements, etc
- authenticate the incoming RST ("decide if it is happy with the request")
- retrieve the values for the requested claims
- package the requested claims in the requested security token format
- send back the token in an RSTR
Those tasks can be grouped in two big categories, tasks that are shared by pretty much all possible STSes and tasks that are specific to your solution. In the latter category we definitely find 4, and to some extend 3; everything else is pure STS play and you need to modify it only in fairly exotic scenarios (for example, if you want to issue a proprietary type of token).
None of the tasks above is rocket science; but the fact is that, unless you are in the business of manufacturing STS for others, it is less than ideal for you to write and maintain code that handles protocol details or check digital signatures. This is the spirit with which we propose a developer framework that takes care of the plumbing details, while offering a convenient mechanism for you to integrate your own logic (like claim values retrieving) without "getting your hands dirty" with protocol work. In the following section you'll see how the workflow of developing an STS with the ADFS "2" identity framework reflects this idea.
Let's write one STS
The STS is a web service; let's create an ASP.NET website for hosting it. That means doing the usual "File.." "New.." "Website".
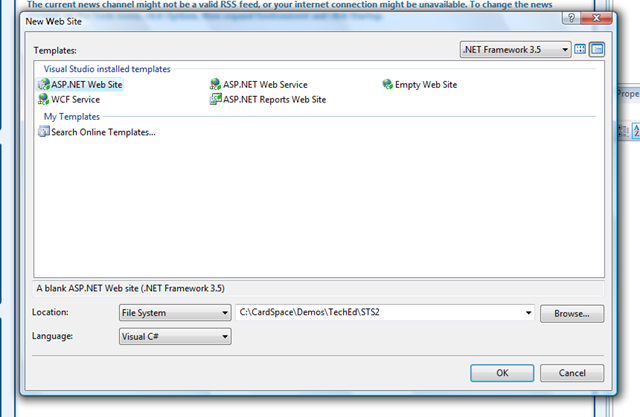
The path should point to a virtual dir (pardon: application), or you should create one.
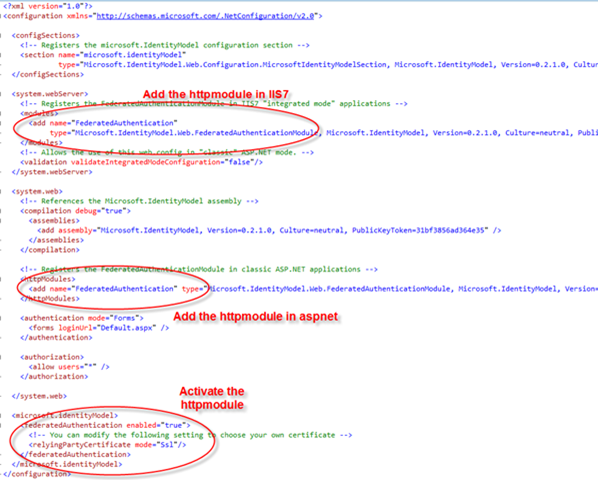
The first thing we want to do is modifying the web.config for activating the httpmodule we use for automate a lot of the validation work in the framework. Note that during the demo at teched at this point I used a single snippet for the entire config, since I already explained the new config lines while building the RP. Here I won't do it as well, it's just syntax and it may change.
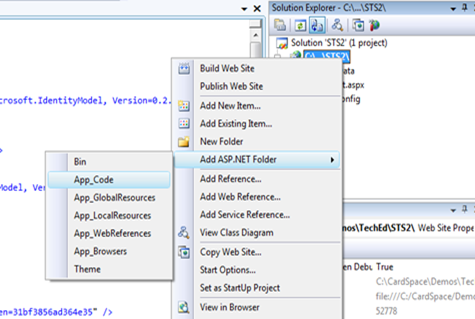
The we are finally able to add some code. Let's add the appropriate APSNET folder.
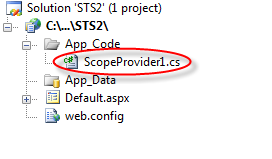
From where do we start to code? We should concentrate on what is strategic to us, that is to say our proprietary IP logic for retrieving claims. Fine! Let's add a code file and let's name it ScopeProvider1.cs, we'll see the reason of the name very soon.
The ScopeProvider is the mechanism we devised for allowing you to integrate your claim logic in the STS: you derive from the ScopeProvider class, and you override a couple of methods with your own logic. Below there's the skeleton of the class:
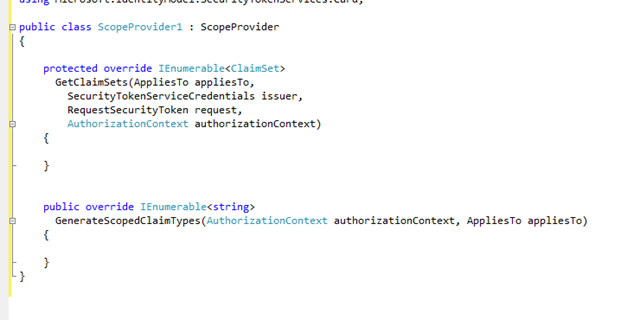
The method GenerateScopedClaimsTypes gives back a list of claims you intend to support for a given context. You can think of this as a way of providing the claim metadata of your STS. Below you can find an example; note that the collection of claims can contain just anything you decide, in this case we have an improbable "Accent" claim.

What else is left to do? The most important thing of all: retrieving the claim values when we receive a request. This is done overriding GetClaimSets. Note that GetClaimSets receives in input a lot of information about the request: appliesTo (the RP to which the token is destined once the subject will obtain it), the request itself, etc etc... those things are all important, and are used for determine if we are satisfied with the request and what are the details of the token we are requested to issue.
In this case we want something really very easy, so we'll substantially ignore the input and give back the same set of claims. After all, the star of this walkthrough is the STS itself and not the proprietary logic it must accommodate.
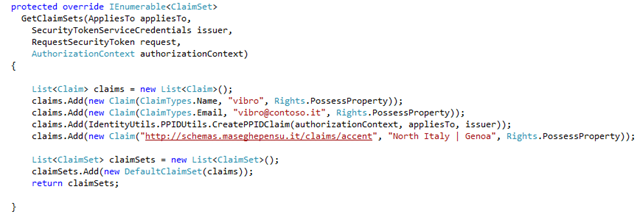
Very well, we have codified our claim issuing logic. Now, how do we plug it in an STS? Very easily.
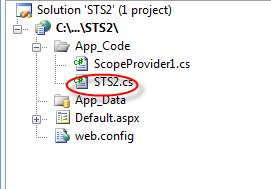
We add a new class file STS2.cs:
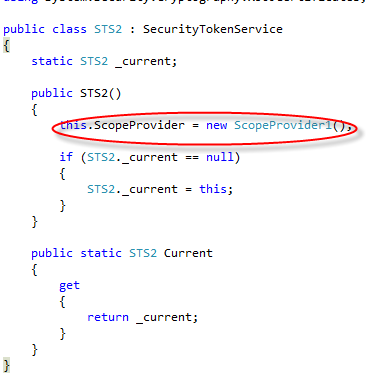
create an STS class, simply by deriving from SecurityTokenService. Then we assign a new instance of ScopeProvider1 to the ScopeProvider class, and voila'! Our STS class is ready! I can understand the people that says that this is way too simple :-)
Note that the static property we define here is a trick that will be useful when we will talk about provisioning. Ignore it for the time being.
The last thing we need to do it actually providing an endpoint through which our STS can listen to requests. In typical WCF style, this is accomplished by dropping in the virtual directory a proper SVC file. Create STS2.svc:
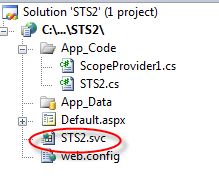
The content of the SVC file is very very easy, thanks to the Factory mechanism. Here we decide what is the method that our STS will have to use for authenticating requests; in this case I am using the factory that leverages Windows authentication ("kerberos"); if I wanted to use a different system I would use a different factory. Note that nothing prevents me from having different endpoints that are secured in different ways but use the same STS class (and ultimately the same ScopeProvider): I would just have to drop as many SVC files as I need.

And here we go! We have just to access the file via explorer to verify that our STS endpoint is up & running!
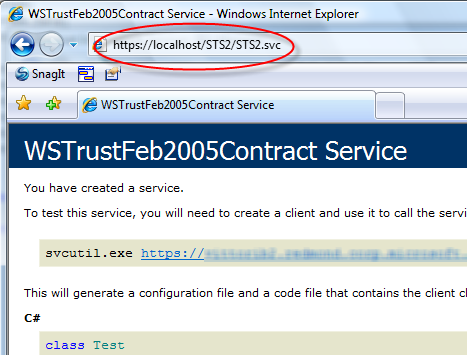
Now, showing the page above is not much of a test; it barely proves that the service is alive and that the metadata generation works. A decent test would include emitting a managed card and creating a suitable RP that could consume it. I have demonstrated both tasks during the TechEd demo, ADFS "2" makes those tasks extremely easy. I'll make a similar walkthrough in some other posts, so that we keep a nice separation of tasks (and now I get to watch at least one of the movies that NWA is offering via in flight entertainment system :-) I think I'll pick Tarzan, nice & relaxing).
So, let me summarize the steps above:
- Created a new website from the template
- Modified the web.config for using & configuring the ADFS "2" httpmodule
- Added ASPNET code folder
- Created a scope provider class file ScopeProvider1.cs
- Implemented GeneratedScopedClaimSet for returning the list of supported claims
- Implemented GetClaimSets for retrieving claim values and returning them
- Added STS2.cs class file.
- Derived a class from SecurityTokenService, initialized the ScopeProvider property to an instance of our ScopeProvider class
- Created the STS2.svc file
Those are the main developing tasks; I don't know how I could make this more pragmatic :-).
Of course that's the minimal STS, and if you have special needs you may want to customize further here and there; however, I believe that in many cases you won't have to do much more than the sequence described above.
OK, enough Live Writer for today. If you have questions, drop me a line :-) in the next days I may add the provisioning and consume parts. Stay tuned!
Comments
Anonymous
November 21, 2007
CardSpace AFDS 2.0, Identity Lab and WS-SX A few good things happened to CardSpace this week ( otherAnonymous
November 26, 2007
In this post I am going to show you an example of CardSpace and an Office application working together.Anonymous
November 26, 2007
In this post I am going to show you an example of CardSpace and an Office application working togetherAnonymous
November 29, 2007
Awesome! Keep the samples and discussion coming! When might we expect a general availability for these bits? Sorry I missed your session. :-)Anonymous
December 10, 2007
Here we are again. I can't believe it's already THREE weeks I've posted part I of this post! Well, thisAnonymous
December 10, 2007
Here we are again. I can't believe it's already THREE weeks I've posted part I of this postAnonymous
December 12, 2007
All right! Welcome to the last installment of this unusual multipart post: this time we are going toAnonymous
December 12, 2007
All right! Welcome to the last installment of this unusual multipart post: this time we are going toAnonymous
July 09, 2008
Ahh, I’ve been looking forward for this post for a looong time. We just made available for download the