Xbox Controller support to a Windows 8 HTML5/JS Game & a HTML5/JS Web Browser game
This game has been built using the Microsoft Platform Starter Kit Game RubbaRabbit platformer
We are actually going to consider two variants:
A game for Windows 8. x and Web Browser game.
GamePad support in Windows 8 using HTML and JavaScript
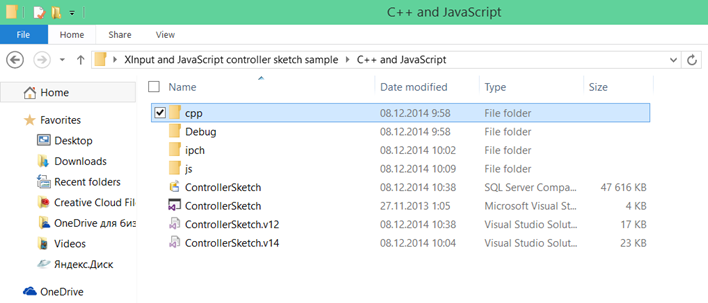
To enable gamepad support to the game which has been developed in HTML5/JavaScript on Windows 8. x you will need to learn how to work with XInput control class. There are a number of great examples available these include the JavaScript controller and XInput sketch.
These samples include some C++ code this C++ code is simply required as its the library project-strapping above XInput to enable it to be able to work in your HTML5/JS game
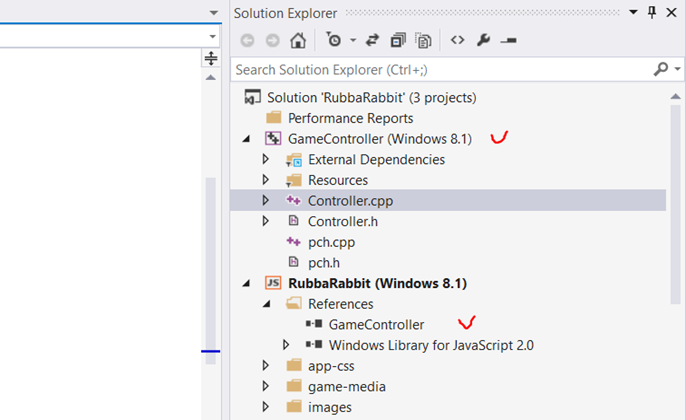
So firstly we need to add the game contraoller to the project. You need to add the C++ .cpp files and header .h files to your solution within the game and add a link to it within your project for Windows 8. x References:
If you wish, you can open up the C++ file with Visual Studio to see what they actually do, simply they are an interface to access the controller: the constructor to obtain a reference to the controller and function getState to retrieve its current state with the projection on the Xbox controller buttons.
Now you need to add support for the GamePad in the game itself. To do this, usually, you have to make quite a small change in processing input from the player.
The game loop
So the game loop is simply the code inside the game which loops on a regular cycle, The game loop forms every scene of the game. In our case we want to check whether the user pressed the button.
In this example the game loop is defined inside the function update:
    1: /**
    2:  * game simulation loop step - called every frame during play
    3:  */
    4: this.update = function () {
    5: ...
    6: }
You need to include the function which is processing the buttons and sticks:
    1: if (touchleft || jaws.pressed("left") || jaws.pressed("a")) {
    2:     player.vx = -move_speed; player.flipped = 1;
    3: }
    4: else if (touchright || jaws.pressed("right") || jaws.pressed("d")) {
    5:     player.vx = +move_speed; player.flipped = 0;
    6: }
    7:
    8: if (!player.attacking && (touchjump || jaws.pressed("up") || jaws.pressed("w") || jaws.pressed("space"))) {
    9:     if (!player.jumping && player.can_jump) {
   10:         sfxjump();
   11:         player.vy = jump_strength;
   12:         player.jumping = true;
   13:         player.can_jump = false;
   14:     }
   15: }
   16: else {
   17:     player.can_jump = true;
   18: }
As you can see, the engine developers are already taken care of that the user can send a command not only with different buttons with the keyboard jaws.pressed("a")
1: if (touchleft || jaws.pressed("left") || jaws.pressed("a"))
What nice is that they have also added support for virtual buttons on a touch device (variables touchleft, touchright , etc.).
1: if (touchleft || jaws.pressed("left") || jaws.pressed("a"))
Your code must have some variables that meet different game actions and imput controls which support various input methods/devices.
Adding Gamepad support
To add gamepad support is really simple
Firstly we need to initialize the controller and them simply check the status on a regular basis.
To initialize the controller we create a Controller via the designer that is available to us from the connected earlier C++ libraries:
    1: //Add Xbox Contoller support
    2: function initXboxpad() {
    3:     var controller = new GameController.Controller(0);
    4:
    5:     if (controller != null) {
    6:         updateState();
    7:     }
    8:
    9:     ...
   10: }
Next, we need to periodically update the status of the controller, for this will describe updateState feature that will query the call on every frame of the animation:
    1: //Add Xbox Contoller support
    2: function initXboxpad() {
    3:     var controller = new GameController.Controller(0);
    4:
    5:     // render loop
    6:     if (controller != null) {
    7:         updateState();
    8:     }
    9:
   10:     function updateState() {
   11:         var state = controller.getState();
   12:
   13:         if (state.connected) {
   14:             var x = state.leftThumbX / 32767;
   15:
   16:             touchleft = (x < -0.9);
   17:             touchright = (x > 0.9);
   18:
   19:             touchjump = state.a;
   20:             touchattack = state.x;
   21:             touchpause = state.start;
   22:         }
   23:         window.requestAnimationFrame(updateState);
   24:     }
   25: }
   26:
Note that in this case we've have added support for touch, keyboard and controller input so a variety of control methods could be used.
GamePad support in browser
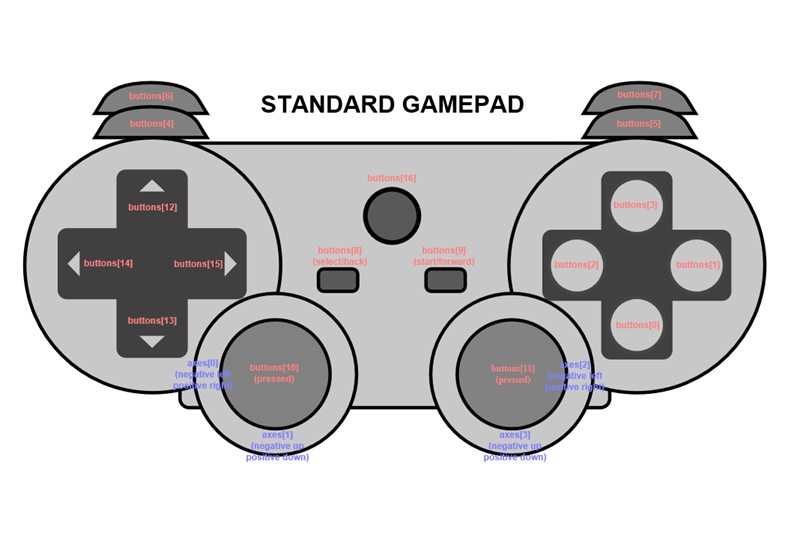
GamePad support is currently being developed in W3C standard Gamepad API that will consistently work with different types of game controllers and browsers.
The W3C standard assumes "General" model
For example, here is the documentation of Mozilla. The only thing I want to mention here is that it is out of date on the assumption Internet Explorer 11 Gamepad API are supported.
The game loop and game code
To demonstrate, I am continuing to use the same example of the Starter Kit, only this time, create an empty Web project and copy the original source files.
Because the game is simply HTML5/JS , the game simply runs in your browser. Everything else remains unchanged, and we use the same assumptions about the game loop, which we did for a project under Windows 8.
Gamepad support
What's great about HTML5/JS is that you can use code from the Babylon.js library which support gamepad input
babylon.gamepads.ts (GitHub). You can simply copy the library itself or make it a fork.
The library makes a few important things:
- The Gamepad API to simulate an event-driven model (if you need);
- makes it easy to access the individual elements of the controller (such as a joystick axis brings together into one object);
- distinguish between an Xbox controller
Please note that the library is written in TypeScript.
You can simply add the library inside the project, Visual Studio includes support for the TypeScript and automatically generates the .js files when saving.
Do not forget to connect the library to the page with the game:
1: <script src="js/babylon.gamepads.js"></script>
The wiring diagram of the controller is very similar to what we did in the case of Windows 8 x:
    1: //Add Xbox Contoller support
    2:    function initGamePad() {
    3:        var xboxpad;
    4:        function updateState() {
    5:            if (xboxpad != null && xboxpad.browserGamepad.connected) {
    6:                xboxpad.update();
    7:                touchleft = (xboxpad.leftStick.x < -0.9);
    8:                touchright = (xboxpad.leftStick.x > 0.9);
    9:                touchjump = (xboxpad.buttonA == 1);
   10:                touchattack = (xboxpad.buttonX == 1);
   11:                touchpause = (xboxpad.buttonStart == 1);
   12:            }
   13:            window.requestAnimationFrame(updateState);
   14:        }
   15:        var gamepadConnected = function (gamepad) {
   16:            if (gamepad instanceof BABYLON.Xbox360Pad) {
   17:                xboxpad = gamepad;
   18:                updateState();
   19:            }
   20:        };
   21:        var gamepads = new BABYLON.Gamepads(gamepadConnected);
   22:    }
Inside features BABYLON.Gamepads is passed to an event handler connection controller from your computer. As you can see, adding support to the project controller is about 20 lines of code
Version of the code with event-based programming model:
    1: //Add Xbox Contoller support
    2:    function initGamePad() {
    3:        var xboxpad;
    4:        var gamepadConnected = function (gamepad) {
    5:            if (gamepad instanceof BABYLON.Xbox360Pad) {
    6:                xboxpad = gamepad;
    7:                xboxpad.onleftstickchanged(function (values) {
    8:                    var x = values.x;
    9:                    touchleft = (x < -0.9);
   10:                    touchright = (x > 0.9);
   11:                });
   12:                xboxpad.onbuttondown(function (button) {
   13:                    switch (button) {
   14:                        case BABYLON.Xbox360Button.A:
   15:                            touchjump = true;
   16:                            break;
   17:                        case BABYLON.Xbox360Button.X:
   18:                            touchattack = true;
   19:                            break;
   20:                        case BABYLON.Xbox360Button.Start:
   21:                            touchpause = true;
   22:                            break;
   23:                    }
   24:                });
   25:
   26:                xboxpad.onbuttonup(function (button) {
   27:                    switch (button) {
   28:                        case BABYLON.Xbox360Button.A:
   29:                            touchjump = false;
   30:                            break;
   31:                        case BABYLON.Xbox360Button.X:
   32:                            touchattack = false;
   33:                            break;
   34:                        case BABYLON.Xbox360Button.Start:
   35:                            touchpause = false;
   36:                            break;
   37:                    }
   38:                });
   39:            }
   40:        };
   41:        var gamepads = new BABYLON.Gamepads(gamepadConnected);
   42:    }
As a result, we can easily control the character in the game directly from the Xbox controller
Useful links
- Starter-Kits for games on the Windows 8: Platformer Starter Kit, Tower Defence Starter Kit
- XInput + JavaScript example for Windows 8
- W3C GamePad API W3C Draft standard for browsers
- babylon.gamepads.ts Wrapper on the GamePad API
- Microsoft Virtual Academy Course on the development of universal applications for HTML/JS
- Download Visual Studio
- Become a Windows 8 and Windows Phone developer
- Windows Insider - Get access to Windows 10 Preview


