Fun with Ink & XAML Part3: Ink Data Binding
Data binding in WPF provides a great way for applications to present and interact with data. Elements can be bound to data from a variety of data sources - for example XML files. I have put together a sample that uses data binding to retrieve a collection of handwritten ink documents from a data store (XML file), present it to the user and let the user interact with it. As always in this series, the task is accomplished by markup only - no code behind required. The sample markup (and the data file) is attached to this post.
Let's take a look at the sample markup, specifically what's inside the <Grid.Resources> tag. I have highlighted the sections that are relevant for the data binding:
<Grid.Resources>
<XmlDataProvider x:Key="InkData" Source="inkdata.xml" XPath="InkFiles"/>
<DataTemplate x:Key="InkDataTemplate">
<StackPanel>
<TextBlock HorizontalAlignment="Center" Foreground="Red"
Text="{Binding XPath=@FileName}"/>
<InkPresenter HorizontalAlignment="Center"
LayoutTransform="0.2,0,0,0.2,0,0">
<InkPresenter.Strokes>
<Binding XPath="@Strokes"/>
</InkPresenter.Strokes>
</InkPresenter>
<Separator/>
</StackPanel>
</DataTemplate>
</Grid.Resources>
The first item here is the XmlDataProvider. This class facilitates the access to XML data for data binding. The other item, our DataTemplate, defines how the data is being presented: The 'FileName' value gets assigned to a <TextBlock/> and the 'Strokes' value gets assigned to the Strokes property of an <InkPresenter/>.
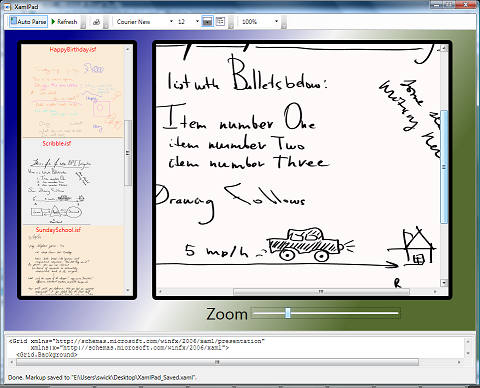
To see how these two resources are being used in the actual UI markup, let's inspect the ListBox element. The ListBox is being used to display a thumbnail view of all ink documents in the data store and to let the user choose which document they want to view or edit.
<ListBox Name="lbStrokes" Background="AntiqueWhite"
ItemsSource="{Binding Source={StaticResource InkData},
XPath=InkFile}"
ItemTemplate="{StaticResource InkDataTemplate}"/>
Now to view and interact with the selected item from our ListBox, we are adding a larger InkCanvas element that is data-bound to the ListBox. So when the user selects a new ink note from the list, that document gets loaded into the InkCanvas automatically. Here is the relevant markup to set up that binding:
<InkCanvas DataContext="{Binding ElementName=lbStrokes,Path=SelectedItem}"
Strokes="{Binding XPath=@Strokes}"
Background="Snow">
Below is a screenshot of the sample that is attached to this post. To run it, unpack the .zip file and load the .xaml file into XamlPad - or just double-click it to open it in IE. Note that the data file (InkData.xml) must reside in the same location as the XAML file.

Next post in this series: Fun with Ink & XAML Part4: WPF BitmapEffects applied to Ink
Previous post in this series: Fun with Ink & Xaml - Part2: Zoom and Scroll
Comments
Anonymous
November 04, 2007
PingBack from http://blogs.msdn.com/swick/archive/2007/11/02/fun-with-ink-xaml-part2-zoom-and-scroll.aspxAnonymous
November 05, 2007
Want to create some fancy looking handwritten text or drawing? Tweaking the standard DrawingAttributesAnonymous
March 02, 2009
Hey how did you created your xml file ?