Azure App service: Using Custom domain with Azure Traffic Manager
Azure Traffic Manager provides a default hostname on Traffic manager creation. It is of the Format <TrafficManagerName>.trafficmanager.net. When we browse this URL, the Domain Name Server (DNS) resolves the Traffic Manager and it further redirects the requests to the most appropriate Endpoint.
If you decide to provide an alias (Custom URL) to the Azure Traffic manager, which in turn routes to the Azure App services, then you have landed at the right place.
Overview of the steps required to complete this configuration:
- Configure Azure Traffic Manager with the Endpoints as Azure App Service.
- Update the DNS records to point to the Azure Traffic Manager.
- Map the custom domains to the Azure Traffic Manager.
- Verification of Custom Domain configuration.
CONFIGURING TRAFFIC MANAGER
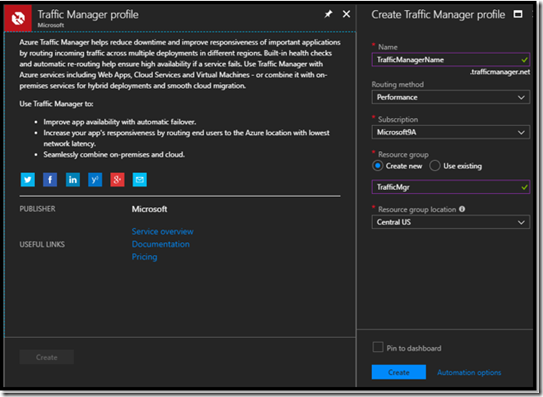
- Purchase an Azure Traffic manager profile.
2. Decide the method of routing:
- Priority based
- Weighted
- Performance
- Geographic
For more details about the types of routing, please refer the article -> Traffic Manager routing methods .
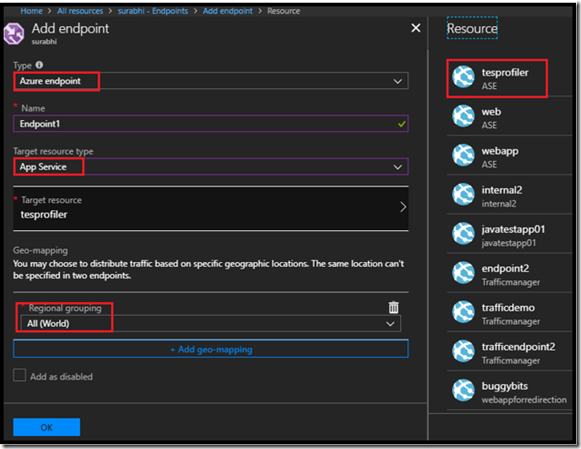
- Once you have decided the routing method, configure the endpoints for the traffic manager. (Azure App service in this scenario)
- In the Azure Traffic manager profile blade, in Settings section, click Endpoints.
- In the Endpoint blade, click Add, insert the necessary details.
- Select the Target resource type as App Service(slots), choose the Target resource and fill in the necessary details depending on the type of routing.
Note: Only WebApps with pricing tier Standard or above and in different regions can use Traffic Manager.
4. Repeat the above steps for all the endpoints.
UPDATING DNS RECORDS
Update DNS registry with a CNAME record pointing to the Azure Traffic Manager.
Do use this as a reference to configure DNS record:
Host is the Custom domain that you want to configure to your Traffic Manager. This points to your Traffic Manager <TrafficManagerName>.trafficmanager.net.
Note: Ensure that the TTL is of the minimum value. One might wonder why everyone mentions this, the reason behind this is TTL decides when the DNS cache is cleared, in case of the above CNAME record the cache is cleared every 600 seconds. Our intention here is to ensure that the DNS change propagates as soon as possible.
MAPPING CUSTOM DOMAIN
Once the DNS propagation is completed the next step will be to configure the custom domain to the Traffic Manager.
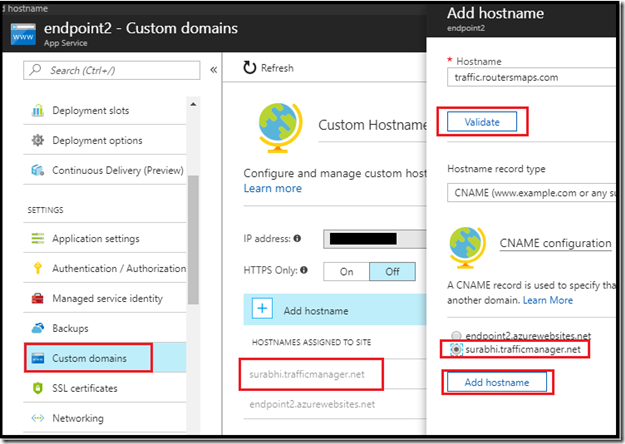
- Go to the Azure App services blade, in the Settings section, click Custom domains.
- Click Add hostname, enter the custom domain and click on Validate. You will see an option to either configure the custom domain to the Azure App service itself or to the Azure Traffic Manager. Go ahead and select Traffic Manager to which you have added this App service as an Endpoint.
Note: You will now be able to see the custom domain under the HOSTNAMES ASSIGNED TO SITE.
Repeat the above step for all the Endpoints configured to the Azure Traffic Manager and you will be good to go.
VERIFICATION OF DNS RECORDS
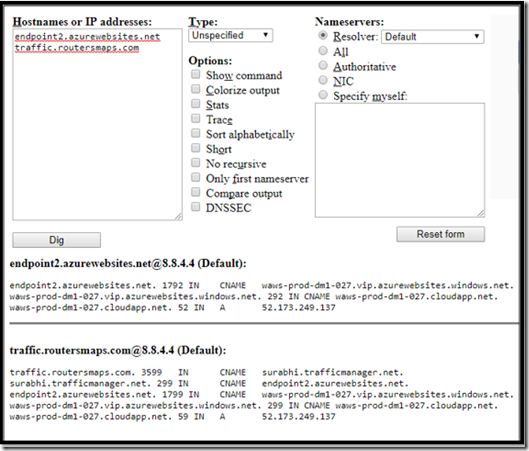
To verify whether the configuration was successfully setup., test cases and verify whether the traffic manager works for all the scenarios, one way to check whether the custom domain is mapped to the Azure WebApp Endpoints is to use Digwebinterface.
Your WebApps can now be accessed over the Traffic Manager. Ensure that you use Traffic manager to the best of its capabilities.


