Windows Server 2012 Shell game
Here's the scenario, you just downloaded the RTM ISO for Windows Server 2012 using your handy, dandy, "wondermus" Microsoft TechNet subscription. Using Hyper-V, you create a new virtual machine, mount the ISO and breeze through the setup screen until you are mesmerized by the Newton's cradle-like experience of the circular progress indicator
Click…click…click…click-- installation complete; the computer reboots.
You provide Windows Server with a new administrator password. Bam: done! Windows Server 2012 presents the credential provider screen and you logon using the newly created administrator account, and then…
Holy Shell, Batman! I don't have a desktop!
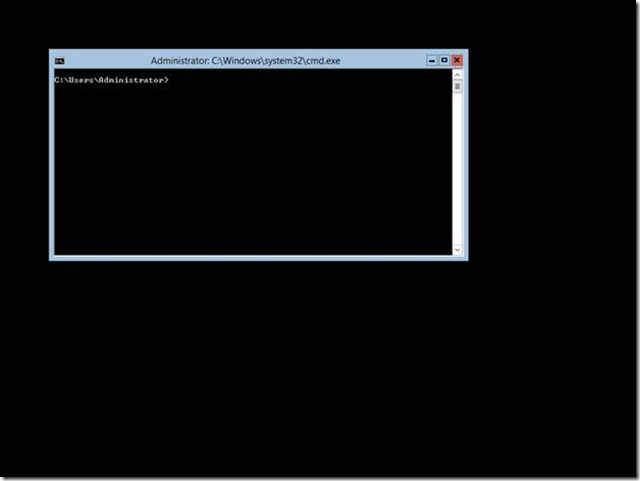
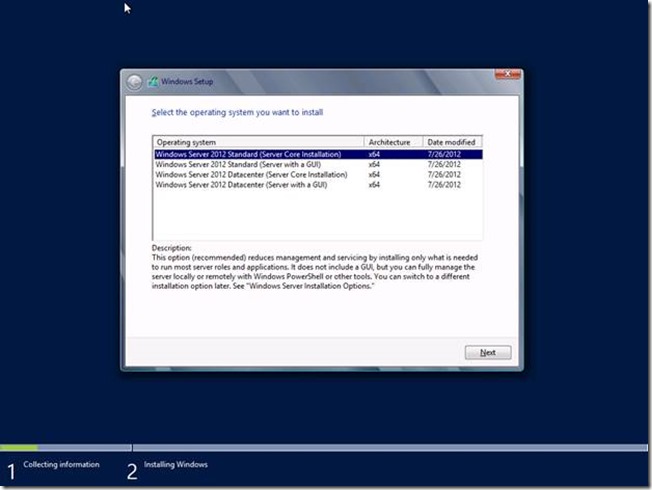
Hey everyone, Mike here again to bestow some Windows Server 2012 lovin'. The previously described scenario is not hypothetical-- many have experienced it when they installed the pre-release versions of Windows Server 2012. And it is likely to resurface as we move past Windows Server 2012 general availability on September 4. If you are new to Windows Server 2012, then you're likely one of those people staring at a command prompt window on your fresh installation. The reason you are staring at command prompt is that Windows Server 2012's installation defaults to Server Core and in your haste to try out our latest bits, you breezed right past the option to change it.
This may be old news for some of you, but it is likely that one or more of your colleagues is going to perform the very actions that I describe here. This is actually a fortunate circumstance as it enables me to introduce a new Windows Server 2012 feature.
There were two server installation types prior to Windows Server 2012: full and core. Core servers provide a low attack surface by removing the Windows Shell and Internet Explorer completely. However, it presented quite a challenge for many Windows administrators as Windows PowerShell and command line utilities were the only methods used to manage the servers and its roles locally (you could use most management consoles remotely).
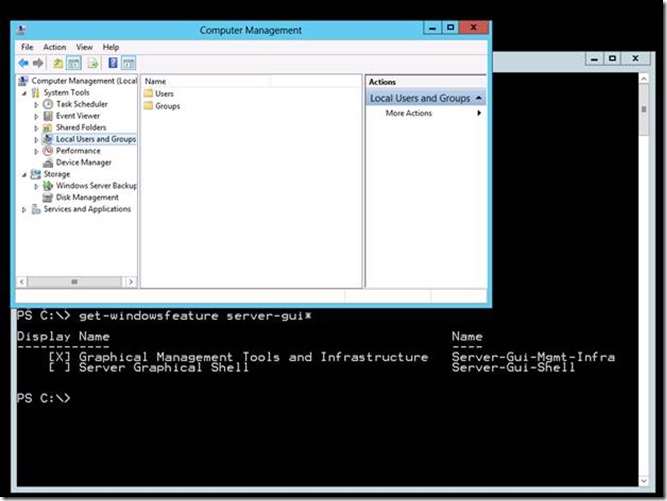
Those same two server installation types return in Windows Server 2012; however, we have added a third installation type: Minimal Server Interface. Minimal Server Interface enables most local graphical user interface management tasks without requiring you to install the server's user interface or Internet Explorer. Minimal Server Interface is a full installation of Windows that excludes:
- Internet Explorer
- The Desktop
- Windows Explorer
- Windows 8-style application support
- Multimedia support
- Desktop Experience
Minimal Server Interface gives Windows administrators - who are not comfortable using Windows PowerShell as their only option - the benefit a reduced attack surface and reboot requirement (i.e., on Patch Tuesday); yet GUI management while the ramp on their Windows PowerShell skills.
"Okay, Minimal Server Interface seems cool Mike, but I'm stuck at the command prompt and I want graphical tools. Now what?" If you were running an earlier version of Windows Server, my answer would be reinstall. However, you're running Windows Server 2012; therefore, my answer is "Install the Server Graphical Shell or Install Minimal Server Interface."
Windows Server 2012 enables you to change the shell installation option after you've completed the installation. This solves the problem if you are staring at a command prompt. However, it also solves the problem if you want to keep your attack surface low, but simply are a Windows PowerShell guru in waiting. You can choose Minimal Server Interface ,or you can decided to add the Server Graphical Interface for a specific task, and then remove it when you have completed that management task (understand, however, that switching between the Windows Shell requires you to restart the server).
Another scenario solved by the ability to add the Server Graphical Shell is that not all server-based applications work correctly on server core, or you cannot management them on server core. Windows Server 2012 enables you to try the application on Minimal Server Interface and if that does not work, and then you can change the server installation to include the Graphical Shell, which is the equivalent of the Server GUI installation option during the setup (the one you breezed by during the initial setup).
Removing the Server Graphical Shell and Graphical Management Tools and Infrastructure
Removing the Server shell from a GUI installation of Windows is amazingly easy. Start Server Manager, click Manage, and click Remove Roles and Features. Select the target server and then click Features. Expand User Interfaces and Infrastructure.
To reduce a Windows Server 2012 GUI installation to a Minimal Server Interface installation, clear the Server Graphical Shell checkbox and complete the wizard. To reduce a Windows Server GUI installation to a Server Core installation, clear the Server Graphical Shell and Graphical Management Tools and Infrastructure check boxes and complete the wizard.
Alternatively, you can perform these same actions using the Server Manager module for Windows PowerShell, and it is probably a good idea to learn how to do this. I'll give you two reasons why: It's wicked fast to install and remove features and roles using Windows PowerShell and you need to learn it in order to add the Server Shell on a Windows Core or Minimal Server Interface installation.
Use the following command to view a list of the Server GUI components
Get-WindowsFeature server-gui*
Give your attention to the Name column. You use this value with the Remove-WindowsFeature and Install-WindowsFeature PowerShell cmdlets.
To remove the server graphical shell, which reduces the GUI server installation to a Minimal Server Interface installation, run:
Remove-WindowsFeature Server-Gui-Shell
To remove the Graphical Management Tools and Infrastructure, which further reduces a Minimal Server Interface installation to a Server Core installation.
Remove-WindowsFeature Server-Gui-Mgmt-Infra
To remove the Graphical Management Tools and Infrastructure and the Server Graphical Shell, run:
Remove-WindowsFeature Server-Gui-Shell,Server-Gui-Mgmt-Infra
Adding Server Graphical Shell and Graphical Management Tools and Infrastructure
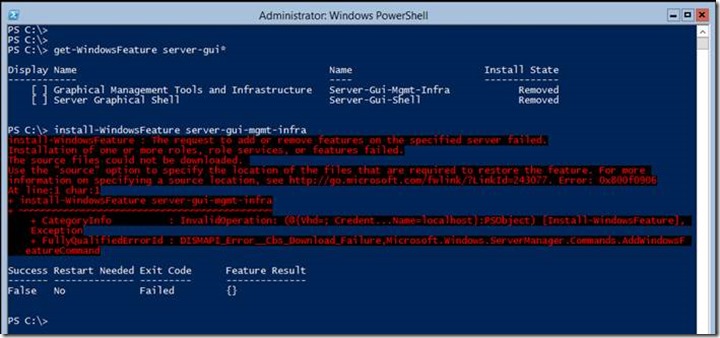
Adding Server Shell components to a Windows Server 2012 Core installation is a tad more involved than removing them. The first thing to understand with a Server Core installation is the actual binaries for Server Shell do not reside on the computers. This is how a Server Core installation achieves a smaller footprint. You can determine if the binaries are present by using the Get-WindowsFeature Windows PowerShell cmdlets and viewing the Install State column. The Removed value indicates the binaries that represent the feature do not reside on the hard drive. Therefore, you need to add the binaries to the installation before you can install them. Another indicator that the binaries do not exist in the installation is the error you receive when you try to install a feature that is removed. The Install-WindowsFeature cmdlet will proceed along as if it is working and then spend a lot of time around 63-68 percent before returning an error stating that it could not add the feature.
To stage Server Shell features to a Windows Core Installation
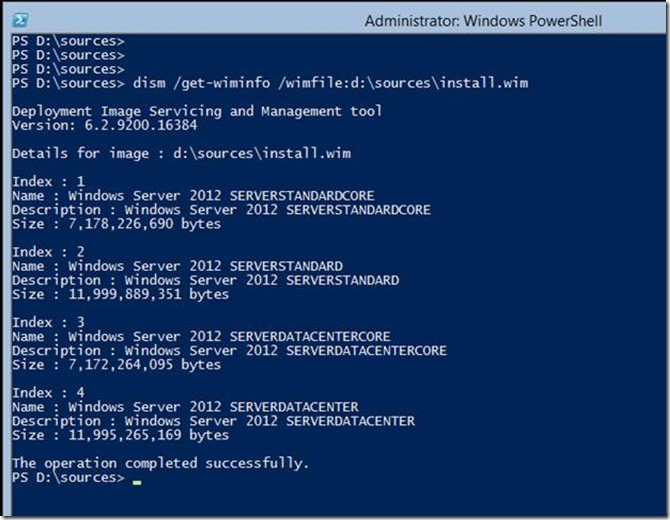
You need to get our your handy, dandy media (or ISO) to stage the binaries into the installation. Windows installation files are stored in WIM files that are located in the \sources folder of your media. There are two .WIM files on the media. The WIM you want to use for this process is INSTALL.WIM.
You use DISM.EXE to display the installation images and their indexes that are included in the WIM file. There are four images in the INSTALL.WIM file. Images with the index of 1 and 3 are Server Core installation images for Standard and Datacenter, respectively. Images with the indexes 2 and 4 are GUI installation of Standards and Datacenter, respectively. Two of these images contain the GUI binaries and two do not. To stage these binaries to the current installation, you need to use indexes 2 and 4 because these images contain the Server GUI binaries. An attempt to stage the binaries using indexes 1 or 3 will fail.
You still use the Install-WindowsFeature cmdlets to stage the binaries to the computer; however, we are going to use the -source argument to inform Install-WindowsFeature the image and index it should use to stage the Server Shell binaries. To do this, we use a special path syntax that indicates the binaries reside in a WIM file. The Windows PowerShell command should look like
Install-WindowsFeature server-gui-mgmt-infra,server-gui-shell -source:wim:d:\sources\install.wim:4
Pay particular attention to the path supplied to the -source argument. You need to prefix the path to your installation media's install.wim file with the keyword wim: You need to suffix the path with a :4, which represents the image index to use for the installation. You must always use an index of 2 or 4 to install the Server Shell components. The command should exhibit the same behavior as the previous one and proceeds up to about 68 percent, at which point it will stay at 68 percent for a quite a bit, (if it is working). Typically, if there is a problem with the syntax or the command it will error within two minutes of spinning at 68 percent. This process stages all the graphical user interface binaries that were not installed during the initial setup; so, give it a bit of time. When the command completes successfully, it should instruct you to restart the server. You can do this using Windows PowerShell by typing the Restart-Computer cmdlets.
Give the next reboot more time. It is actually updating the current Windows installation, making all the other components aware the GUI is available. The server should reboot and inform you that it is configuring Windows features and is likely to spend some time at 15 percent. Be patient and give it time to complete. Windows should reach about 30 percent and then will restart.
It should return to the Configuring Windows feature screen with the progress around 45 to 50 percent (these are estimates). The process should continue until 100 percent and then should show you the Press Ctrl+Alt+Delete to sign in screen
Done
That's it. Consider yourself informed. The next time one of your colleagues gazes at their accidental Windows Server 2012 Server Core installation with that deer-in-the-headlights look, you can whip our your mad Windows PowerShell skills and turn that Server Core installation into a Minimal Server Interface or Server GUI installation in no time.
Mike
Stephens

