Web Services and SharePoint: How do I do it?
When building an OBA, you’re often going to want to either integrate with the native Web services for SharePoint (when I say SharePoint, in this instance I’m referring to both the WSS and the MOSS services) or you’ll want to create your own custom services. The question often comes up is how? In this post, I’ll show you a couple of different ways of doing this by creating a custom client app that achieves the same thing (i.e., inserts a record into a SharePoint list). Before we get to the client app, though, let’s quickly review a few of the more common ways that we can deploy a service:
- ASMX Web service that is deployed into the SharePoint hive (e.g. deployed into the _vti_bin or _layouts folder;
- ASMX Web service deployed to its own Web application domain;
- WCF service deployed into the _vti_bin or _layouts folder; and
- WCF service deployed into its own Web application domain.
When deploying an ASMX service into the _vti_bin, there are a few things that you need to do in order to prepare your service to be supportable by SharePoint. While based on VS 2005, you can apply the same methods for VS 2008 by using the article here: https://msdn.microsoft.com/en-us/library/ms464040.aspx. Most important to remember are:
- Add DLL to GAC;
- Run Disco tool against ASMX file;
- Add the appropriate amendments to the .dsco and .wsdl files (see the aforementioned article);
- Rename the x.dsco and x.wsdl files to be xdsco.aspx and xwsdl.aspx;
- Copy the .asmx file, xwsdl.aspx and xdisco.aspx files to the _vti_bin folder.
When deploying a service (ASMX or WCF) to its own web app domain, you need to first make sure you create and publish your web service to a folder on your application server and then map that folder to an IIS web site. To do this:
- Open IIS;
- Create a New Web Site;
- Map the Path to the folder where your service is published;
- Set Permissions (use either ASP.NET Impersonation or Windows Authentication and set to Enabled); and
- Refresh the view of your site.
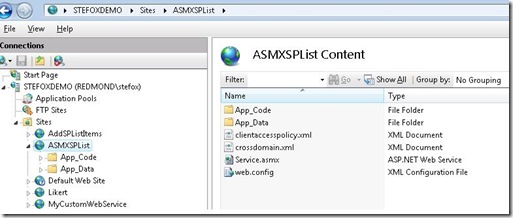
Now you’ll likely need what is called a client access policy or cross-domain policy file, which are files that are required for cross-domain calls into SharePoint. You may also need to have the files in your published web site root folder as well as having them in your SharePoint site root folder. Note: While you can copy and paste the policy files into your IIS web site, remember that you should use SharePoint Designer to open the SharePoint site and then copy the policy files to the root directory of the site. Here is a snapshot of what the root folder in my Content View of IIS (7.0) looks like:
When deploying a WCF service to SharePoint, you need to remember that you must create a VirtualPathProvider because SharePoint doesn’t support the loading of .svc files. A good summary of how to do this is here: https://blah.winsmarts.com/2008-5-SharePoint_2007_as_a_WCF_host_-_Step_-4,_Write_a_Virtual_Path_Provider.aspx.
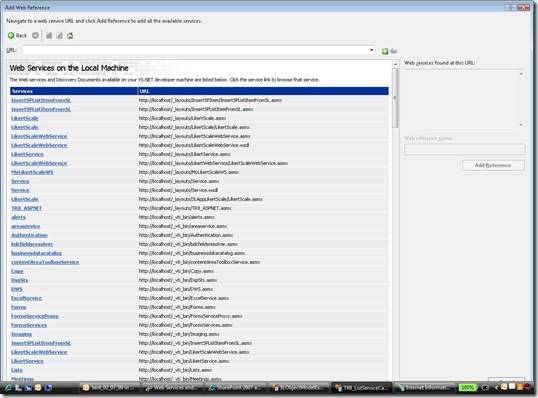
If you use the native Web services that ship with SharePoint (e.g. Lists, Excel Services, or BDC), you can simply open up a VS project and add these to your project. To discover the services, click Add a Web Reference and then click the Web services on this local machine (presumably you’ve got SharePoint on that machine), and then all of the SharePoint services will be listed.
In my example, I’ll show you how to call a custom web service (that uses WCF and ASMX deployed to their own IIS web sites) and a native SharePoint web service that does the same thing as the custom code. The custom code in my service that I’m using to insert the record into a SharePoint list called “TR8” is listed as follows (at least this is how it looks for the ASMX service):
using System;
using System.Collections.Generic;
using System.Linq;
using System.Web;
using System.Web.Services;
using Microsoft.SharePoint;
[WebService(Namespace = "https://tempuri.org/")]
[WebServiceBinding(ConformsTo = WsiProfiles.BasicProfile1_1)]
// To allow this Web Service to be called from script, using ASP.NET AJAX, uncomment the following line.
// [System.Web.Script.Services.ScriptService]
public class UpdateSharePointList : System.Web.Services.WebService
{
public UpdateSharePointList () {
//Uncomment the following line if using designed components
//InitializeComponent();
}
[WebMethod]
public void useNormalMOSSApi(string SalesSPSite, string productName, string productNumber, string FY08Sales)
{
string strDashListRoot = SalesSPSite;
using (SPSite site = new SPSite(strDashListRoot))
{
using (SPWeb web = site.OpenWeb())
{
web.AllowUnsafeUpdates = true;
SPList list = web.Lists["TR8"];
SPListItem Item = list.Items.Add();
Item["Title"] = productName;
Item["ProductNum"] = productNumber;
Item["Sales"] = FY08Sales;
Item.Update();
}
}
}
}
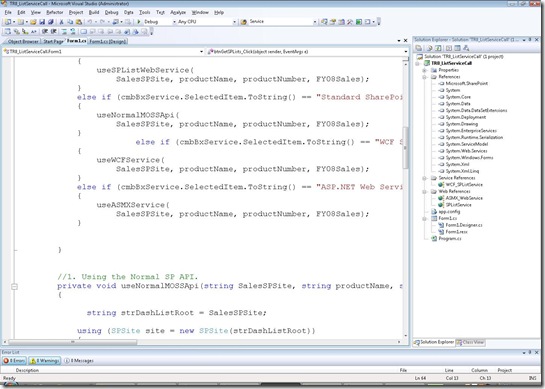
The core code is similar for the WCF service; however, the major differences are standard WCF/ASMX differences—e.g. uses contracts as opposed to Web method declarations, and so on. After I created the services, I then added them to a VS 2008 project using the Add Service and Add Web Reference functions within VS. Here’s a snapshot of my project, so you can see all of the standard references, WCF reference and ASMX references (both the native SharePoint Lists.asmx reference and the custom ASMX service I built).
Okay, enough on the service side; let’s take a look at the client code.
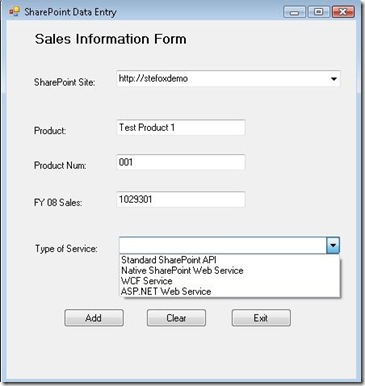
In this example, I built a simple client UI to test out a couple of different services. The following UI shows the form:
You can see that the form accepts a SharePoint site (selected from a combo-box), three separate user entries from textboxes (product name, product number, and sales), and then another input (type of service to call when executing the insertion of the record into SharePoint) from the other combo-box.
In the code-behind my WinForm app, I’ve first got four key class-level variables that I’ll use to contain the input from the above form:
string productName = "";
string productNumber = "";
string FY08Sales = "";
string SalesSPSite = "";
Then, when the user clicks the Add button (which corresponds to the btnGetSPLists_Click event), the application looks at the Type of Service control entry and then calls a specific method to handle the specific type of service.
private void btnGetSPLists_Click(object sender, EventArgs e)
{
//Setting the variables to link to specific site
SalesSPSite = cmboBxSPSite.SelectedItem.ToString();
productName = txtBxProduct.Text;
productNumber = txtBxProductNum.Text;
FY08Sales = txtBoxSales.Text;
//User can set whether they can call the service or not.
if (cmbBxService.SelectedItem.ToString() == "Native SharePoint Web Service")
{
useSPListWebService(
SalesSPSite, productName, productNumber, FY08Sales);
}
else if (cmbBxService.SelectedItem.ToString() == "Standard SharePoint API")
{
useNormalMOSSApi(
SalesSPSite, productName, productNumber, FY08Sales);
}
else if (cmbBxService.SelectedItem.ToString() == "WCF Service")
{
useWCFService(
SalesSPSite, productName, productNumber, FY08Sales);
}
else if (cmbBxService.SelectedItem.ToString() == "ASP.NET Web Service")
{
useASMXService(
SalesSPSite, productName, productNumber, FY08Sales);
}
}
The conditional code in the btnGetSPLists_Click event sets the class-level variables and then calls one of four different methods depending on what the user has selected.
One of the selections calls the ASMX code (which is the native Lists.asmx web service):
//1. Using the Native SP Web Service.
private void useSPListWebService(string SalesSPSite, string productName, string productNumber, string FY08Sales)
{
// Declare and initialize a variable for the Lists Web Service.
TR8_ListServiceCall.SPListService.Lists listService = new TR8_ListServiceCall.SPListService.Lists();
//Authenticate to the current user.
listService.Credentials = System.Net.CredentialCache.DefaultCredentials;
//Set the Url property of the service for the path to a subsite.
listService.Url = SalesSPSite + "/_vti_bin/Lists.asmx";
//Get Name attribute values (GUIDs) for list and view.
System.Xml.XmlNode ndListView = listService.GetListAndView("TR8", "");
string strListID = ndListView.ChildNodes[0].Attributes["Name"].Value;
string strViewID = ndListView.ChildNodes[1].Attributes["Name"].Value;
//Create an XmlDocument object and construct a Batch element
//and its attributes.
System.Xml.XmlDocument doc = new System.Xml.XmlDocument();
System.Xml.XmlElement batchElement = doc.CreateElement("Batch");
//Create a CAML construct to insert data into the field into the TR8 list.
batchElement.InnerXml = "<Method ID='1' Cmd='New'><Field Name='Title'>" + productName + "</Field><Field Name='ProductNum'>" + productNumber + "</Field><Field Name='Sales'>" + FY08Sales + "</Field>" + "</Method>";
//Call the UpdateListItems method to insert the record into the list.
XmlNode ndReturn = listService.UpdateListItems(strListID, batchElement);
MessageBox.Show("Record Added (Via Web Service)");
}
One of the selections calls the normal MOSS API (which is essentially the custom code that runs directly against my SharePoint server):
//2. Using the Normal SP API.
private void useNormalMOSSApi(string SalesSPSite, string productName, string productNumber, string FY08Sales)
{
string strDashListRoot = SalesSPSite;
using (SPSite site = new SPSite(strDashListRoot))
{
using (SPWeb web = site.OpenWeb())
{
web.AllowUnsafeUpdates = true;
SPList list = web.Lists["TR8"];
SPListItem Item = list.Items.Add();
Item["Title"] = productName;
Item["ProductNum"] = productNumber;
Item["Sales"] = FY08Sales;
Item.Update();
MessageBox.Show("Record Added (Via API)");
}
}
}
One of the selections calls my custom ASMX service:
//3. Using the ASMX Service.
private void useASMXService(string SalesSPSite, string productName, string productNumber, string FY08Sales)
{
TR8_ListServiceCall.ASMX_WebService.TR8ASPWebService myService = new TR8_ListServiceCall.ASMX_WebService.TR8ASPWebService();
myService.UseDefaultCredentials = true;
myService.useNormalMOSSApi(SalesSPSite, productName, productNumber, FY08Sales);
MessageBox.Show("Record Added (Via ASMX)");
myService.Dispose();
}
And the last of the selections calls my custom WCF service:
//4. Using the WCF Service.
private void useWCFService(string SalesSPSite, string productName, string productNumber, string FY08Sales)
{
TR8_ListServiceCall.WCF_SPListService.InsertItemsClient proxy = new TR8_ListServiceCall.WCF_SPListService.InsertItemsClient();
proxy.useNormalMOSSApi(SalesSPSite, productName, productNumber, FY08Sales);
MessageBox.Show("Record Added (Via WCF)");
proxy.Close();
}
Each of these calls does exactly the same thing: inserts a record using the data from the input form into the SharePoint list called “TR8.” Note, though, that there are syntactical differences. For example, for the custom services we are really executing the code inside the custom service so we need the proxy, the default windows credentials, and the calling of the specific web method (useNormalMOSSApi) to add the entries. And of course don’t forget to dispose/close the service to clean up your sessions.
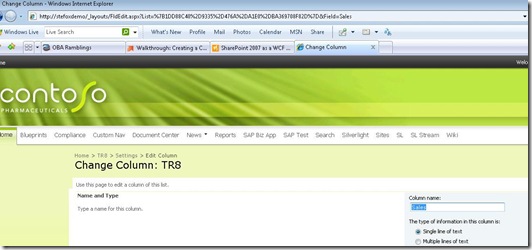
The biggest syntactical difference from the above, though, is the native Lists.asmx web service. Note the use of the CAML construct to create the XML ‘document’ that represents the data we’re inserting into the list. A tip here is if you’re going to use this method, the ‘field’ attribute in the CAML construct is not the column display name. To get the proper attribute, go to your SharePoint site, click List Settings, and then click the column in question. Note at the end of the URL is the field name. In the below figure, you can see ‘Field=Sales’ – this is the correct field attribute to use. (Hopefully, this will save you troubleshooting XML errors.)
So, the only remaining code is that which corresponds to the other buttons, which is fairly self-explanatory.
//Events to handle the clearing of the controls.
private void ctnClear_Click(object sender, EventArgs e)
{
txtBoxSales.Clear();
txtBxProduct.Clear();
txtBxProductNum.Clear();
}
//Event to exit the application.
private void btnExit_Click(object sender, EventArgs e)
{
Application.Exit();
}
When executing the code, what will happen is that you can insert records from the client app via a service that then update the SharePoint list. So, why is this cool? Because you can use the same method described above to interact with many different areas of SharePoint—expanding the breadth of your OBA to include OM calls and data management with SharePoint. Here’s a final view of what the end result of the above code (selecting and executing each of the services in my Type of Service combo-box) looks like:
Note that I’ve added the complete code-behind for my sample app below.
Hope this helps you in your quest!
Steve
Complete Code-Behind for the WinForm App
using System;
using System.Collections.Generic;
using System.ComponentModel;
using System.Data;
using System.Drawing;
using System.Linq;
using System.Text;
using System.Windows.Forms;
using Microsoft.SharePoint;
using System.Collections;
using System.Data.SqlClient;
using System.Xml.Linq;
using System.Xml;
using System.Xml.Serialization;
using Microsoft.SharePoint.SoapServer;
using System.ServiceModel;
namespace TR8_ListServiceCall
{
public partial class Form1 : Form
{
//Class-level variables
string productName = "";
string productNumber = "";
string FY08Sales = "";
string SalesSPSite = "";
public Form1()
{
InitializeComponent();
}
private void btnGetSPLists_Click(object sender, EventArgs e)
{
//Setting the variables to link to specific site
SalesSPSite = cmboBxSPSite.SelectedItem.ToString();
productName = txtBxProduct.Text;
productNumber = txtBxProductNum.Text;
FY08Sales = txtBoxSales.Text;
//User can set whether they can call the service or not.
if (cmbBxService.SelectedItem.ToString() == "Native SharePoint Web Service")
{
useSPListWebService(
SalesSPSite, productName, productNumber, FY08Sales);
}
else if (cmbBxService.SelectedItem.ToString() == "Standard SharePoint API")
{
useNormalMOSSApi(
SalesSPSite, productName, productNumber, FY08Sales);
}
else if (cmbBxService.SelectedItem.ToString() == "WCF Service")
{
useWCFService(
SalesSPSite, productName, productNumber, FY08Sales);
}
else if (cmbBxService.SelectedItem.ToString() == "ASP.NET Web Service")
{
useASMXService(
SalesSPSite, productName, productNumber, FY08Sales);
}
}
//1. Using the Normal SP API.
private void useNormalMOSSApi(string SalesSPSite, string productName, string productNumber, string FY08Sales)
{
string strDashListRoot = SalesSPSite;
using (SPSite site = new SPSite(strDashListRoot))
{
using (SPWeb web = site.OpenWeb())
{
web.AllowUnsafeUpdates = true;
SPList list = web.Lists["TR8"];
SPListItem Item = list.Items.Add();
Item["Title"] = productName;
Item["ProductNum"] = productNumber;
Item["Sales"] = FY08Sales;
Item.Update();
MessageBox.Show("Record Added (Via API)");
}
}
}
//2. Using the Native SP Web Service.
private void useSPListWebService(string SalesSPSite, string productName, string productNumber, string FY08Sales)
{
// Declare and initialize a variable for the Lists Web Service.
TR8_ListServiceCall.SPListService.Lists listService = new TR8_ListServiceCall.SPListService.Lists();
//Authenticate to the current user.
listService.Credentials = System.Net.CredentialCache.DefaultCredentials;
//Set the Url property of the service for the path to a subsite.
listService.Url = SalesSPSite + "/_vti_bin/Lists.asmx";
//Get Name attribute values (GUIDs) for list and view.
System.Xml.XmlNode ndListView = listService.GetListAndView("TR8", "");
string strListID = ndListView.ChildNodes[0].Attributes["Name"].Value;
string strViewID = ndListView.ChildNodes[1].Attributes["Name"].Value;
//Create an XmlDocument object and construct a Batch element
//and its attributes.
System.Xml.XmlDocument doc = new System.Xml.XmlDocument();
System.Xml.XmlElement batchElement = doc.CreateElement("Batch");
//Create a CAML construct to insert data into the field into the TR8 list.
batchElement.InnerXml = "<Method ID='1' Cmd='New'><Field Name='Title'>" + productName + "</Field><Field Name='ProductNum'>" + productNumber + "</Field><Field Name='Sales'>" + FY08Sales + "</Field>" + "</Method>";
//Call the UpdateListItems method to insert the record into the list.
XmlNode ndReturn = listService.UpdateListItems(strListID, batchElement);
MessageBox.Show("Record Added (Via Web Service)");
}
//3. Using the ASMX Service.
private void useASMXService(string SalesSPSite, string productName, string productNumber, string FY08Sales)
{
TR8_ListServiceCall.ASMX_WebService.TR8ASPWebService myService = new TR8_ListServiceCall.ASMX_WebService.TR8ASPWebService();
myService.UseDefaultCredentials = true;
myService.useNormalMOSSApi(SalesSPSite, productName, productNumber, FY08Sales);
MessageBox.Show("Record Added (Via ASMX)");
myService.Dispose();
}
//4. Using the WCF Service.
private void useWCFService(string SalesSPSite, string productName, string productNumber, string FY08Sales)
{
TR8_ListServiceCall.WCF_SPListService.InsertItemsClient proxy = new TR8_ListServiceCall.WCF_SPListService.InsertItemsClient();
proxy.useNormalMOSSApi(SalesSPSite, productName, productNumber, FY08Sales);
MessageBox.Show("Record Added (Via WCF)");
proxy.Close();
}
//Events to handle the clearing of the controls.
private void ctnClear_Click(object sender, EventArgs e)
{
txtBoxSales.Clear();
txtBxProduct.Clear();
txtBxProductNum.Clear();
}
//Event to exit the application.
private void btnExit_Click(object sender, EventArgs e)
{
Application.Exit();
}
}
}
Comments
Anonymous
February 07, 2009
PingBack from http://www.clickandsolve.com/?p=4735Anonymous
March 10, 2009
Tipps Copied folders are not indexed bug SharePoint Calendar Hard Limit SharePoint Tip #23. Do you knowAnonymous
July 08, 2009
Is there anyway to use the SP API version without having to run it on the SP server?
