Rapid “Data Collection” Solutions – Part 3: designing and implementing the business process
I refer to the business problem already described in the post “Rapid “Data Collection” Solutions – Part 1: defining the business problem”. In this series of posts, I am considering the options available for building a quick and – possibly – zero-code solution based on a SharePoint web environment.
In my previous post “Rapid “Data Collection” Solutions – Part 2: designing and implementing a data model” I have considered the problem of “preparing the storage” for the data that need to be collected; in that post I have also described the possibility to implement some kind of “data-completion workflows”, helpful especially when it is desired to automate the filling of “redundant columns”.
In this post I will consider the problem of contacting the users that need to provide that data. Sometimes it’s enough to send them an email with the link to the SharePoint list where they are invited to write their data. Other times a more complicated business process need to be implemented: it may happen, for example, that the users to be involved must be chosen with some kind of specific logic; other times, the problem of completing the set of information in a certain “row” can be subjected to a custom review process, where the reviewers can decide to recollect part or all that information from the same authors or from other users.
The tool allowing the creation of zero-code workflow solutions for a SharePoint environment is the “Workflow Designer” (or “Workflow Editor”) in SharePoint Designer [SPD]; this tool – which was already available in SPD 2007 – has been greatly enriched in terms of functionalities and usability in SPD 2010.
While it seems often trivial to write and deploy simple workflows in SPD 2010, the implementation of medium or complex business processes may introduce the need to face tricky challenges; in my previous post “Common Challenges with SharePoint and SharePoint Designer Workflows” I have listed the most important problems and thought that I have encountered – and, somehow, solved… or, sometime, avoided – in my real-world workflow experiences. It may be necessary to consider all of these challenges when implementing a business process for a data collection solution.
One of the mentioned thoughts is especially important in the scenario of a data collection business process; I am referring to the consideration about where to store the collected data; here below I will describe the available options.
The workflows functioning mechanism in SharePoint uses the “Tasks” lists in order to:
1. wait for any kind of human intervention;
2. offer, to the involved users, a web user interface (the task form) where they can provide their contribution (data);
3. automatically resume the execution when the expected contribution is arrived (that is, when the task is completed).
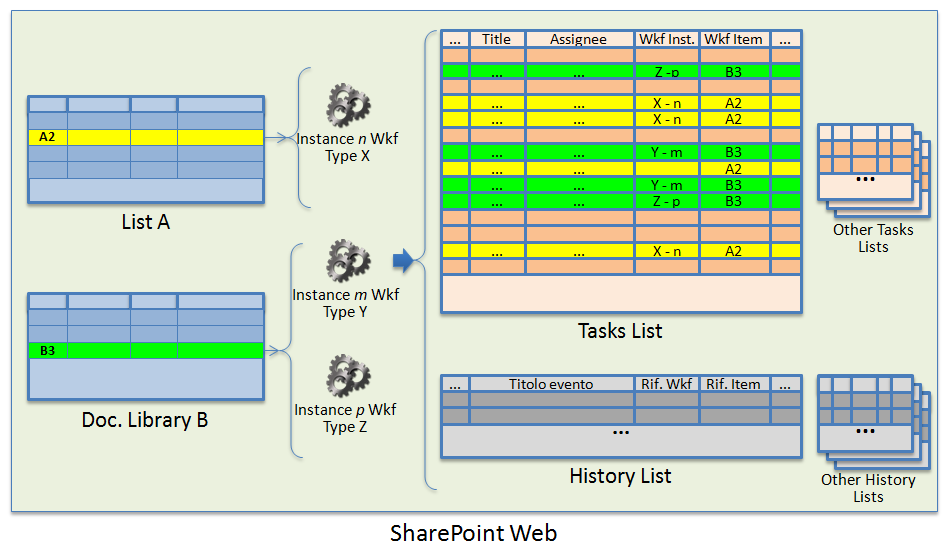
In a specific SharePoint web, a single “Tasks” list can contain the tasks (items) created by different workflow instances of different workflow types running on one or more lists or libraries.
The figure here below gives a visual representation on how the tasks are related to the workflow instances with multiple lists and multiple workflow types.
It is worth to highlight that other tasks list can be created and assigned to a specific workflow type; this option – which was already available in SharePoint 2007 – was not applicable for the declarative workflows deployed with SPD 2007; it is now available for the declarative workflows created with SPD 2010.
In the standard mechanism, when a specific task is complete, by default it remains on the “Tasks” list and will be listed as complete on the “Workflow Status” page for its own workflow instance. More in details, the “Workflow Status” page can list the completed and not completed tasks for a given workflow instance; unfortunately, it does not give a single aggregated view of all the data collected (in different tasks, potentially of different types) by a workflow instance.
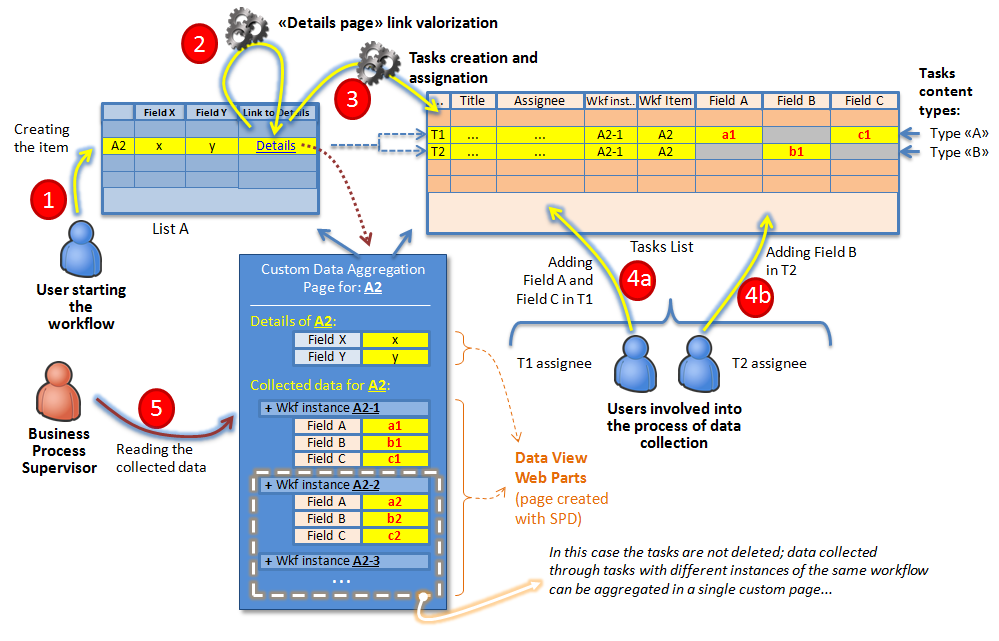
In order to have a similar view, it is necessary to create a custom ASP.NET page; the SPD page editor has a powerful data aggregation control: the “Data View Web Part” [DVWP]; this can be used to find all the details and the related data for a given list item (whose ID can be read, for example, from the query string); this solution does not require to write any code (just DVWP configuration in SPD).
The data aggregation on a custom ASP.NET page is especially important when it is necessary to combine data from more than one workflow instance; this may be required in the following scenarios:
· more than one data collection workflow type is defined on the considered list;
· it is important to see the historical data provided by the users (in different subsequent instances of the same workflow type).
The following figure gives a visual representation of a data collection workflow instance writing two different tasks (of different types) into the “Tasks” list; a custom data aggregation page gives a single view on the initial and collected data (and even on historical data, if required).
It is worth to highlight that the same data collection workflow can be responsible of setting the link to the custom data aggregation page into a “link field” of its list item (see the step 2 in the previous figure); this link has usually the following structure: <URL_of_the_common_custom_page>.aspx?ItemId=<ID_of_the_current_list_item> (the workflow have to dynamically set this ID into the link field).
A complete sample about how to create a similar custom data aggregation page can be found in “Watch this: Design a document review workflow solution” (see the videos in “Part 12: Design the Workflow Dashboard” and “Part 13: Design the Workflow Dashboard (continued) ”).
Trying to summarize, when using the default functioning for the “workflow tasks” mechanism provided by SharePoint it may be desired or necessary to create a custom data aggregation page.
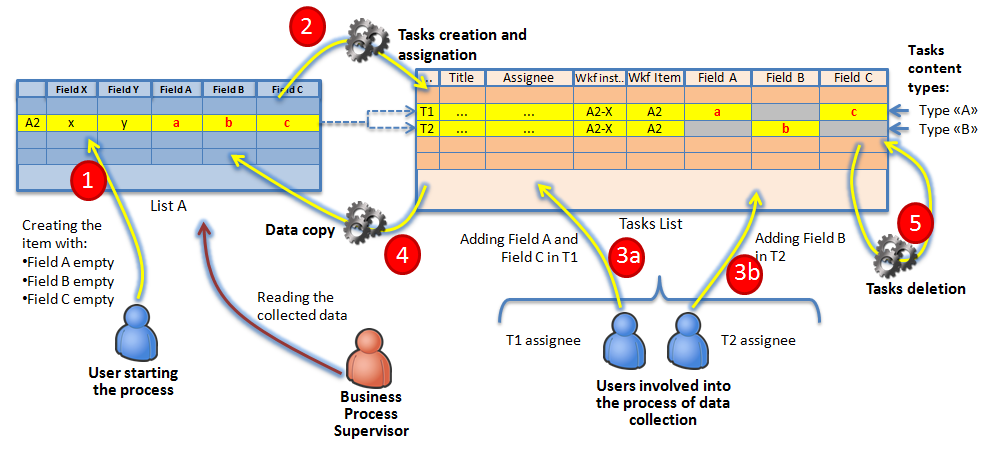
Another approach in data collection workflows consists in using the “workflow tasks” mechanism only for contacting the involved users; when a task has been completed by the user, the acquired data can be copied back into the “primary” list item and the task can be deleted.
The following figure shows the described mechanism in the same scenario considered above (a data collection workflow instance writing two different tasks – of different types – into the “Tasks” list).
The step 4 in the previous figure shows the data copy action done by the workflow (the copy include the values of the fields “A”, “B” and “C” in the two completed tasks); the step 5 shows the tasks deletion action done by the workflow (the two completed tasks are deleted after that their values have been copied back to the current list item).
This “copy and delete” approach has an evident disadvantage: it does not allows automatically maintaining an historical vision of the data collected by the users. For this reason:
· it is often (let me say… always) necessary to copy back, on the current item, also the name of the person that completed the tasks and the date & time when this happened;
· when the “logical workflow” [*] involves loops, that is when the same task type can be created and completed more than once, the previous answers (the data on the previous completed tasks) are lost unless a custom “historical storage” list is prepared and the copy action is done twice (on the current “live” item and in a new list item in the historical storage list).
Here it is worth to notice that, when using this approach, part of the “Workflow Status” page loses sense: it remains a dashboard listing the “log messages” written by the workflow, but it is no more the entry point for accessing the completed tasks associated to the item (only the active tasks are shown because the completed tasks are deleted).
When choosing the “copy and delete” approach, there is another problem to be solved: how to avoid that the “additional fields” on the current list item can be directly changed by the contributors of this list? These “additional fields” (like the “Field A”, “Field B” and “Field C” in the previous figure) should be updated only by the workflow after the tasks completion, when performing the “copy and delete” actions. A partial solution consists in hiding these fields from the “list forms” (this can be done by enabling the content types on the list and by selecting these fields as “Hidden” into the current “Item” content type) and showing them only into the “list views”. Unfortunately, the contributors of the list can switch the view in “Data Sheet” mode; in this way, they can potentially edit directly these additional fields. There are a few more options to make this editing “harder” (by configuring permissions, by using calculated columns, etc…); I am planning to write more about this in sequent posts… Anyway, not always this problem can be technically addressed; there are situations when the best (and/or only) way is simply to “teach” the users about what they should or should not do (…and to enable the “versioning” on the list items in order to understand what happened when some users have done something not correct…).
On the “copy and delete” approach I see the following advantages:
· It avoids the proliferation of items into the “Tasks” list: in a real world data collection workflow, the number of the completed tasks can quickly become huge, especially when the “logical workflow” [*] involves loops. Not always an historical view of the given answers is required; even when this is a requirement, it is possible to prepare, fill and maintain a tailored “historical storage” list (as mentioned above) where it is possible to have more control on the size of the stored data.
· It helps to maintain the consistency of the collected data: when the completed tasks are not deleted, a task assignee can potentially modify or delete an already completed task, causing the corruption of the collected data. Fortunately, the same user can be unauthorized to modify the current list item where the data filled in the completed task can be copied; this happens because the data copy action, performed by the workflow, is done in the security context of the user that started the workflow; this last and the task assignee are often different users.
· It often avoids the need to create a custom data aggregation page because all the collected data is directly shown into the current list item view form. Obviously, a custom data aggregation page is still necessary if it is required to show the historical data collected by subsequent instances of the defined workflow types (reading it from the custom "historical storage" list).
Although this “copy and delete” approach requires an extra effort when designing the workflow (for the copy and delete actions) and, potentially, when preparing the web (a tailored “historical storage” list may be required; some trick may be needed in order to hide the “additional columns”; etc…), I personally prefer this approach against the standard approach.
_________________________________________
[*] I am talking about “logical workflows”, which can be realized by different workflow instances of different workflow types; I am planning to write more about this in this blog…


