Office 365-Configure Inbound Hybrid Search with Directory Synchronization –Password Sync –Part2
We have set up outbound search in Part 1 of this post .Now let’s take a look at how to configure inbound search.
Configure Inbound Search
Inbound from SharePoint Online to company’s corporate network i.e. SharePoint On-premises. User that is not on corporate network, but signed into SharePoint Online in Office 365, searches. There is an inbound request to customers network i.e. SharePoint On-premises to return results. Results from both SharePoint Online and SharePoint On-premises are displayed.
For this post we are going to look at search experience for the same user manas in the mbspoincloud domain (manas@mbspoincloud.com) who at this point is able to search from SharePoint On-premise and get results from SharePoint Online.(outbound search) For this same user we will now configure Inbound Search. At this point it’s assumed that the organization has already followed the steps above and configured the steps mentioned in the part 1 of this post i.e.
1> Directory Synchronization
2> Server-to-Server Trust with Windows Azure ACS
The next steps would be to configure SharePoint Online to display results from SharePoint On-Premise Server.
1. Configure Secure Store target application.
2. Configure Forefront as a reverse proxy.( In this post I am going to share steps with Forefront as a Reverse Proxy.)
Note: - We are testing additional Reverse Proxy and should be posting the test results accordingly.)
3. Search configuration in SharePoint Online.
a. Result Source.
b. Query Rule.
Configure Secure Store Service Target Application
In order for SharePoint Online to access SharePoint Server 2013 on premises, a reverse proxy that supports certificate authentication is needed and a Secure Sockets Layer (SSL) certificate needs to be installed on the reverse proxy and the Secure Store Service (SSS) of SharePoint Online. SharePoint Online for hybrid search requires you to acquire a Secure Channel certificate and then create a Secure Store Service application in SharePoint Online to store the certificate. This target application is called Secure Channel target application. Before SharePoint Online submits the Search Query String, it performs a S2S authentication with the reverse proxy and only if the authentication is success fully (trusted Root CA, CRL check successful, Certificate valid, etc.), the Search Query String is submitted. Based on the query, Online Search service would send a HTTPS request which includes the client certificate from the Secure Store and the OAuth token, as well. The reverse proxy authenticates the request by using the client certificate and forwards it to the on-premise SharePoint 2013 farm. SharePoint 2013 On-Premise farm then extracts the ID of the user from OAuth token and uses client object model (CSOM) to map it to the corresponding identity of the user in on-premise.
SSL certificate that is used should be from a Public Certification authority issued to for your domain (mbspoincloud.com in our case), must be at least of 2048-bit encryption and should be of either
· Wildcard (A wildcard certificate is a public key certificate, which can be used with multiple subdomains of a domain example *. mbspoincloud.com)
or
· SAN X.509 standard (SAN Certificate Subject Alternative Names let you protect multiple host names with a single SSL certificate. To validate if you have a SAN certificate, you need to look up the Subject Alternative Name field in the Details tab of the certificate.
You need to ensure that the certificate is from a well-known Public Certification authority and acts both a server and client certificate. Self-signed certificate cannot be used for this purpose. To validate, you can take a look at the Details of the certificate under “Enhanced Key Usage” field.
Once correct certificate type is obtained, then we should be good to proceed with Secure Store target application creation.
Complete the following steps to create Secure Store service application in SharePoint Online to store the SSL certificate used to authenticate against the reverse proxy.
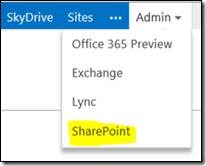
Open Internet Explorer and browse to https://portal.microsoftonline.com and log on with your global administrator account that you used when you signed up for the tenant. From the navigation bar at the top, click Admin and then click SharePoint.
In the SharePoint Online Administration Center, click secure store from the left navigation pane. Click New to create a Secure Store target application in the Secure Store service application.
In the Target Application Settings section, perform the following actions.
Target Application ID: Type the name (for example, SPOnline).
Note : This Target Application ID should be provided while you create the Result Source in SharePoint Online .This ID is a unique target application name that cannot be changed later.
Display Name: This is just a name to identify the target application ID within your SharePoint Online farm. Type in a name of your
choice (for example, SPOnline).
Contact E-mail: Type the e-mail address of the primary contact for this target application
Credential Fields: This is where we need to define the authentication type for communication with the reverse proxy.
Field Name: This is the name of the field that the user will get to see once they choose the Set Credentials option. The field names cannot be edited later. Within the text box in the first row, type Certificate.
Field Type: Select Certificate from the drop-down list box as the field type.
Field Name: This is just the name of the field that the user will get to see once they choose the Set Credentials option. The field names cannot be edited later. Within the text box in the second row, type Certificate Password.
Field Type: Select Certificate Password from the drop-down list box as the field type.
Once the above steps are completed, the Credential Fields section should look like the following screenshot.
Target Application Administrators: This is where you need to define the list of users who would later have access to manage the secure store Target Application settings that you are creating..
Members: This is where you need to define the list of users and groups mapped to the credentials that are defined for this target application. Make sure to add any users who will be using the hybrid configuration.
Once you click OK, the target application should be created. Under Target Application ID, select the Target Application ID check box that you created which in this case is SPOnline. Click the Set tab.
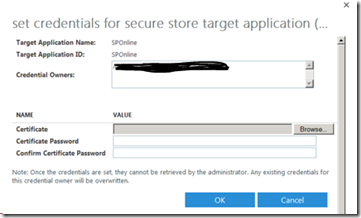
Click the Credentials group, click Set, click Browse next to the Certificate field and then browse to the location that you stored the public Certificate you acquired. You would need a .pfx format of the certificate
The Certificate that you acquired from a public certification authority may have been delivered to you in a different format but the certificate which you import here should be in a .pfx format which means you definitely would have had a password for the same. Type the passwordin the password field. If you are unsure about the password, you should not proceed with import. There is no validation of the password field while you upload the certificate to Secure Store Target Application, which means it will accept any characters for password. Incorrect password will result in failure for establishing a secure channel with reverse proxy and hence no search results will be returned. Following is an optional step that you should try in case of doubt about the password.
Double click the .pfx file and follow the steps until it prompts you to enter the password. You can enter the password after you specify the file to import screen.If it takes you to the Certificate Store screen, it means that you have the correct password. You do not need to install the certificate. Click Cancel as you are on the screen identical to the image below since now you are sure about the password.
Once you have typed in the correct password, click OK to upload and set the certificate for the target application. A copy of this certificate would be required in the reverse proxy server. This completes the target application creation for Secure Store in SharePoint Online.
Configure Forefront as a Reverse Proxy
In order for SharePoint Online to query and return results from on-premise SharePoint farm, a reverse proxy device must be configured to provide a secure endpoint for connection to SharePoint On premise . A reverse proxy device is required to receive incoming requests from SharePoint Online and pass them to SharePoint On-Premise servers. Next step would be to configure a reverse proxy. While creating this content we are still validating additional reverse proxies and I should be posting the test results for additional reverse proxy devices later in this blog shortly.
Reverse proxy has a few standard requirements.
· Reverse proxy should support pass-through authentication.
· Reverse proxy should support OAuth 2.0.
· Reverse proxy should support client certificate authentication.
· Reverse proxy should not modify the original SharePoint headers.
Threat Management Gateway (TMG 2010) is a supported reverse proxy device for SharePoint 2013 hybrid. Forefront Threat management gateway or TMG can be configured to support both pass-through authentication and certificate authentication. Threat Management Gateway (TMG 2010) when used, a Reverse Proxy should be domain joined to support SSL client certificate authentication
Prerequisites for Configuring Forefront TMG as a Reverse proxy
· A public SSL certificate issued by a trusted public certification authority (CA).
· The SSL certificate of the web server needs to be installed as a personal certificate of the computer account.
· Member server preferably Windows Server 2008 R2.
· Two NICs.
· Public IP address.
· Private IP address in the same subnet as domain controller.
Configuration Overview
The following steps that need to be configured on the TMG server.
1. Install the Secure Channel certificate to configure client certificate authentication for the TMG web listener.
2. Configure Listener for HTTPS.
3. Configure Web publishing rule for SharePoint.
Let us take a look at the detailed configuration steps.
Install the Secure Channel Certificate
To start, we need to configure client certificate authentication for the TMG web listener. The SSL certificate that you have obtained from a well-known public Certification authority and imported in the Secure Store application has to be imported first as a personal certificate of the computer account on the machine Forefront TMG is installed to. Unless you do so it will not show up in the list of existing certificates. To do so follow the steps below.
1. On the Forefront TMG computer, click Start, click Run, type mmc in the Open text box, and click OK.
2. In the Console1 window, click the File menu and then click Add/Remove Snap-in.
3. Select Certificates and click Add.
4. On the Certificates snap-in page, select Computer account and click Next.
5. On the Select Computer page, select Local computer and click Finish.
6. In the console tree, expand the Certificates (Local Computer) node, and right-click Personal.
7. Select All Tasks, and then click Import.
8. On the Welcome to the Certificate Import Wizard page, click Next.
9. On the File to Import page, browse to the location where you have stored the certificate and select the certificate from public certification authority, and then click Next.
1. On the Password page, type the password for this file and then click Next.
The Password page provides the option Mark this key as exportable. If you want to prevent exporting of the key from the Forefront TMG computer, do not select this option.
2. On the Certificate Store page, verify that Place all certificates in the following store is selected and that Certificate Store is set to Personal (the default settings), and then click Next.
3. On the Completing the Certificate Import Wizard page, click Finish.
Verify Server Certificate Was Properly Installed
1. Click Start, click Run, type mmc in the Open text box, and click OK.
2. In the Console1 window, click the File menu and then click Add/Remove Snap-in.
3. In the Add/Remove Snap-in dialog box, click Add.
4. In the Add Standalone Snap-in dialog box, select Certificates and click Add.
5. On the Certificates snap-in page, select Computer account and click Next.
6. On the Select Computer page, select Local computer and click Finish.
7. In the Add Standalone Snap-in dialog box, click Close.
8. In the Add/Remove Snap-in dialog box, click OK.
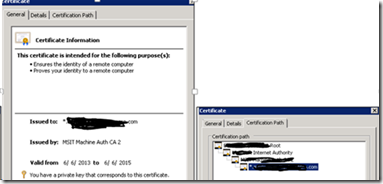
9. In the console tree, expand the Certificates (Local Computer) node, expand Personal, click Certificates, and double-click the new server certificate, that is, *. mbspoincloud.com
On the General tab, there should be a note that says You have a private key that corresponds to this certificate.
On the Certification Path tab, you should see a hierarchical relationship between your certificate and the certification authority (CA) and a note that says This certificate is OK.
There are at times company policy would have service accounts which are either in the Managed Service Accounts AD container, or do not have local logon rights to domain members .A best practice for configuring the cert on the Reverse Proxy server: Rather than adding the certificate to the personal store of the fwsrv account the cert should only be added to the computer’s personal store, and the fwsrv account should be granted at least read permissions to the private key of the cert. Provide the service account of Forefront TMG read access to the private key of the cert.
10. In case you want to do so, from within the MMC window that you opened above right click the certificate, click All Tasks and then click Manage Private Keys.
fwsrv account should be granted read (at least) permissions to the private key of the cert. Note the service account shows up NT Service\ fwsrv
Publish SharePoint Server For Extranet
Note : Every company would have their best practices around publishing web server in the internet . It is advised to consult the company’s security/ network expert and share the plan and get his buy in before following the steps below. The below steps are just “As Is” and may not considered be the best way to publish and secure SharePoint or any Web servers in the Internet.
To publish the SharePoint server so that it is accessible from the Internet, you need to create a web listener and a publishing rule. When you create a web publishing rule, you specify a web listener to be used when applying the rule.
Configure Listener for HTTPS
Log in to the server that hosts Forefront TMG .From the Toolbox tab on the very right, expand Network Objects group. Within the group, right-click the Web Listener node and click New Web Listener.
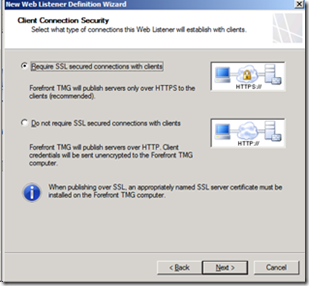
Provide a name of the new web listener (for example, SPS) and click Next. Under Client Connection Security, click the Require SSL secured connection with client’s option button and click Next.
Under Web Listener IP Address, choose the Network Interface that is associated with the external IP address of your company’s network (in my case External) , and then click Next.
Under Listener SSL Certificate, click the Use a single certificate for the Web Listener option button, and then Select Certificate. You should be able to choose the wildcard certificate that you have acquired from a public certification authority and added to the server.
Under Authentication Settings, ensure you have selected SSL Client Certificate Authentication in the Select how clients will provide credentials to Forefront TMG drop-down list box.
Click Next on the Single Sign On Settings. his will create the web listener. Click Apply to save the changes and update the configuration.
Completing the above steps will create a web listener and activate the same. The next step would be to create a web publishing rule to publish the on-premise SharePoint Server 2013.
Publishing Rule for SharePoint Server 2013
Once the web listener was successfully created, complete the following steps.Select the Firewall Policy node from the tree on the very left. Right-click the tree node, click New, and then click SharePoint Site Publishing Rule.
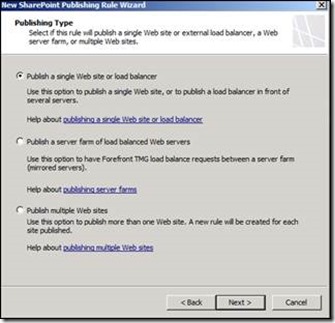
Provide an easily identifiable name for the new Publishing Rule (for example, SPS Publishing) and then click Next.Select the correct publishing type (in my case, it is just a single SharePoint Server 2013 site) and click Next.
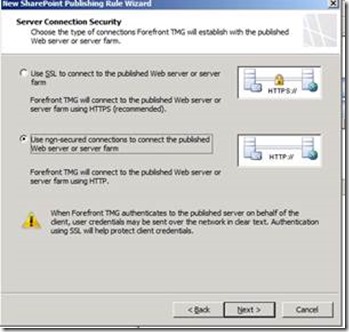
You can choose for SSL termination or SSL bridging at this stage. This decides whether the communication between the TMG server and SharePoint will be HTTPs which is the most recommended way. You would then need to ensure that the web front end of your SharePoint server has a copy of the certificate and you also accordingly have the correct alternate access mappings settings. This is definitely more secured and desired approach. For this example I will use HTTP. Click the Use non-secured connections to connect the published Web server or server farm option button, and then click Next.
Enter the URL to the Internal SharePoint Site and the host name of the SharePoint Server. In this case, it is spweb. Click Next.
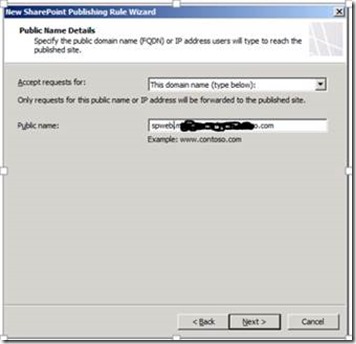
Specify the Public name (or select any domain name option), and then click Next.
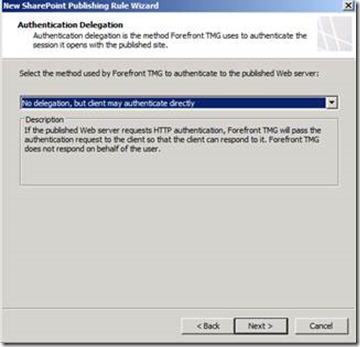
Select the web listener you created in the previous step and then click Next.Leave the default selection for Authentication Delegation settings and then click Next.
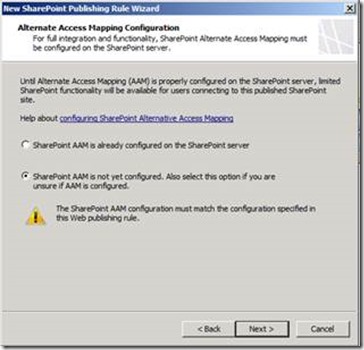
Select the option corresponding to your current Alternate Access Mapping settings on the SharePoint Server 2013 machine and then click Next.
In the next screen you can either limit the User sets to a bunch of users or change User Sets that the publishing rule applies to All Users and click Next. Click Finish to have the publishing rule created, and then click Finish.Click Apply to save the changes and update the configuration. If you click Firewall policy, you should now see the web publishing rule that you created.
As I mentioned earlier, depending on the security standards of a company the above configuration may vary . Configuring TMG is not the core-objective of this post , but I just wanted to share a standard way of publishing SharePoint site through reverse proxy and also create a listener for secure store target application to be able to make requests to.
Alternate Access Mappings
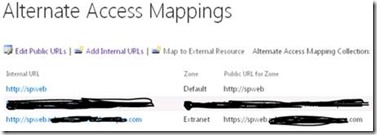
The next step would be to ensure that we have the correct alternate access mappings for the SharePoint On-Premise site collection to be accessed from the Internet. It is recommended to extend and map the web application and have separate IIS sites for Extranet and Intranet. You can follow the steps documented in TechNet https://technet.microsoft.com/en-us/library/gg276325.aspx. Apparently if you have chosen the option to terminate SSL at TMG level your alternate access mappings should look identical for the web application that you are looking at publishing externally.
For more information about alternate access mappings, see: https://technet.microsoft.com/en-us/library/cc288609(v=office.12).aspx
At this stage, you should be able to access your on-premise SharePoint environment using the public URL from anywhere, even from your Corpnet.
Search Configuration in SharePoint Online.
Now that we have the Secure Store target application created and SharePoint On-Premise site collection published using TMG, we need to perform a few additional steps in order to see search results from SharePoint Online.
Two steps are needed to configure Hybrid Search:
1. Create a result source.
2. Create a query rule.
New Result Source
Browse to https://portal.microsoftonline.com and log on with your global administrator account. From the navigation bar at the top, click Admin and then click SharePoint.
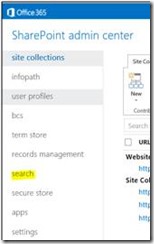
The configuration can happen on different levels: Global in the Search Service Application, Local per Site Collection or per Site Level. For this post , we will do the configuration at tenant admin level. From left navigation pane in SharePoint admin center, click Search.
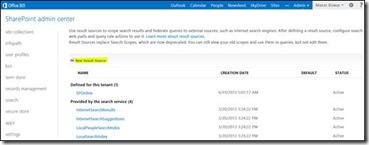
In Search Administration, click Search Result Sources. On the Manage Result Sources page, click New Result Source.
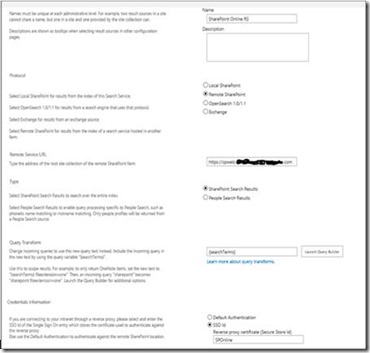
On the Search Result Sources page, do the following:
a. In the Name text box, type a name for the new result source (for example, SharePoint Online RS).
b. For the Protocol, select Remote SharePoint.
c. For the Remote Service URL, type the address of the root site collection of the SharePoint On-Premise site collection whose results should be included . This is the same URL for SharePoint On-Premise site collection that was published via TMG through this same URL.
d. For the Type, select SharePoint Search Results.
e. Leave Query Transform as default, which is {searchTerms}.
f. For Credentials Information, select SSO Id and type in the Name of the Secure Store target application you created earlier and have uploaded the certificate.
It is recommended that you validate that you do not have an in-correct Target application name here. Click OK to save the new result source. If you edit the result source, you should see the settings identical to the ones shown in the following screenshot.
The next step would be to create a new query rule. From the left navigation pane in SharePoint admin center in SharePoint Online, click Search.
1. In Search Administration, click Manage Query Rules.
2. In the Select a Result Source drop-down list, select the result source you created before example SharePoint Online RS.
3. Click New Query Rule.
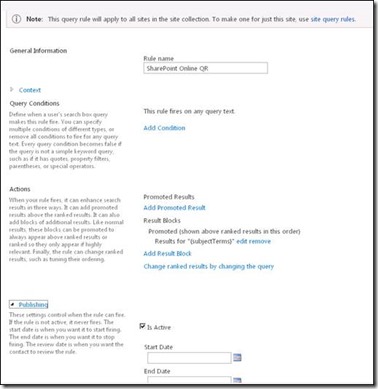
4. In the General Information section, in the Rule Name box, type a name for the new query rule (for example, SharePoint Online QR).
5. Click the Context link to expand the options.
6. In the Context section, do the following:
a. Under Query is on these sources, either select All Sources or One of these sources. If you select One of these sources, make sure to select the result source created before (here, it is SharePoint Online RS).
b. Leave the default selection for the Query is performed from these categories and Query is performed by these user segments options.
7. In the Query Conditions section, click Remove Condition so that the rule will fire for every query.
8. In the Actions section, leave Promoted Results as default.
9. In the Actions section, under Result Blocks, click Add Result Block.
10. In the Edit Result Block dialog box, do the following:
a. Leave the default for the Query Variables and Block Title sections.
b. In the Query section, in the Search this Source drop-down list box, select the name of the result source that you created before (here, it is SharePoint Online RS). In the Items drop-down list box, specify the number of items to show up as maximum (the default is 2 but feel free to select a number of your choice).
c. Click the Settings hyperlink.
d. In the Settings section, make sure the This block is always shown above core results option is selected. This is just to easily see if the Hybrid Search configuration is actually working and the block will always show up in your results page.
e. Skip the Routing section and click OK to add the result block.
11. Back at the Add Query Rule page, click the Publishing hyperlink.
12. In the Publishing section, make sure the Is Active check box is selected.
13. Click Save. Once you view the Query rule, it should look identical to the following screenshot.
This completes the configuration that is required on SharePoint Online.
Open a new browser session and type in the SharePoint Online site collection URL https://<tenantdomain>.sharepoint.com .In the Sign in with your organization account tab, type in the username and password . Note :-The user has been already synchronized from your on-premise AD following the steps in part 1 of this post and has been added to SharePoint Online site collection, (example ,user manas@mbspoincloud.com)
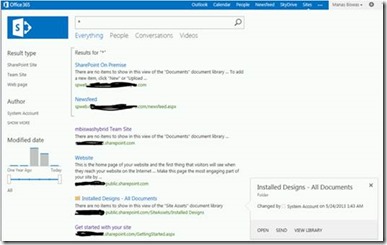
In the search drop-down list box, select Everything as a filter for your search.
Within the search text box, type a keyword. Search result should be displayed from both verticals (online, on-premise) identical to figure below.
In case you do not see any results here are a few quick troubleshooting tips since you do not have access to ULS logs like you do in your on-premise farms.
Test Result Source
Browse to https://portal.microsoftonline.com and log on with your global administrator account that you used when you signed up for the tenant. From the navigation bar at the top, click Admin and then click SharePoint.
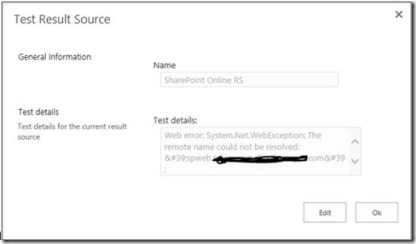
From SharePoint admin center from left navigation pane, click Search and then click Manage Result Sources. In the Manage Result Sources page, hover your mouse on result source you created SharePoint Online RS and click Test Source.
This fires a test query and shows you relevant troubleshooting information, example in the below case the on-premise SharePoint site collection is not accessible.
You can also find relevant information from Query Builder. Browse to https://portal.microsoftonline.com and log on with your global administrator account that you used when you signed up for the tenant. From the navigation bar at the top, click Admin and then click SharePoint. From SharePoint admin center, from left navigation pane, click Search.
In the Search Administration section, under Site Collection Administration, click Search Result Sources. In the Manage Result Sources page, click the result source you created in the previous procedure (for example, SharePoint Online RS). In the Edit Result Source page, click Launch Query Builder. In the Build Your Query page, select the Test tab. Click the Show more hyperlink.
Type a search term of your choice in the textbox next to {subject terms} and click Test Query (Hint: “*” is also a valid search term).
Relevant search results will be displayed in the Search Result Preview window if your configuration is valid. If there are problems with your configuration, troubleshooting information will be displayed.
At this stage, you have configured a two-way Hybrid search with DirSync password synchronization. A quick recap:
Outbound Search (most common): Outbound from on premises or corporate network i.e SharePoint On-Premise to SharePoint Online. User searches from on-premise. There is an outbound request to SharePoint Online to return results. Results from both SharePoint Online and SharePoint On-Premise are shown.
Inbound Search: Inbound from SharePoint Online to On-Premise where Sharepoint is hosted. User that is not on corporate network, but signed into SharePoint Online, searches. There is an inbound request to corporate network - SharePoint On-Premise to return results. Results from both SharePoint Online and SharePoint On-Premise are shown.
Two-way Search: Search is setup both inbound and outbound as described above. Both scenarios are supported in that case – whether user is on-premise on corpnet or only signed in to SharePoint Online
In my next part of this post I will discuss about steps to configure an ADFS server so that users can have single sign on experience.
Please watch this Space for Part 3 of this series which would be coming soon!!!!
POST BY : MANAS BISWAS [MSFT]
Comments
Anonymous
May 14, 2015
Hi Manas Can this configuration be done with .CER certificates instead of the *.pfx certificate ?Anonymous
June 02, 2015
You are just great Manas.This is the best article.


![clip_image002[4] clip_image002[4]](https://msdntnarchive.z22.web.core.windows.net/media/MSDNBlogsFS/prod.evol.blogs.msdn.com/CommunityServer.Blogs.Components.WeblogFiles/00/00/01/28/88/metablogapi/0654.clip_image0024_thumb_403D64E6.jpg)







![clip_image002[6] clip_image002[6]](https://msdntnarchive.z22.web.core.windows.net/media/MSDNBlogsFS/prod.evol.blogs.msdn.com/CommunityServer.Blogs.Components.WeblogFiles/00/00/01/28/88/metablogapi/1643.clip_image0026_thumb_762DAA27.jpg)
![clip_image002[8] clip_image002[8]](https://msdntnarchive.z22.web.core.windows.net/media/MSDNBlogsFS/prod.evol.blogs.msdn.com/CommunityServer.Blogs.Components.WeblogFiles/00/00/01/28/88/metablogapi/1134.clip_image0028_thumb_1506AEB7.jpg)
![clip_image002[10] clip_image002[10]](https://msdntnarchive.z22.web.core.windows.net/media/MSDNBlogsFS/prod.evol.blogs.msdn.com/CommunityServer.Blogs.Components.WeblogFiles/00/00/01/28/88/metablogapi/8865.clip_image00210_thumb_28B628FC.jpg)



![clip_image024[1] clip_image024[1]](https://msdntnarchive.z22.web.core.windows.net/media/MSDNBlogsFS/prod.evol.blogs.msdn.com/CommunityServer.Blogs.Components.WeblogFiles/00/00/01/28/88/metablogapi/6663.clip_image0241_thumb_6E4909FF.jpg)




![clip_image024[2] clip_image024[2]](https://msdntnarchive.z22.web.core.windows.net/media/MSDNBlogsFS/prod.evol.blogs.msdn.com/CommunityServer.Blogs.Components.WeblogFiles/00/00/01/28/88/metablogapi/7750.clip_image0242_thumb_4F31FEED.jpg)