Developing Windows Azure applications - Setup

I’ve been working with Windows Azure (post PDC09 build) to take a look at the basic mechanics of coding and deploying applications. To that end, I wanted to share what I’ve learned so far in this post.
First, I’ll talk about what you need to download and install to get started. There are several categories of items to get in order for you to start developing. Of course what you’ll need is dependent on what you intend to build.
I initially wanted to build ASP.NET C# applications that either used Windows Azure storage (i.e. table, blob or queue) or that used SQL Azure storage (i.e. RDMS-like tables). I’ll remind you that other application development languages are supported, such as PHP. Also if you were simply using SQL Azure as storage, there is no requirement that the front-end application actually be a Window Azure application.
Now to the tools.
First you’ll need an OS and a version of Visual Studio. VS2008 SP1 is the minimum version. I used Windows 7 and VS2010 Nov 2009 CTP. Using the latter reduces the configuration steps for the IDE. Steps needs for VS2008 SP1 are as follows:
•Windows Vista SP1 (when installing on Windows Vista)
•IIS 7.0 (with ASP.NET, WCF HTTP Activation and optionally CGI)
•Microsoft Visual Studio 2008 SP1, Microsoft Visual Studio 2010 Beta 2 or Microsoft Visual Web Developer 2008 Express Edition with SP1
•SQL Server 2005 Express Edition (or above)
•Hotfix: Native Debugging Improvements (not required for Visual Studio 2010)
•Hotfix: Improve Visual Studio Stability (not required for Windows 7 RC or later)
•Hotfix: Support for FastCGI on the Development Fabric (not required for Windows 7 RC or later, or Windows Server 2008 SP2 or later)
If you plan to work with SQL Azure, then you’ll want to use SQL Server 2008 standard or better RC2 CTP (released at PDC09). The reason for this is that this build allows SSMS management of SQL Azure and greatly simplifies working with your cloud database.
Again, if working with SQL Azure, you may want to pull down the SQL Server Sync Framework, as the latest version can integrate with SQL Azure as well. There are also downloadable power pack tools for the SQL Azure sync framework.
Next you’ll need the Windows Azure SDK. This will give you tools, such as the Development Fabric and the Development Storage which will help you to work with local instances of your Windows Azure applications. It also includes important documentation about Windows Azure.
You may also want to download the Windows Azure AppFabric SDK if you are planning to create applications that make use of AppFabric features, such as the Service Bus or Access Control.
AFTER you’ve downloaded and installed the Windows Azure SDK AND configured your particular setup of Visual Studio, you’ll then want to download and install the Windows Azure add-in for your particular version of Visual Studio, so that you’ll have project templates to start with.
Then you may want to grab some working sample applications to play around with. I recommend the Windows Azure Platform Training Kit. It contains presentations, labs and more. It’s a great place to start learning to write Windows Azure applications.
Next, I’ll talk about the current account (token) acquisition process.
There are two types of tokens that you currently (as of Dec 23, 2009) need to deploy Windows Azure applications. The first is an application token. Redeeming a valid token (here) allows you to set up a compute and a storage account. The storage account includes endpoints for the three types of Windows Azure storage – tables, blobs or queues.
The second type of token is for SQL Azure storage. Redeem your token here. This allows you to create RDMS-like databases with relational tables and other familiar RDMS objects, i.e. view and stored procedures. Be aware that there is NOT 100% parity between SQL Server features available locally and in the cloud. In a future blog post, I will detail the differences.
Currently you do NOT need a token to develop using the Windows Azure AppFabric.
The token acquisition process will change as we move from CTP to GA (general availability or live) in 2010.
To request tokens, you go here, register with a Windows Live ID and then you’ll get and email with a key, which you will redeem on the Windows Azure portal for a token.

*Tip – Currently the Developer site CodeProject has a system which allows you to request and to receive tokens immediately.
After you get your token via email, then sign in and then click on the Account tab of the Windows Azure portal, then on the ‘Manage My Tokens’ link as shown in the screenshot below.

Next copy and paste your token into the text box and then click ‘Claim Token’ as shown in the screenshot below. Of course, I’ve ‘scratched out’ the actual token values here.
After you’ve successfully redeemed your token, then you’ll have a number of service instances, either Windows Azure compute, Windows Azure storage or SQL Azure server to allocate. To allocate one of those instances, then click on the ‘New Service’ button on the left side of the Windows Azure portal and you’ll see the page which lists your existing services. On that page click the ‘New Service’ button on the upper right and then you’ll see the number of services remaining unallocated as shown below (for example for Storage, I have 4 services to allocate, for Hosted Services [or Compute] I have 0 unallocated.)

In the case of Windows Azure, when allocating a service instance, you’ll be asked for a service name and description and then you’ll be shown the upload service page. This page has two upload areas – Staging or Deployment. I am showing my first test application, (which has already been deployed to production) in the screenshot below. You will use the name of the service as well as the physical storage endpoint in your configuration files (for tables, blobs or queues) when you move from development to staging and then to production.

Then I’ll describe the deployment process and the three sample applications that I’ve deployed to date.
Deploying the First Sample Windows Azure Application – ToDo List
I worked with three of the sample applications in the Windows Azure Platform Training Kit. I started with the simplest possible application, the ‘ToDo’ List. The deployed application is at this location. Working with this application was a pretty straight-forward process.

The only complexity I ran into when working with the first sample was the dependency on .NET 3.5 (rather than the default of .NET 4.0 in Visual Studio 2010). After I changed that setting in the VS IDE, it was simply a matter of publish, to create the two required files for deployment (*.csdef and *.cscfg) and then upload the files to staging and then push them to production via with Windows Azure portal.
The screenshot below shows where you change the version of the .NET framework from 4.0 to 3.5 in VS2010. Also you must run VS2010 ‘as administrator’ to use the Windows Azure tools (Development Fabric and Development Storage visualizers).

The other thing I did when deploying this first test application was to test out the ability to configure multiple Windows Azure compute instances via the portal. I did this by clicking on the ‘Configure’ button and then by setting the number of compute instances to ‘2’ in the XML configuration file (show in the screenshot below).

Coding and Deploying the Second Application – Windows Azure Guest Book
The next application is a an ASP.NET application which uses both a web and worker role. It is a guest book application and I’ve deployed it at this location.

What is interesting about this application is that it uses both a Windows Azure web (for UX) and worker (for uploaded picture re-size) role. The main application is written in C#, the worker role is written in VB.NET. It is also interesting to see how Windows Azure queue storage is used here, i.e. notify on item [picture] upload, then resize the image. The screenshot below shows part of the sample code.

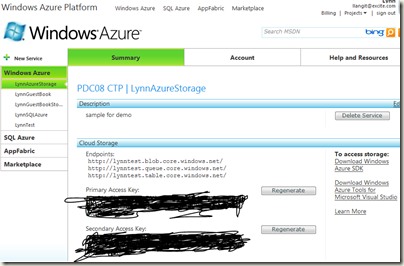
Of course when you move from development to production you will want to change your Windows Azure storage settings from using the default (using the local storage) to using the cloud-based storage. You can do this either before you deploy (called ‘publish’ in Visual Studio) of after, using the ‘Configure’ button in the portal, and then manually editing the XML file. You’ll need both the Windows Azure storage endpoint URLs (different ones for tables or blob or queues) and also the primary access key. I’ve shown where this information is displayed in the portal (with the keys blacked out) in the screenshot below.

Working with SQL Azure storage.
The next application is a ASP.NET application which uses SQL Azure storage. It simply returns the result of a query and displays it on a web page. I’ve deployed it at this location.

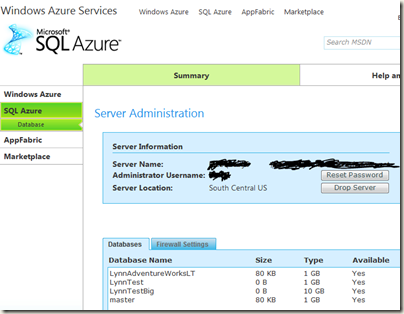
One of the interesting things about working with SQL Azure was creating the database on the cloud instance and populating that database with sample data. You will probably use a combination of the SQL Azure portal (website), to create the database and to configure the firewall rules and other tools. The screenshot below shows the SQL Azure portal.

I also used SQL Server 2008 R2 CTP to create and populate my cloud database as the process was significantly easier, using SQL Server Management Studio, as shown in the screenshot below.
It is interesting to note that you can execute some, but not all, T-SQL statements via SSMS while connected to SQL Azure. As previously mentioned, in a subsequent blog post, I’ll detail differences between local and cloud-based SQL databases. I used the simplest possible method to populate my cloud-based SQL Azure database with sample data –that is via a series of INSERT statements. You may also note that we’ve added support for bcp in this release as well.
What’s next?
As I continue to explore the Windows Azure developer platform, I’ll work through the samples, including working with the AppFabric. Next I’ll be writing some applications from scratch. These will include applications that use non-.NET languages, such as PHP and Java. I’ll continue to blog about my experiences and will be happy to hear from you about yours as you start coding for Windows Azure.
Comments
Anonymous
December 23, 2009
It is very good!Anonymous
February 12, 2010
Thanks for share with us. It would be good if you share a video tutorial with this.

