Where did my cache location go?
Hello All, ConfigNinja here to write about the client cache management a few weeks ago I was working onsite with a customer, and they performed an upgrade to a new version of Configuration Manager. When completed the upgrade, something happened on some of the machines in their environment: their cache size changed from 5120MB to 250MB and the default client cache location changed from c:\Windows\ccmcache to c:\ccm\cache.
To solve this problem, we start thinking of methods to correct this in the environment. We look at several potential options to do this, and we come up with the following solution. The solution ensure the client cache location is the correct one, and the cache size is appropriate for the environment. One of the first things I look at before performing a solution was to check one of the broken clients using System Center Support Center; one of the free utilities we have to troubleshoot ConfigMgr Clients.
System Center Support Center can be downloaded from the following link: https://www.microsoft.com/en-us/download/details.aspx?id=42645
This tool remediates clients but what happened if we have multiple clients that may need this fix.
One of the questions I received was, how can I know the impact of this and how many clients have the wrong path?
That’s a very good question right? So to solve this problem, I did the usual research on this and here is what I ended up doing to correct the issue.
First, create a custom hardware inventory class to collect the client cache information.
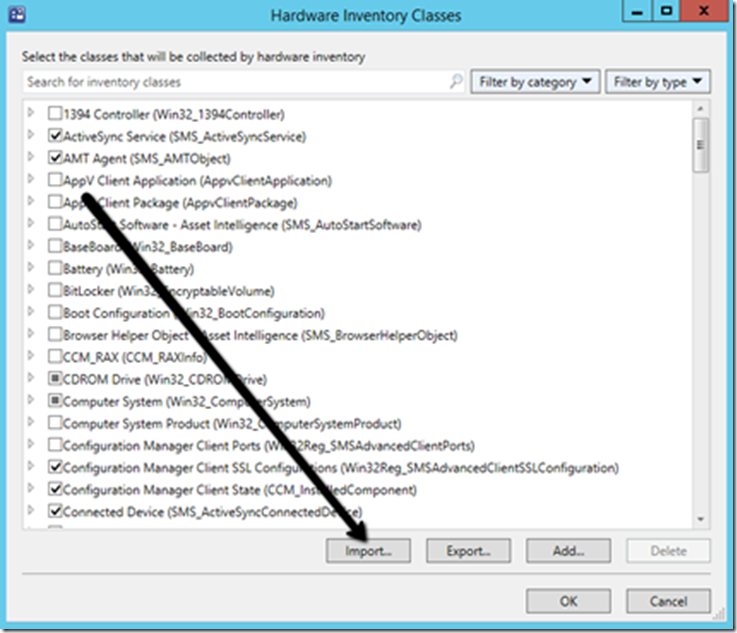
Hardware Inventory Class, Exhibit 1
As you can see in Exhibit 1, we can import a custom class into Configuration Manager Console and navigating into Administration Workspace> Client Settings > and right-click on the Default Client Settings.
Then, find Hardware Inventory and click Set Classes, there you be on the Exhibit 1, and then select a .MOF file that contains the information about the cache location. To do this, I created the following .mof file based on a commonly used method provided by one of the Microsoft MVPs Sherry Kissinger.
[ SMS_Report (TRUE),
SMS_Group_Name ("Client Cache"),
SMS_Class_ID ("CLIENT_CACHE"),
Namespace ("\\\\\\\\.\\\\root\\\\ccm\\\\softmgmtagent") ]
class CacheConfig : SMS_Class_Template
{
[ SMS_Report (TRUE), key ]
String ConfigKey;
[ SMS_Report (TRUE) ]
Boolean InUse;
[ SMS_Report (TRUE) ]
String Location;
[ SMS_Report (TRUE) ]
UInt32 Size;
};
A copy of the MOF is available on the TechNet gallery link provided on this blog post.
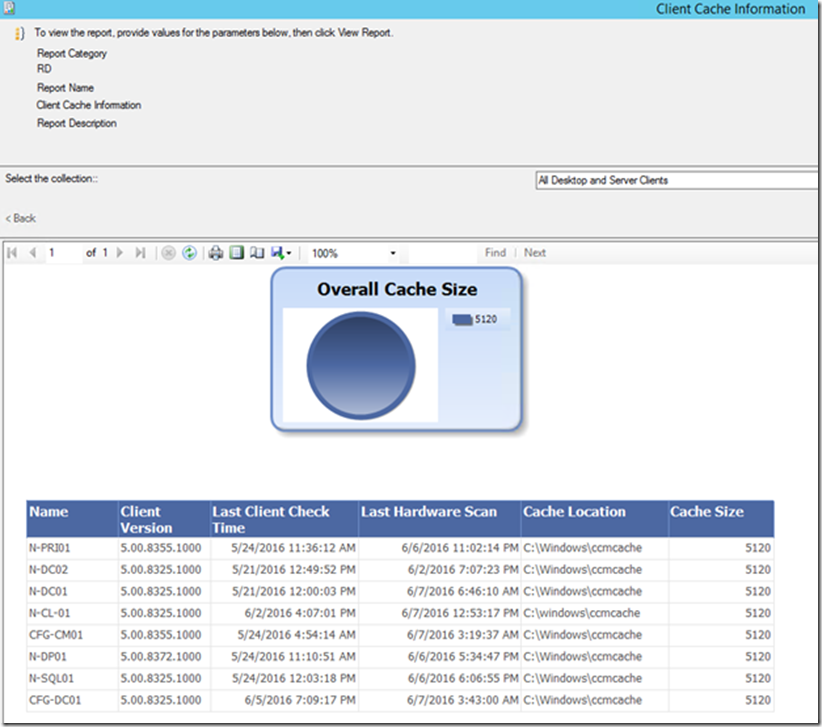
You need to wait until the clients send out their new hardware inventory information back to the server and then run a custom client cache report.
I created this report based on the mof file and the dataset query looks like this:
select coll.collectionid, comb.Name, comb.ClientVersion, comb.LastClientCheckTime, comb.LastHardwareScan, CAC.Location0 'Cache Location', CAC.Size0 'Cache Size' from fn_rbac_GS_CLIENT_CACHE0(@UserSIDs) CAC
join fn_rbac_CombinedDeviceResources (@UserSIDs) comb on cac.ResourceID = comb.MachineID
LEFT OUTER JOIN fn_rbac_FullCollectionMembership(@UserSIDs) coll on cac.ResourceID = coll.ResourceID
where coll.CollectionID = @CollectionID
I have provided a copy of the .rdl file in the TechNet gallery link; however, you can create the report yourself with no problems. the custom report in this blog is just a template I build for testing this solution and is not 100% ready since there are no customization to the look and feel. If you create a better report let me know J.
You can also create a collection from the MOF; however, you may not need it. I leave it up to you. Here is a sample of the code I build for a test collection.
select * from SMS_R_System inner join SMS_G_System_CLIENT_CACHE on SMS_G_System_CLIENT_CACHE.ResourceId = SMS_R_System.ResourceId where SMS_G_System_CLIENT_CACHE.Location != "c:\\windows\\ccmcache"
Now that we have a list of clients and understand the potential impact let's see what is the next question and answer.
How can we fix it?
The answer to that is to create a compliance baseline that will monitor and remediate those clients that are not in compliance with your client cache size and client cache location.
I created two Configuration Items and one Baseline to solve this problem.
Create the two Configuration Items are as follows:
Check Client Cache Location and Check Client Cache Size.
The Client Cache Location Configuration Item has two PowerShell scripts: one for the discovery and one for the remediation.
The discovery script is:
$ccmcfg = Get-WmiObject -Namespace root\ccm\SoftMgmtAgent -Class CacheConfig
Write-Host $ccmcfg.Location
The remediation script is:
$ccmcfg = Get-WmiObject -Namespace root\ccm\SoftMgmtAgent -Class CacheConfig
$ccmcfg.Location = "C:\windows\ccmcache"
$ccmcfg.Put()
Get-Service ccmexec | Stop-Service
Start-Sleep 10
Get-Service ccmexec | Start-Service
Write-Host "Current cache location is " $ccmcfg.Location
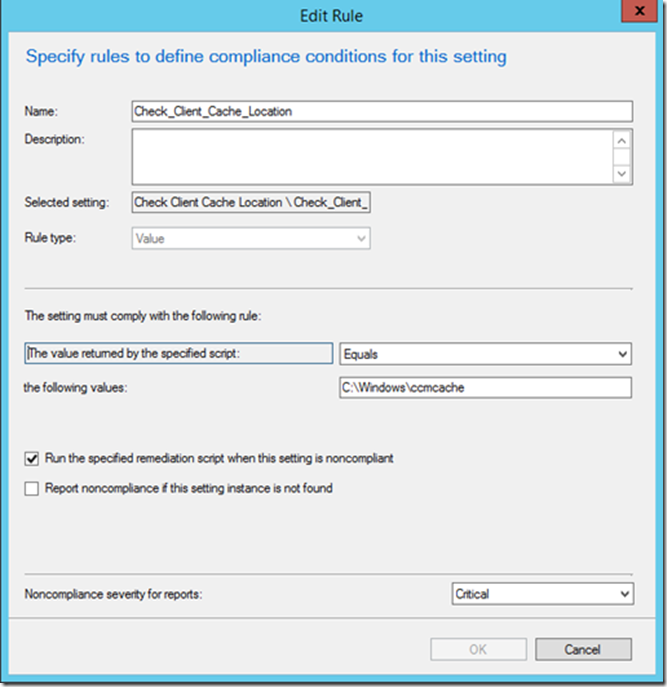
My compliance rule is configured like this:
I have provided a copy of the baseline on my TechNet gallery link as well.
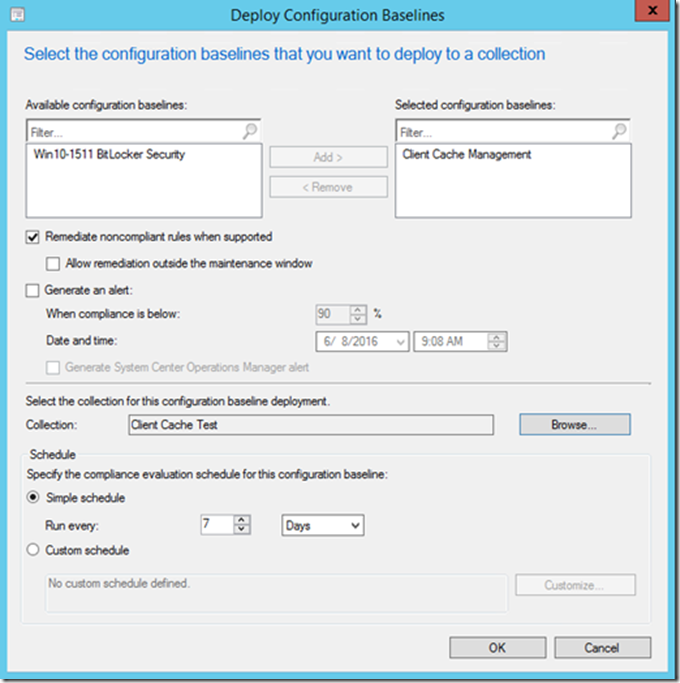
Once you created the baseline, you deploy it to the collection and wait until the results are in. It is critical to perform the deployment as remediation so those clients with the wrong path can get remediated to the correct one. Otherwise, it is set as monitoring only.
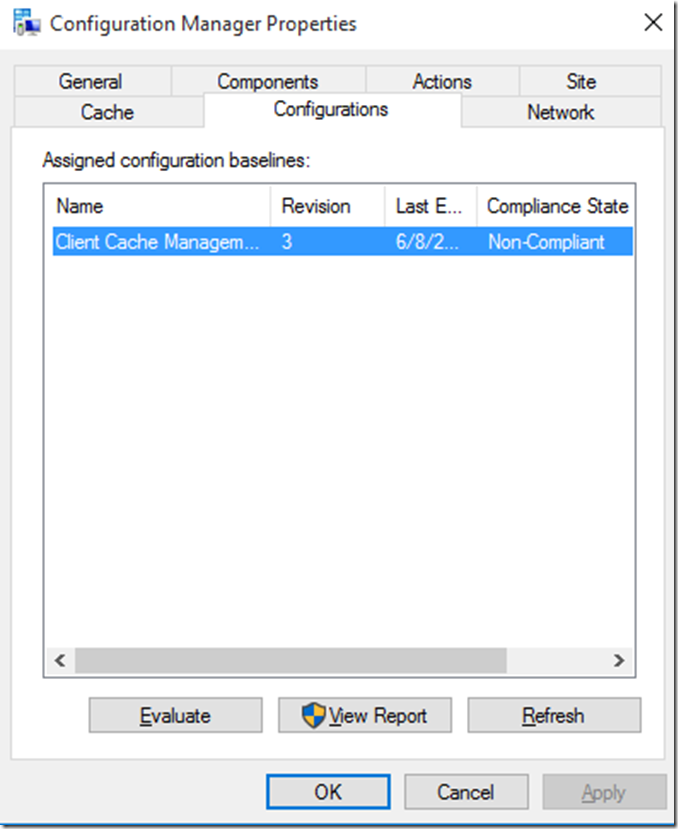
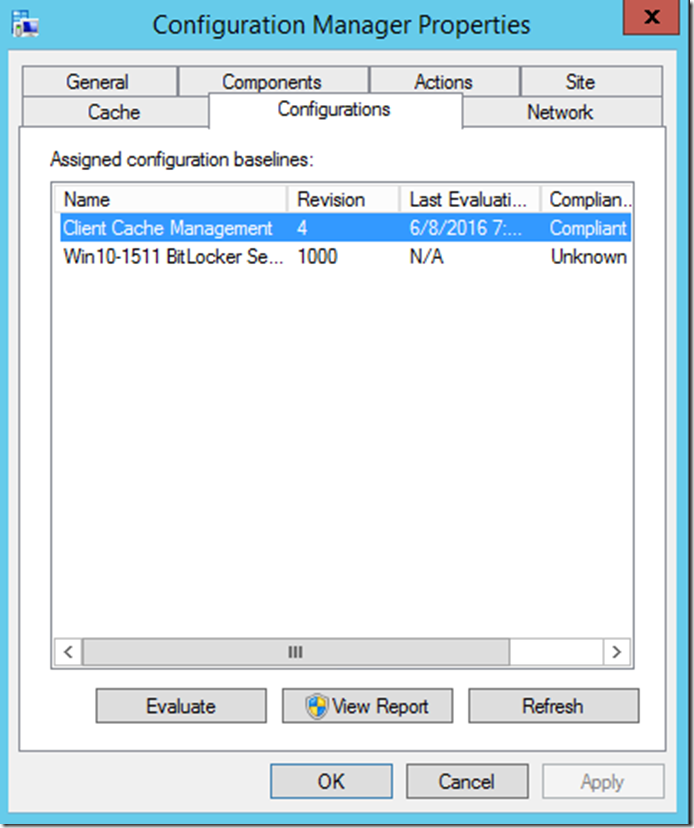
Once the clients process the policy, they are able to review the current state of the client location. If the machine is not in compliance, they are remediated.
In this case, the machine is Non-Compliant, so the remediation script will remediate the machine.
Here is a machine that is compliant, the scripts remediate the machine to the correct client cache path if is found in the incorrect location.
Now one of the other problems they have was the cache size as well. So in the same configuration baseline, you have a Configuration Item to fix the space as well. At a high level, the Configuration Item validates the cache size is a specific size and remediates it to the correct size if its not set to the default size. You can use this to change the cache size for your clients as well.
Summary
The first part of this blog post identifier the impact of a problem and the second part of the blog post is a potential solution. Always test out the solution provided in a lab environment or a small collection to ensure the configuration items are working as expected.
You can download the examples from the following site:
https://gallery.technet.microsoft.com/Client-Cache-Compliance-95b566d0
NOTE: If you still have problems to remediate your environment please open a Ticket with Microsoft Support, at the time of this blog post there is an open item to investigate the problem and identify better solutions in the future so will be very important to open a support ticket if you are unable to solve it with this small workaround.
Santos Martinez – SR PREMIER FIELD ENGINEER – Author and Ninja.
Disclaimer: The information on this site is provided "AS IS" with no warranties, confers no rights, and is not supported by the authors or Microsoft Corporation. Use of any included script samples are subject to the terms specified in the Terms of Use

