SSRS Integrated mode with SharePoint and Report Builder 2.0
Wanted to draw attention to some new features the SQL Server team released in the latest Service Pack for SQL Server 2008. Specifically, the click-once integration of Report Builder within SharePoint.
If you are not running SSRS in Integrated mode with SharePoint, what are you waiting for? You’ll get all the benefits of SharePoint document management for your reports, and now, make it even easier for your users to create and publish their own reports. Here’s what you do:
You’ll need the SQL Server 2008 Reporting Services Add-in for Microsoft SharePoint Technologies, April 2009. A mouthful I know, but you won’t be disappointed.
Before you install this on your SharePoint servers, ensure you have configured the Report Server to use SharePoint integrated mode.
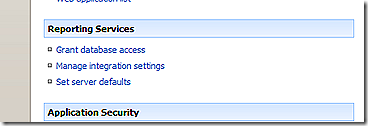
Now install the Reporting Services add-in in your SharePoint environment. Once completed, head on over to the SharePoint Central Administration page to configure the add-in. Under the Application Management tab, you should now see a new area called Reporting Services with three main items. 
Let’s configure each one in turn. Click on “Grant database access”. First, identify where the Report Server exists, and the name of the instance you wish to connect too.
Next, select “Manage integration settings” and specify the URL of the Report Server to be used with this SharePoint site and authentication method.
Lastly, you can change the default settings for the server by selecting “Set server defaults”, including limiting the number of snapshots, enable ad-hoc reporting (this should be checked), and auditing settings. You can leave the Custom Report Builder Launch URL blank, which will allow users to use Report Builder 1.0, or add the following to enabler Report Builder 2.0 “ /_vti_bin/ReportBuilder/ReportBuilder_2_0_0_0.application.”
Now the Report Server is configured to work with SharePoint, and we have specified the version of Report Builder we want to use. We will need to activate the Report Server features for your site collection. You can do this by going to Site Actions –> Site Settings –> Modify All Site Settings. Under Site Collection Administration column, select Site collection features and then activate the Report Server integration Feature.
Let’s now add the content types to our document library. From the menu of the Document Library, select Settings, then Document Library settings, navigate to Content Types, and select Add from existing site content types
From the drop down menu, select Report Server Content Types, and then add the items you want displayed when a user clicks on the New button in the document library. Once you have selected the right items for your document library, click OK. You can modify the order, and change the default New behavior as well once you are back to the Customize document area.
Go back to your document library and now when you click the down arrow next to the New icon, the content types you selected are now visible.
If you now select the Report Builder Report, Report Builder will begin to deploy to your desktop and in a few seconds, will allow you to start authoring a report. That’s pretty much it. You have now enabled the click-once functionality for Report Builder and integrated it with your SharePoint document library and site. Be sure to check out the click once readme for additional items, and troubleshooting tips.
Comments
Anonymous
May 28, 2009
PingBack from http://microsoft-sharepoint.simplynetdev.com/ssrs-integrated-mode-with-sharepoint-and-report-builder-20/Anonymous
May 28, 2009
SQL Server Reporting Services умеет работать в двух режимах: Native (хранит и генерирует отчеты сам)Anonymous
April 15, 2013
What about from an SSRS (BI) project in Visual Studio 2012? I have a SharePoint 2010 list on a site with Claims based. How can I connect to that? I get a 403 - Denied. I have no problem connect using integrated when the site is NTLM. Thanks.


