Microsoft Bot Framework Part 2: Hello World
Welcome back to the continuation of Microsoft Bot Framework Part 1, for more information on how to configure new channels with communication services such as Slack and the web. Before we can connect our bot to users on the web, there are a few security measures we'll have to take with our code.
Many REST APIs require an access token. You’ll need to use this access token in your application when accessing the API, but you don’t want to expose your token to users. If you post your code to a public repository like GitHub, anyone can view the code and obtain your key. Slack is smart enough to know when your Slack Token has been posted to GitHub, and it will automatically deactivate that key. A Meetup API key exposes the Meetup groups you've joined, even private groups, so you really don’t want that getting out in the open.
Protect Your API Keys by using Environment Variables
Previously, in Part 1, I told you to go in your app.js code and swap out ‘YourAppId’ and ‘YourAppPassword’ for the values generated when you registered your bot.
var connector = new builder.ChatConnector({ appId: 'YourAppId', appPassword: 'YourAppPassword' });
While that's fine for local debugging and using the Bot Framework Emulator, if we just changed our code from that to this,
var connector = new builder.ChatConnector({ appId: 'BotWorks', appPassword: '9876543210d1234abc5678efg9h0i1jk' });
I wouldn't be able to upload that to GitHub or Azure without introducing the secret keys to the public.
To avoid that, we create Environment Variables on our server that contain the API keys that we want to protect. Whenever we need to access the keys, we use the node global process object to access the key, ‘process.env’.
 var appId = process.env.MY_APP_ID,
var appPassword = process.env.MY_APP_PASSWORD;
key: MY_APP_ID value: botworks…
key: MY_APP_PASSWORD value: 9876543210d…
Put Environment Variables in Visual Studio Code
Visual Studio Code has support for debugging and using environment variables. You can skip the configuration and still use the tools. VS Code has these 4 icons on the left sidebar:
- Explore file folders
- Open a “Working folder” that contains every file pertaining to your project
- Search
- Local git source control changes
- Debugging
- Node debugger console built in.
- Automatically creates a launch.json file in a .vscode folder. You should create a .gitignore to avoid uploading .vscode and files with keys in them to GitHub.
- Add environment variables to launch.json under “env.”
To add environment variables to VS Code before uploading your code to GitHub or Azure, you can add them to your launch.json file. When you click on the Debugging icon on the left sidebar, choose Node from the dropdown menu at the top, Launch, and then the Run button. If those files aren't in your project yet, VS Code will create them for you now. Then, just be sure to add .vscode to your .gitignore file.
Watch this screenshot gif to see how.
[video width="1784" height="920" mp4="https://msdnshared.blob.core.windows.net/media/2016/06/VS_env.mp4"][/video]
Build a Front End with Embed codes
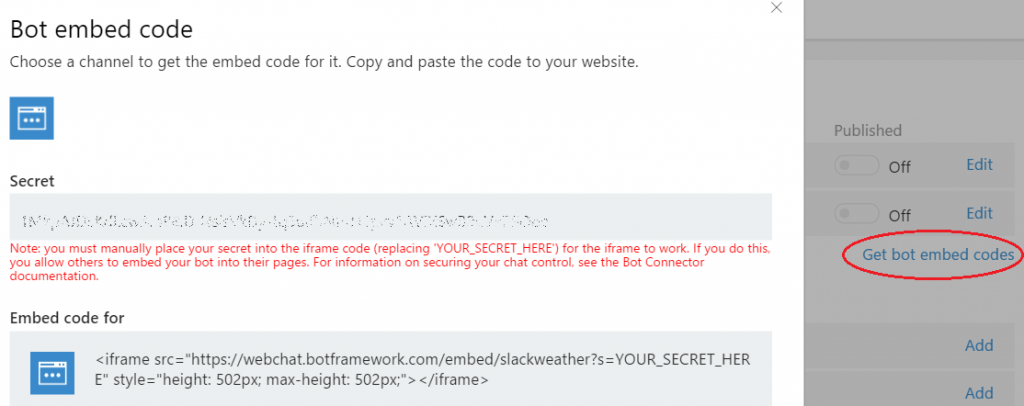
Don't be discouraged if you visit https://localhost:3000/ in a browser and see some kind of error. We just haven’t built any client-facing front end code yet! (That's what the Bot Emulator is for.) Just go to dev.botframework.com, sign in and click on "My bots" to see your bot dashboard. Click “Get bot embed codes”.

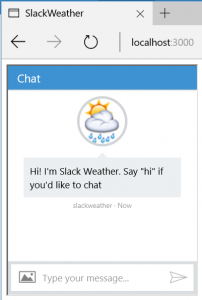
I’d like to create an index.html file so that when I go to MyAppId.azurewebsites.net, I’m greeted by the sunny disposition of my own bot.
In the Node.js cmd prompt, type:
>cls>index.html
[Creates a file called “index.html” in your file explorer. Edit this through VS Code.]
 <!doctype html>
<html>
   <head>
      <title>MyAppID</title>
   </head>
   <body>
      //iframe
   </body>
</html>
In the index.html code above, replace //iframe with:
<iframe src="https://webchat.botframework.com/embed/YourAppId?s=YOUR_SECRET_HERE" style="height: 502px; max-height: 502px;"></iframe>
Manually place your Secret into the iframe code (replacing 'YOUR_SECRET_HERE') for the iframe to work. If you do this, you allow others to embed your bot into their pages.
The only thing left to do is to add the following lines of code to your app.js file:
 server.get(/\/?.*/, restify.plugins.serveStatic({
 directory: __dirname,
 default: '/index.html'
}));

Put Environment Variables in Azure
Since I am uploading this project onto Azure, I can place the values of my API keys in my project’s application settings. Doing this keeps my secret tokens separate from my code and files, and I can still check in my code to GitHub.
Go back to https://portal.azure.com and click on your web app (BotWorks). In the Settings blade, scroll down until you see General. Click Application Settings to open a new blade. (While we're here, under "General settings," you can set the Azure web app to "Always on." Doing this makes it so Node will never shut off, because your bot might not have a browser to ping. This option is, however, more expensive.)
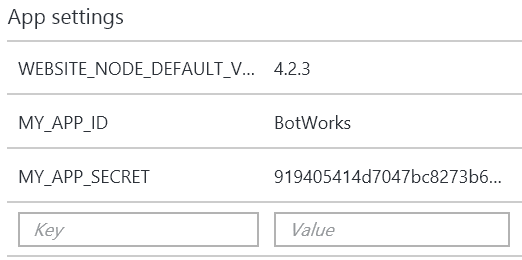
Scroll down to "App Settings" until you see a set of Key/Value pairs. Copy and paste your AppId in the “Value” form, then create a corresponding variable name in the “Key” form.
Copy and paste your AppPassword in the next “Value” form, then create a similar corresponding variable name in the “Key” form. These names must coincide with the names you used in VS Code, and usually follow an ALL_CAPS naming convention.
Click on the Save icon to save these values. It will look something like this in the Azure portal:

Deploy Node.js App from GitHub to Azure
Uploading these variables to our Azure web service is nice, in theory, but it doesn't do us any good if no code has been deployed yet!
In order to get my bot's code working on https://botworks.azurewebsites.net/api/messages, I can continuously deploy my app from GitHub to Azure.
Making a file called app.js will automatically cause Azure to recognize it as a Node.js app. Azure will immediately look for a package.json file and install all dependencies listed therein. Like I mentioned earlier, make sure package.json is up-to-date with your dependencies before you publish to Azure.
First, we'll need to push all local changes to GitHub, without exposing any secret keys.
GitHub
- Update dependencies
Try to think of any node modules you might want Azure to install in the future of your bot.
If you want to call a RESTful API, chances are good Node.js has a module for that.
Installing "https" may help you call said API.
If you want to give your bot front-facing HTML content, consider installing "express".
-
 npm install --save [your API of choice]
npm install --save https
- Hide tokens
- Hide any and all secrets, API keys, or tokens you may have acquired by using 'process.env'.
- You can still access the tokens by setting them in your execution environment via
exportor at runtime. - Another route is to create the token in a specific file and include that, but also add that specific file to .gitignore to ensure it doesn't get checked in to GitHub.
- Commit and Push
- Save your working files.
- Commit to git either through VS Code or Node.
- Push to GitHub either through VS Code or Node.
- Enter your GitHub username and password to authenticate.
- Refresh GitHub online to verify changes.
Azure
In the Azure Portal, in the Settings blade, scroll down to Publishing and look for the words “Deployment options.” Follow the prompts to select a method of source control. (Options include Visual Studio Team Services, OneDrive, Local Git Repository, GitHub, BitBucket, Dropbox, and External Repository.)
Choose Source: (GitHub) > Authorization: (YourUserName) > Choose your organization: (Personal?) > Choose project: (YourAppID) > Choose branch: (master) > Performance Test: (Not Configured) > OK.
Azure will now start setting up the deployment source. If successful, you may click "Deployment source" again to see it linking up the GitHub repo, building, deploying, fetching changes, and going active.
Node.js Debugging Tricks
Test Chat
Now we would like to test our connection to our bot. Your developer dashboard has a test chat window you can use to send test messages to your bot. Microsoft Bot Framework has this reusable chat control that developers can put in their own websites to talk directly with their bots. You can use this tool to interact with your Bot without further configuration, and verify that the Bot Framework can communicate with your Bot’s web service.
(Note that the first request after your Bot starts up can take 20-30 seconds as Azure starts up the web service for the first time. Subsequent requests will be quicker.) This simple viewer will let you see the JSON object returned by your Bot.
Bot Framework Emulator
Microsoft also invented the Bot Framework Emulator to do much the same thing, but this one only runs on Windows.
Kudu SCM
Every Azure web site has an associated 'scm' service site, which runs both Kudu and other Site Extensions. If your web site has URL https://YourAppID.azurewebsites.net/, then the root URL of the Kudu service is https://YourAppID.scm.azurewebsites.net/. Note the added scm token.
This service is a pretty cool debugging trick. If you go to "Debug console" > "PowerShell" you will see PowerShell that's actually for the virtual machine that's running your website!
Above that is a folder structure. "site" > "wwwroot" contains your web-facing files. You can actually see what has been deployed here, including node_modules.
If you click on "Process explorer" you can see what apps are running. W3wp.exe will always be running. Node.exe only boots up once someone pings the server through the browser. If you only build a Slack bot, you might want to enable "Always on" so that you don't have to visit YourAppID.azurewebsites.net every time you want your Slack bot to come online, since there's no other browser to ping.
Under "Tools" > "Log stream" you can see anything printed to console log, errors, etc.
Node Inspector
As an alternative to debugging in VS Code, you can install Node Inspector globally from NPM. If this is your first time:
- Open a regular cmd command prompt window
- Type “npm install -g node-inspector” and hit enter.
- Wait at least 60 seconds. This is a global package that you can use anywhere on your machine.
- Let node-inspector run in the folder you want to debug (this needs to be running in the background).
If you have already installed node-inspector:
- Open a regular cmd command prompt window
- Type “node-inspector” and hit enter.
- Switch to the the Node.js cmd prompt, type “node --debug app.js” and hit enter. That puts Node into Debug mode. It opens a port that you can connect the debugger to.
- Open Chrome browser and navigate to https://localhost:8080
- Allow it to show notifications.
- You can put breakpoints on any of the lines, and when you hit them, you’ll get a notification (which is why you enabled them). You can go in there and see the Step Over, Step Into, Step Out Of call stack on the right side.
- You can kill your node.js process the normal way, with Ctrl^C. When you do, localhost:8080 will go blank, because it will no longer be connected.
- If you start your node.js app up again, you may need to refresh Chrome.
To stop listening and deactivate your bot, go back to the Node.js command prompt and type ^C.
Now, if your Bot is up and running, you can configure it for a communication channel like Slack! Configuring channels is a combination of Microsoft Bot Framework workflow and conversation service workflow, and is unique for each channel you wish to configure.
Check out Microsoft Bot Framework Part 3 for info on how to build more conversational dialog options into your bot, and configure new channels with communication services such as Slack and SMS!
Comments
- Anonymous
July 10, 2016
Hello,Thanks for the detailed tutorial.I have an issue. I kinda followed the tutorial except that I used the v3.When I test the connection to my bot on botframework.com, I get an "Accepted". Yet, when using the webchat, it does not work.I really reused the code that was given (see below) except for the index.html part.I published the webapp directly from my github repo. The webchat appears but the bot does not work.What could I have done wrong ?Best regards and thank you in advance for any help,Yanis var restify = require('restify');var builder = require('botbuilder');//=========================================================// Bot Setup//=========================================================// Setup Restify Servervar server = restify.createServer();server.listen(process.env.port || process.env.PORT || 3978, function () { console.log('%s listening to %s', server.name, server.url); }); // Create chat botvar connector = new builder.ChatConnector({ appId: "HERE I PUT THE ACTUAL APP ID", appPassword: "HERE I PUT THE ACTUAL PASSWORD"});var bot = new builder.UniversalBot(connector);server.post('/api/messages', connector.listen());server.get('/', restify.serveStatic({ directory: __dirname, default: '/index.html'}));//=========================================================// Bots Dialogs//=========================================================bot.dialog('/', function (session) { session.send("Hello World");}); - Anonymous
August 27, 2016
Great tutorial - thanks Sarah! A minor correction regarding deployment to Azure. After signing into the Azure Portal, you need to open up your bot's app service, then select the "Deployment options" (under App Deployment) blade. Then you can follow the rest of the prompts to link your source repository. Cheers. - Anonymous
September 03, 2016
nice job with this! several other tutorials were missing key steps, but yours really works! :) - Anonymous
October 21, 2016
This article mostly worked for me. I didn't realise you had to generate a secret from the Bot Framework Web Chat Channel to embed in the iFrame URL. Also the code in the GIFs contains deprecated items. Use the code in the previous article and amend that. Also when using the process.env stuff in VCode to hide your ID and Secret, and using the emulator, it will only work if you run app.js through the debugger rather than the node.js cmd window! - Anonymous
April 25, 2017
Hi Sarah,how do you build the "YOUR_SECRET_HERE" field from the two Secret Keys generated from MS site?I receive this msg where I run the html file with the frame inside: "You do not have permission to view this directory or page."Thank youArbri