How to Increase the Maximum Upload Size in SharePoint 2013
There are so many configuration settings documented elsewhere online to increase the maximum file upload size in order to store large files in SharePoint. Often times, you keep on trying different settings (you may even forget what you have tried and still can't get it to work!!) In this post I will walk you through two simple steps to accomplish this task :)
- Change the maximum upload size on the web application level
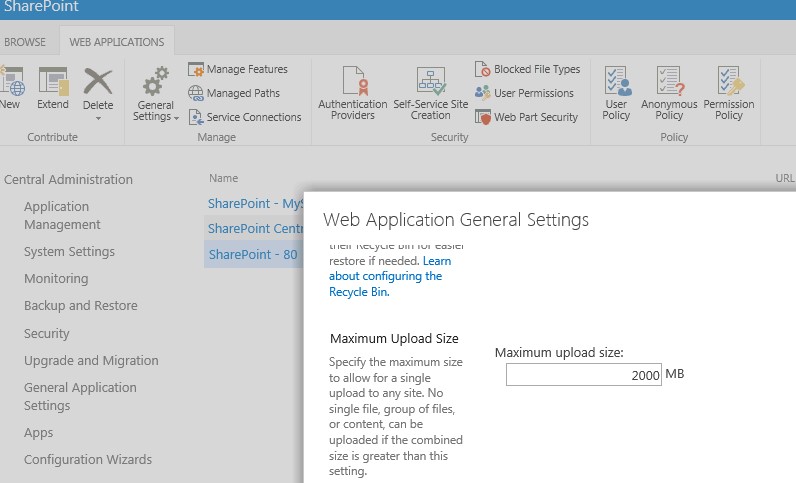
Central Admin>Application Management>Manage Web Applications> Select the desired web app and click General Settings on the ribbon
- Modify the web.config file for the appropriate web application, this is located by default at C:\inetpub\wwwroot\wss\VirtualDirectories\web application name or port
-
- Make a backup copy of the web.config, then open it
- Do a Ctrl+f to find this element
<httpRuntime maxRequestLength="51200" requestValidationMode="2.0" />
-
- Modify the above element to match the following
<httpRuntime executionTimeout="999999" maxRequestLength="2048000" requestValidationMode="2.0" />
-
- In the above step we added executionTimeout="999999" and we set the maxRequestLength to what we set the maximum upload size on the web application general settings, which is 2048000 (2000mb * 1024 = 2048000)
And that should be all that you have to do :)
If you run into trouble, you can keep on reading on how you can use the ULS logs to find out more information about the issue.
- If you upload a large file to an out of the box web application with default settings, you should expect to get an error. Copy the correlation id of the error and open the ULS logs and you should see the following exception about the Maximum request length exceeded, hence we change the maximum request length in the web.config to the desired amount, in this case it was 2048000.

- Now change the maximum request length in the web.config and save the file and try to upload a large file size, you should get another error, copy the correlation id and lets check the uls logs one more time. You should see another exception this time is about the request timed out, hence we added executionTimeout="999999"

I am not a big fan of changing the upload file size to a very large amount due to other implications, for instance large files uploaded to IIS can have a high impact on server memory, also transferring large files over TCP can run into network issues where you may have to re-upload the file again from scratch!! A better option is to use some custom upload manager to stream the upload. My recommendation is to set the file size somewhere between 250-400 mb, unless your business case requires otherwise.
Happy SharePointing!!
Comments
- Anonymous
October 15, 2015
nice and clean instructions... but what about SP2013 on cloud... any suggestions, what is the max limit for upload, what is the max to migrate to SP2013? - Anonymous
February 04, 2016
The max limit for file upload is 10Gb and file attachment is 250Mb. Please refer to this link for all the limits of onlinehttps://support.office.com/en-us/article/SharePoint-Online-and-OneDrive-for-Business-software-boundaries-and-limits-8f34ff47-b749-408b-abc0-b605e1f6d498?ui=en-US&rs=en-US&ad=US - Anonymous
April 15, 2016
Application of your instructions worked well for a manual file upload (and download) of 1.95GB zip files, but moving an uploaded file via an approval workflow to a Records Library failed for zip file sizes exceeding ~750MB. Is there another IIS threshold value that can be increased to avoid the ULS log Maximum request length exceeded) - Anonymous
August 31, 2016
Thank you
