SQL Server 2008 R2 Sysprep Step by Step
Starting in SQL Server 2008 R2, we have added Sysprep functionality. The Sysprep functionality enables rapid deployment and configuration of SQL SQL Server. The SQL Server sysprep functionality allows you to install files and then configure at a later point. SQL Server Sysprep can be used with Windows Sysprep to create an operating system image that includes an unconfigured SQL Server installation. After completing the configuration of the operating system, you can then configure the SQL Server install using the “Complete Image” wizard. The Sysprep functionality is available in all SQL Server 2008 R2 editions.
There are 2 different phases:
(1) Preparing the image by installing the files on to the system for the features that are selected. At this point, the features are not usable
(2) Configure the features to be useable. At this point the instance, networking and service accounts are configured. Once the image is configured the SQL Server image can be used.
Limitations:
- Only the database engine and reporting services supports Sysprep
- Cannot be used for clustering scenarios
- Not supported on IA64 system or supported in WOW64
- The installation media need to be available when preparing an image and configuring the image. When Sysprepping a SQL Server Express, you need to extract the files to the local machine before preparing the image.
See https://msdn.microsoft.com/en-us/library/ee210754(SQL.105).aspx for an overview of SQL Server sysprep and https://technet.microsoft.com/en-us/library/ee210664(SQL.105).aspx for additional information on how to install in the SQL Server 2008 R2 books online.
Prepare an image:
1. If you are going to sysprep Express, extract the source media to the local machine as follows:
SQLEXPR_x64_ENU.exe /x:c:\SQLServer2008R2Express
2. Run Setup.exe from your original source media or from the extracted Express location. When the Installation Center comes up, navigate to the Advanced page and select “Image preparation of a stand-along instance of SQL Server”.
3. Select OK on the Setup Support Rules, if there are no errors.
4. Click Install on the Setup Support Files dialog.
5. Click Next.
6. Accept the License Terms
7. Select the features to Sysprep and then click Next. Notice only the Database Engine, Replication, Full-text, and Reporting Services can be Sysprep.
8. Specify an Instance ID and then click Next
9. Click Next on the Disk Space dialog.
10. Click Next on the Prepare Image Rules, if there are no errors.
11. Click Prepare to kick off the installation of the files.
12. Just wait for the process to continue.
13. You are now done installing the files. Click Close to exit out of wizard.
Complete or configure the installation:
Important: To complete this configuration, the Wizard needs access to the original source media.
1. Launch the “Complete SQL Server 2008 Installation” short-cut off of the Start menu.
2. Click OK
3. Click Install
4. Click Next
5. Enter your Product Key
6. Accept the License terms and then click Next.
7. Specify the Instance ID that you want to complete or configure and then click Next.
8. Click Next on the features to be completed and configured.
9. Specify an Instance Name and then click next.
10. Specify the account that the services should run under and then click next.
11. Specify the accounts that should have admin permission inside of SQL Server
12. Specify how to configure Reporting Services configuration mode
13. Specify the Error Reporting settings.
14. Click Next if there are no errors.
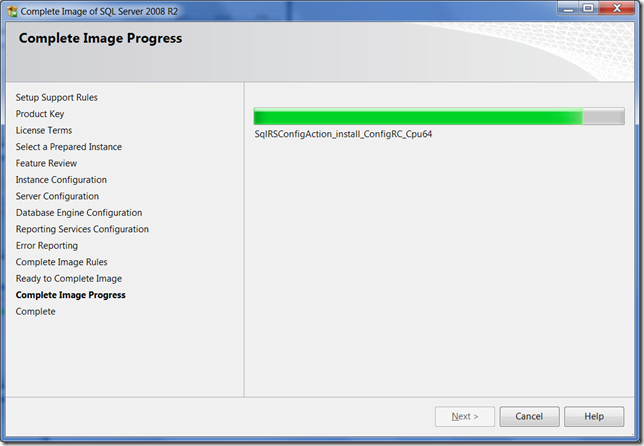
15. Click complete to start the process of configuring the features
16. Setup is setting up the instance and services.
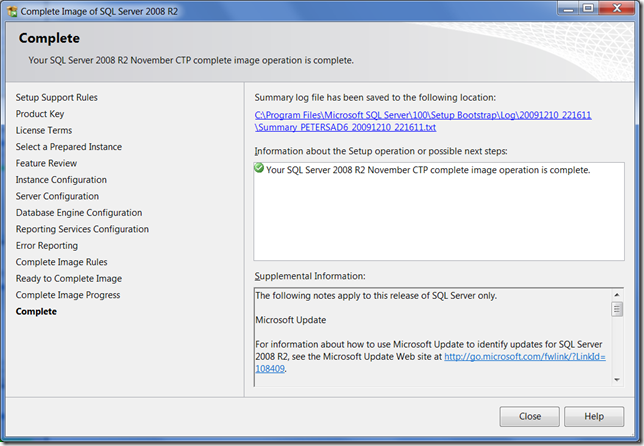
17. Setup is done configuring the features. You can now start using the instance.
Comments
Anonymous
November 07, 2010
The comment has been removedAnonymous
December 06, 2010
IS GOOD IMAGES SHOWING INISTALATIONAnonymous
May 26, 2011
How can i set Mix mode authentication at the time of installing Sql Server 2008Anonymous
November 17, 2011
Can We Install schema and then sysprep to reuse ?Anonymous
June 13, 2012
Hello if select the default name (MSSQLSEVER) the name of de instance is Equal to name of the NETBIOS neme after syspre processAnonymous
June 24, 2012
Thanks Sir.... for giving such a nice Article... Thanks AgainAnonymous
September 11, 2013
Guys please fix problem with images. I doesn't see it.Anonymous
October 22, 2013
Pl tell me that it is important that u first install sql server 2008R2 before visual studio. if visual studio already install it create problemAnonymous
October 30, 2013
Hi Plz help me, I am unable to find SQL SERVER Management studio in lapy. I have fallowed all instruction which has above mentioned. I am using win 8. Please helpAnonymous
November 01, 2013
pls tell me how to connect with sql server with serverAnonymous
December 30, 2013
WEL'''''''''''''''HHHHHHHHHHHHHHHHHHHHHHHHHHHJNKJKNKNJAnonymous
May 08, 2014
Thanks Sir.... for giving such a nice Article.Anonymous
June 04, 2014
Thanks for this article Excatly what we were lookign for :-) !Anonymous
July 20, 2014
Hi Friends, How to installation sql server.Anonymous
September 09, 2014
i dont know why my sql server 2008 shortcut is missing in start menuAnonymous
November 23, 2014
thanks sir well guided!! needed alot this...Anonymous
February 27, 2015
The comment has been removed


