Trigger a PowerShell Script from a Windows Event
Note: Portions of this blog are taken from an old blog post titled “Reference the Event That Triggered Your Task”
This example will demonstrate both how to trigger (launch) a PowerShell script from a specific Windows Event, AND pass parameters to the PowerShell script from the Windows Event that triggered the script. For the purpose of this example, a test event will be generated using the built-in EventCreate command-line utility.
Background: The scenario behind this example was a need to clean up a file-share after a specific Windows Event occurred. A specific Windows Event was logged upon the success of a file watermarking process. The event used in this example loosely follows the original event format.
The following steps will be demonstrated:
- Manually create the trigger event.
- Use Event Viewer to create an event triggered task from the above event.
- Modify the task to expose event details to the downstream script.
- Implement the PowerShell script to be triggered.
- Verify the setup.
Step 1: Create the trigger event using EventCreate (it’s easier to go this route to generate a Scheduled Task for modification rather than trying to create one from scratch).
C:\>eventcreate /T INFORMATION /SO SomeApplication /ID 1000 /L APPLICATION /D "<Params><Timestamp>2011-08-29T21:24:03Z</Timestamp><InputFile>C:\temp\Some Test File.txt</InputFile><Result>Success</Result></Params>"
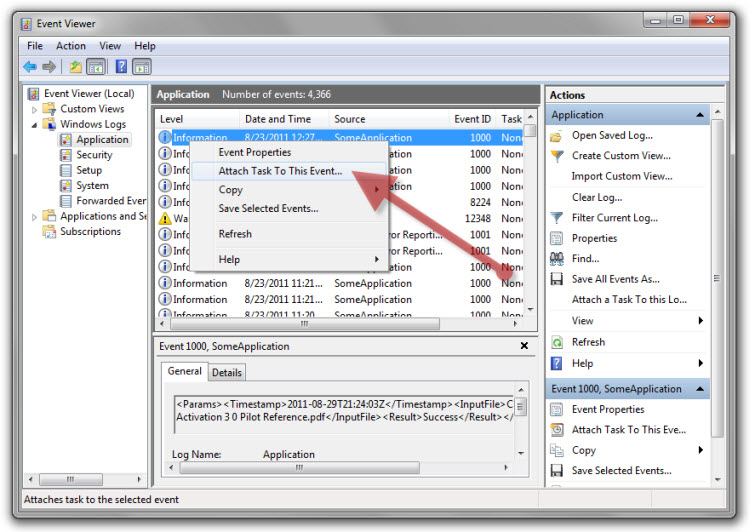
Step 2: Use the Event Viewer “Attach Task to This Event…” feature to create the task.
Launch "Event Viewer" and find the event you created in Step 1. It should be located toward the top of the "Windows Logs\Application" Log. Once found, right-click on the event and select "Attach Task to This Event..." then use the defaults for the first couple screens of the wizard.
Create a task to “Start a Program” with the following parameters:
Program/script: PowerShell.exe
Add arguments: .\TriggerScript.ps1 -eventRecordID $(eventRecordID) -eventChannel $(eventChannel)
Start in (you might need to create this directory or alter the steps to use a directory of your choice): c:\temp
Step 3: Modify the task to expose details about the trigger event and pass them to the PowerShell script
From within Task Scheduler, export the newly created task (as an XML file). Right-click on the task "Application_SomeApplication_1000" in the "Event Viewer Tasks" folder, and select "Export...".
Use Notepad (or your text editor of choice - keep in mind the text editor must honor unicode which notepad does) to add the Event parameters you which to pass along to your task. The event parameters below are the most useful for event identification. Notice the entire node <ValueQueries> and its children need to be added to the EventTrigger branch.
<ValueQueries>
<Value name="eventChannel">Event/System/Channel</Value>
<Value name="eventRecordID">Event/System/EventRecordID</Value>
<Value name="eventSeverity">Event/System/Level</Value>
</ValueQueries>
See below:
From an Elevated Command Prompt, execute the following commands to delete the Trigger Task and recreate it with the newly modified exported Trigger Task (I don't believe there's a way to modify an existing task using an updated XML file).
C:\>schtasks /delete /TN "Event Viewer Tasks\Application_SomeApplication_1000"
C:\>schtasks /create /TN "Event Viewer Tasks\Application_SomeApplication_1000" /XML Application_
SomeApplication_1000.xml
Step 4: Implement the PowerShell script to be triggered by creating a script called “TriggerScript.ps1” below
Note: The script below is passed basic information about the event that triggered it. The script then queries the Windows Event Log to get more details about the event (the event payload). For this example, XML is used in the payload to separate the parameters, but any text can be passed as long as the script knows how to parse it. In addition, the “eventRecordID” that’s passed to the script should not be confused with the eventID of the event. The eventRecordID is a sequential number assigned to all events as they are logged to a specific channel. In addition, eventRecordIDs are only unique for a specific Channel (Log).
# Script Name: TriggerScript.ps1
# Usage Example (use a valid ID found via Event Viewer XML view of an event): powershell .\TriggerScript.ps1 -eventRecordID 1 -eventChannel Application
#
# Create a fake event or testing with the following command (from an elevated command prompt):
# eventcreate /T INFORMATION /SO SomeApplication /ID 1000 /L APPLICATION /D "<Params><Timestamp>2011-08-29T21:24:03Z</Timestamp><InputFile>C:\temp\Some Test File.txt</InputFile><Result>Success</Result></Params>"
# Collects all named paramters (all others end up in $Args)
param($eventRecordID,$eventChannel)
$event = get-winevent -LogName $eventChannel -FilterXPath "<QueryList><Query Id='0' Path='$eventChannel'><Select Path='$eventChannel'>*[System[(EventRecordID=$eventRecordID)]]</Select></Query></QueryList>"
[xml]$eventParams = $event.Message
if ($eventParams.Params.TimeStamp) {
[datetime]$eventTimestamp = $eventParams.Params.TimeStamp
$eventFile = $eventParams.Params.InputFile
$popupObject = new-object -comobject wscript.shell
$popupObject.popup("RecordID: " + $eventRecordID + ", Channel: " + $eventChannel + ", Event Timestamp: " + $eventTimestamp + ", File: " + $eventFile)
}
Note: Besides executing a script, a task can display a popup directly or send an email. An email can be useful for catching infrequent events on your system or in your environment. And a task can be deployed via Group Policy Preferences.
Step 5: Verify the setup by generating another trigger event as in Step 1
C:\>eventcreate /T INFORMATION /SO SomeApplication /ID 1000 /L APPLICATION /D "<Params><Timestamp>2011-08-29T21:24:03Z</Timestamp><InputFile>C:\temp\Some Test File.txt</InputFile><Result>Success</Result></Params>"
You should see the following Popup window appear (it might be hidden behind other Windows):
Didn’t work? Try the following:
- Check for the trigger event in Event Viewer (you might need to “refresh” you view of a log w/F5).
- Manually run the script with real parameters and check for errors (see script comments for usage examples). Since this script is not “signed”, PowerShell will need to be configured to run an unsigned script (PS> get-help about_Execution_Policies).
- Verify that the task is actually in the Task Scheduler in the folder “Event Viewer Tasks” and view its “History”.
Comments
Anonymous
August 24, 2011
Great article! Good to know you can pass useful parameters to the script. Cheers, Trevor Sullivan http://trevorsullivan.netAnonymous
August 30, 2011
You can use WMI permanent consumers to achieve the same: www.ravichaganti.com/blog


