Debugging Remote Event Receivers with Visual Studio
Editor’s update (3/21/2013) : The RTM version of the Office Developer Tools for Visual Studio 2012 include tools for debugging remote event receivers. You no longer have to follow the procedure described in this post. Chakkaradeep just published a post about the new tools for debugging remote event receivers. For more information, see Update to debugging SharePoint 2013 remote events using Visual Studio 2012.
Introduction
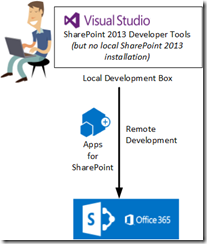
One of the new features introduced for SharePoint development in the Microsoft Office Developer Tools for Visual Studio 2012 – Preview 2 is the ability to use a remote development environment to build apps for SharePoint. With previous versions of the SharePoint tools in Visual Studio, developers had to install SharePoint Foundation or SharePoint Server locally before they could build SharePoint solutions in Visual Studio. With SharePoint 2013, you can build apps for SharePoint targeting a remote SharePoint 2013 site (installed in a remote server) or SharePoint 2013 Online (Office 365). You don’t have to install SharePoint locally to build apps for SharePoint.
Figure 1. SharePoint 2013 remote development
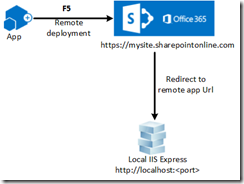
Remote development allows you to deploy and debug an app for SharePoint on a remote SharePoint website. When there is a web project involved, as in the case of autohosted or provider-hosted apps, debugging is achieved by running the web project locally on Internet Information Services (IIS) Express.
Figure 2. Apps for SharePoint debugging experience
During remote app development, you create remote event receivers and app event receivers to handle events such as list events, list item events, and app events. If you are new to remote event receivers, get a quick overview in Handling events in apps for SharePoint.
However, debugging a remote event receiver locally is challenging because the locally running IIS Express would typically not be reachable from the remote SharePoint server. When the remote SharePoint server cannot reach the local development machine due to network boundaries, some extra work is required to invoke the remote event receiver.
Figure 3. Debugging remote event receivers
This blog post describes how to use the Windows Azure Service Bus to work around the network boundary issue so as to enable remote event receiver debugging when using a remote development for building apps for SharePoint with the Preview 2 release.
Windows Azure Service Bus to the rescue
Add Service Bus extensions to the web project
Debug the remote event receiver
Publish your app to the marketplace
Sample project
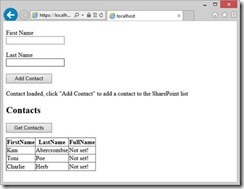
I have a simple autohosted app that adds items to a contacts list.
Here’s how it looks:
Figure 4. Autohosted app that adds items to a contacts list
Add Contact will add the contact with the given first name and last name. However, as you can see, it does do not set the full name of the contact. The full name can be as simple as (First Name + “ “ + Last Name).
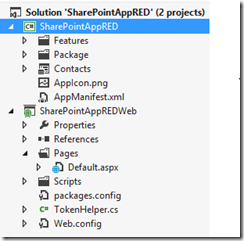
Here is the snapshot of Solution Explorer:
Figure 5. Project in Solution Explorer
Add a remote event receiver
Let’s use a remote event receiver to set the FullName property of a contact.
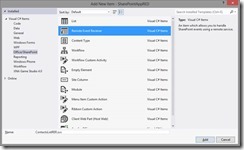
You can add a new remote event receiver by right-clicking the app for SharePoint project and choosing Add,New Item,Remote Event Receiver.
Let’s name the remote event receiver ContactsListRER.
Figure 6. Adding a remote event receiver
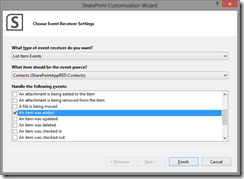
When you click Add, a wizard starts. For this example, we will handle the following event: An item was added.
Figure 7. SharePoint Customization Wizard
This adds the ContactsListRER.svc— a remote event receiver service—to the web project:
Figure 8. Remote event receiver service added
At the same time, a remote event receiver item is added to the app for SharePoint project:
Figure 9. Remote event receiver item added
Open ContactsListRER.svc.cs and replace the ProcessOneWayEvent code with the following code:
 public void ProcessOneWayEvent(SPRemoteEventProperties properties)
{
    using (ClientContext clientContext =
        TokenHelper.CreateRemoteEventReceiverClientContext(properties))
    {
        if (clientContext != null)
        {
            string firstName =
                properties.ItemEventProperties.AfterProperties[
                    "FirstName"
                    ].ToString();

            string lastName =
                properties.ItemEventProperties.AfterProperties[
                    "LastNamePhonetic"
                    ].ToString();

            List lstContacts =
                clientContext.Web.Lists.GetByTitle(
                    properties.ItemEventProperties.ListTitle
                );

            ListItem itemContact =
                lstContacts.GetItemById(
                    properties.ItemEventProperties.ListItemId
                );

            itemContact["FullName"] =
                String.Format("{0} {1}", firstName, lastName);
            itemContact.Update();

            clientContext.ExecuteQuery();
        }
    }
}
The code retrieves the item properties FirstName and LastName and generates the full name. It then updates the FullName property with the full name value.
The remote event receiver’s Elements.xml file provides the information to SharePoint as to where the remote event receiver service is hosted. If you look through the file’s contents, you will see the Url property:
 <?xml version="1.0" encoding="utf-8"?>
<Elements xmlns="https://schemas.microsoft.com/sharepoint/">
  <Receivers ListTemplateId="10000">
      <Receiver>
        <Name>ContactsListRER.svcItemAdded</Name>
        <Type>ItemAdded</Type>
        <SequenceNumber>10000</SequenceNumber>
        <Url>~remoteAppUrl/ContactsListRER.svc.svc</Url>
      </Receiver>
  </Receivers>
</Elements>
Notice that the following token is used to resolve the remote App Url: ~remoteAppUrl
- ~remoteAppUrl will be replaced with https://localhost:[port-number] when you are debugging locally in your development environment as the web project is hosted in IIS Express.
- ~remoteAppUrl will be replaced with the Windows Azure instance when the app is deployed to the SharePoint Online site.
- For provider-hosted apps, you can replace this value with the actual service Url
During F5 (debugging), if you are building a high trust app, you may not have any issues calling the remote event receiver service as long as your local SharePoint instance can reach the service. However, if SharePoint is not able to reach the service, the remote event receiver will fail to work in debugging mode.
Windows Azure Service Bus to the rescue
Windows Azure Service Bus provides a hosted, secure connectivity options for Windows Communication Foundation (WCF) and other service endpoints, including REST (Representational State Transfer) endpoints that would otherwise be difficult or impossible to reach. Most importantly, Service Bus endpoints can be located behind network address translation (NAT) boundaries or dynamically assigned IP addresses. This means that the Service Bus Relay can expose select WCF services that reside within your internal network to the public cloud, without having to open a firewall connection or requiring any changes to your network infrastructure.
We will use the Service Bus to create and host the remote event receiver service in a Service Bus endpoint, and update the remote App Url to be the Service Bus endpoint. This will then enable SharePoint to directly talk to the Service Bus endpoint, which will then call back to your service running in IIS Express.
To use Windows Azure Service Bus, the following things are required:
- Register a Windows Azure account and then a Service Bus namespace. See Managing Service Bus Service Namespaces for more information about managing namespaces.
- If you are behind a firewall, a proxy client (such as TMG proxy client) may be required depending on your network topology.
Add Service Bus extensions to the web project
In order to work with the Service Bus, we will need to reference Service Bus assemblies in the web project.
We can make use of the Service Bus NuGet package to reference the assemblies:
- Right-click the web project, and select Manage NuGet Packages .
- Search for the following package online: windowsazure.servicebus.
- Select Windows Azure Service Bus and then select Install .
This will install the NuGet package
The next step is to update the web.config file to create and host the Service Bus endpoint. Replace the entire code within the <system.servicemodel> with the following:
 <system.serviceModel>
    <bindings>
        <basicHttpBinding>

            <!--Used by app for SharePoint-->
            <binding name="secureBinding">
                <security mode="Transport" />
            </binding>
        </basicHttpBinding>

        <!-- Service Bus Binding -->
        <basicHttpRelayBinding>
            <binding name="BasicHttpRelayBindingConfig">
                <security relayClientAuthenticationType="None" />
            </binding>
        </basicHttpRelayBinding>

        <!-- Service Bus Binding -->
    </bindings>
    <protocolMapping>
        <add
            binding="basicHttpBinding"
            scheme="https"
            bindingConfiguration="secureBinding" />
    </protocolMapping>
    <extensions>

        <!-- In this extension section we are introducing all known service
        bus extensions. Users can remove the ones they don't need. -->
        <behaviorExtensions>
            <add
                name="transportClientEndpointBehavior"
type=
"Microsoft.ServiceBus.Configuration.TransportClientEndpointBehaviorElement,
                    Microsoft.ServiceBus,
                    Version=1.8.0.0,
                    Culture=neutral,
                    PublicKeyToken=31bf3856ad364e35" />
            <add
                name="serviceRegistrySettings"
type="Microsoft.ServiceBus.Configuration.ServiceRegistrySettingsElement,
                    Microsoft.ServiceBus,
                    Version=1.8.0.0,
                    Culture=neutral,
                    PublicKeyToken=31bf3856ad364e35" />
        </behaviorExtensions>
        <bindingExtensions>
            <add
                name="basicHttpRelayBinding"
type=
"Microsoft.ServiceBus.Configuration.BasicHttpRelayBindingCollectionElement,
                    Microsoft.ServiceBus,
                    Version=1.8.0.0,
                    Culture=neutral,
                    PublicKeyToken=31bf3856ad364e35" />
        </bindingExtensions>
    </extensions>

    <!-- Service Bus Binding -->
    <services>
        <clear />
        <service
            name="[your RER service class name with namespace]"
            behaviorConfiguration="default">
            <endpoint
                address="[your IIS Express http address]"
                binding="basicHttpBinding"
contract="Microsoft.SharePoint.Client.EventReceivers.IRemoteEventService"/>
            <endpoint
                address="[your IIS Express http address]/mex"
                binding="mexHttpBinding"
                contract="IMetadataExchange" />
            <endpoint
                address="[your service bus namespace]/[your address]"
contract="Microsoft.SharePoint.Client.EventReceivers.IRemoteEventService"
                binding="basicHttpRelayBinding"
                bindingConfiguration="BasicHttpRelayBindingConfig"
                behaviorConfiguration="sharedCredentials" />
        </service>
    </services>
    <behaviors>
        <serviceBehaviors>
            <behavior name="default">

                <!-- To avoid disclosing metadata information,
                set the values below to false before deployment. -->
                <serviceMetadata
                    httpGetEnabled="true"
                    httpsGetEnabled="true"/>

                <!-- To receive exception details in faults for debugging
                purposes, set the value below to true. Set to false before
                deployment to avoid disclosing exception information. -->
                <serviceDebug includeExceptionDetailInFaults="true" />
            </behavior>
        </serviceBehaviors>
        <endpointBehaviors>
            <behavior name="sharedCredentials">
                <transportClientEndpointBehavior
                    credentialType="SharedSecret">
                    <clientCredentials>
                        <sharedSecret
                            issuerName="[your service bus issuer name]"
                            issuerSecret="[your service bus secret]" />
                    </clientCredentials>
                </transportClientEndpointBehavior>
                <serviceRegistrySettings discoveryMode="Public" />
            </behavior>
        </endpointBehaviors>
    </behaviors>

    <!-- Service Bus Binding -->
</system.serviceModel>
Replace the following with your own values:
Text to replace |
Replace with |
Comments |
[your RER service class name with namespace] |
Generated remote event receiver class in the web project |
For example: SharePointAppREDWeb.ContactsListRER Double-click the .svc in the web project to view the RER class name. |
[your IIS Express http address] |
IIS Express HTTP Port |
You can get the IIS Express port numbers from the web project properties pane |
[your service bus namespace]/[your address] |
Windows Azure Service Bus Namespace and your choice of address |
You will need to sign up for a Windows Azure Service Bus account and create a namespace. You can use any name for the address name, and it denotes the service you are hosting in the Service Bus namespace. For example: https://spappdebug.servicebus.windows.net/hellospservice |
[your service bus issuer name] |
Service Bus Namespace Issuer Name |
You can get this from your Service Bus Access Key properties. |
[your service bus secret] |
Service Bus Namespace Secret |
You can get this from your Service Bus Access Key properties. |
One last change to the web project is to set the ContactsListRER.svc as the start page. This will enable IIS Express to automatically host the service and create the Service Bus endpoint as specified in the web.config file:
- Right-click ContactsListRER.svc.
- Select Set as Start Page.
Update the remote app Url in the SharePoint project
In the app for SharePoint project:
- Open ContactsListRER | Elements.xml
- Replace the Url property for the event receiver with [your service bus namespace]/[your address].
Text to replace |
Replace with |
Comments |
[your service bus namespace]/[your address] |
Windows Azure Service Bus Namespace and your choice of address |
The same values as the corresponding entries in web.config |
Below is the updated Elements.xml:
 <?xml version="1.0" encoding="utf-8"?>
<Elements xmlns="https://schemas.microsoft.com/sharepoint/">
  <Receivers ListTemplateId="10000">
      <Receiver>
        <Name>ContactsListRER.svcItemAdded</Name>
        <Type>ItemAdded</Type>
        <SequenceNumber>10000</SequenceNumber>

        <!--<Url>~remoteAppUrl/ContactsListRER.svc</Url>-->
        <Url>https://spappdebug.servicebus.windows.net/rerdemo</Url>
      </Receiver>
  </Receivers>
</Elements>
Update the app manifest
In order for SharePoint to call back to the Service Bus endpoint address, we will need to update the DebugInfo in the app manifest. This will tell SharePoint that it is safe to make the external call (outside of SharePoint).
In the app for SharePoint project:
- Right-click AppManifest.xml, and select View Code.
- Replace <AutoDeployedWebApplication/> with the following code:
 <AutoDeployedWebApplication>
    <DebugInfo
        ClientSecret="[your client secret from web.config]"
AppUrl="[IIS Express https address];[service bus namespace]/[address];" />
</AutoDeployedWebApplication>
Text to replace |
Replace with |
Comments |
[IIS Express https address] |
IIS Express HTTPS Port |
You can get the IIS Express port numbers from the web project properties pane |
[service bus namespace]/[address] |
Windows Azure Service Bus Namespace and your choice of address |
The same values as the corresponding entries in web.config |
Debug the remote event receiver
Now that we have updated the required project artifacts to use the Service Bus, we are ready to debug the app.
Go ahead and set a breakpoint in the ProcessOneWayEvent method in the remote event receiver.
Press F5 to debug the app.
WCF Test Client will start.
This will host your service in IIS Express and the Service Bus.
Ignore any IMetadataExchange errors:
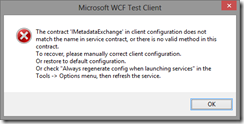
Figure 10. WCF Test Client error
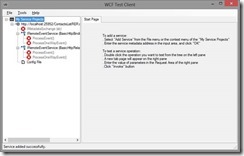
Once the services are hosted, you should see something similar (you can safely ignore the schema errors):
Figure 11. WCF Test Client
Now let’s click Add Contact.
After a few seconds, you should see the breakpoint hit:
Press F10 to continue to the next step or F5 to continue debugging.
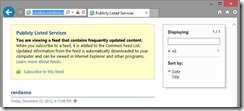
Now click Get Contacts in the app, and you should see the full name property set:
Figure 12. Clicking Get Contacts in the app to see the full name property set
Publish your app to the marketplace
Since we added the service bus assemblies and the modified web.config file, the changes will be persisted when you package the app to publish in the marketplace.
We highly recommend that you remove the Service Bus assemblies and revert the web.config changes before publishing to the marketplace.
This requires the following changes:
- In the app for SharePoint project:
Open the remote event receiver Elements.xml, and update the Url property with the ~remoteAppUrl token.
Right-click AppManifest.xml, and choose View Code:
§ Replace the <AutoDeployedWebApplication> section with the following:
<AutoDeployedWebApplication/>
- In the web project:
- Replace the <system.servicemodel> section in the web.config file with the following:
 <system.serviceModel>
    <bindings>
      <basicHttpBinding>
        <!--Used by app for SharePoint-->
        <binding name="secureBinding">
          <security mode="Transport" />
        </binding>
      </basicHttpBinding>
    </bindings>
    <protocolMapping>
      <add
        binding="basicHttpBinding"
        scheme="https"
        bindingConfiguration="secureBinding" />
    </protocolMapping>
</system.serviceModel>
- Uninstall the Service Bus NuGet package.
Download the sample app
You can download the sample app here:
Download SharePointAppRED.zip.
Remote event debugging FAQ
What about app events?
This blog post only works for remote event receivers, and not app events.
How do I know my service is hosted in the Service Bus?
Once the WCF client has successfully hosted all your services, browse to your Service Bus namespace in your browser, and you should see your endpoint:
Figure 13. Browsing to the Service Bus namespace
The remote event receiver does not hit the breakpoint, so what is wrong?
Depending on the event, the remote event may be synchronous or asynchronous. It might take a few more seconds or more to hit your breakpoint if it is asynchronous.
Events that are “* being *”—like “item is being added”, “item is being deleted”—are synchronous.
Events that are “* was *”—like “item was added”, “item was deleted”—are asynchronous.
Can I debug more than one remote event receiver?
This blog post covers debugging only one remote event receiver at a time.
Comments
Anonymous
July 16, 2013
Is it possible to debug sharepoint hosted app?Anonymous
October 31, 2013
Hi MsSPJ, Yes, you can debug SharePoint-hosted app. SharePoint-hosted app is all declarative. You can debug the client-side code (HTML, JS, etc.) using F12 web browser debugging tools and VS debugging tools. Thanks, Xiaoying Guo Program Manager, Visual Studio Office Developer Tools teamAnonymous
January 17, 2014
How to deploy the app, we need upload it to the sharepoint store? why the app with remote event receiver can not be add to site, I have upload the app to the app catalog site? ThanksAnonymous
April 02, 2014
Hi I have tried and followed your steps, I have a Provider Hosted app and using a Azure web site to host the web project. I wanted to debug my remote event receiver. because it is a Provider Hosted app then there is no AutoDeployedWebApplication element in the manifest file, so removed RemoteWebapplication element and replaced it with your AuthoDeployWebApplication element. When I hit F5 it gets an error and says "Side loading is not activated on this site...". I thought maybe it is good to set the web project to staratedup project but it generates another error when I hit F5Anonymous
April 03, 2014
Adam, is your SharePoint site a Developer Site? If It is, I suggest you to post your issue on the App for SharePoint forum social.msdn.microsoft.com/.../home. It'd be easier and more efficient to communicate and investigate there the issue you run into. Thanks! XiaoyingAnonymous
April 03, 2014
Frank, It's not necessary to always deploy the app to the SharePoint Store. I'm not exactly sure what error you saw. It'd be helpful if you could provide more details about the steps you executed and the detailed description on the exact error/results you saw. Again, I suggest you post your issue on the app for SharePoint forum social.msdn.microsoft.com/.../home to get more efficient help. Thanks! Xiaoying
