Paging Michael Chiklis
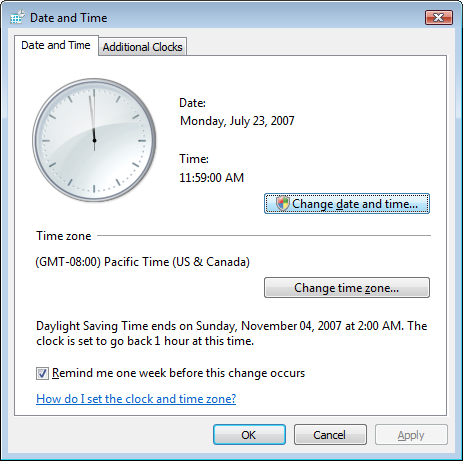
A style guideline within Vista is to add a shield icon to a button when pressing the button results in an action which requires elevation. For example, to change the date and time on the system clock, you are presented with a dialog that looks like this:

In native code, a developer can add the shield icon to a button by sending the BCM_SETSHIELD message. Here is an example of how to do it in C#. I'm still trying to track down a sample which does this in VB.
I'm sure you're thinking "What a cool concept! Isn't Vista great? If only there was a way to add a shield icon to an installer." Well, today's your lucky day: not only is it possible to add a shield icon to an installer button, but I'm going to show you how to do it.
Windows installer has an attribute to add to a push button that produces this shield: the msidbControlAttributesElevationShield attribute, with value 0x00800000. Now we just need a way to add it to the install UI of a setup project's output. Using a SELECT queries along with the Or operator from last time, this is very easy to do.
Let's begin by creating a new setup project, SetupWithShield. Add an excluded file to the project (in the project's root directory) called PostBuild.proj with contents:
 <Project xmlns="https://schemas.microsoft.com/developer/msbuild/2003" DefaultTargets="PostBuild">
    <Import Project="$(MSBuildExtensionsPath)\\SetupProjects\\SetupProjects.Targets" />

    <Target Name="PostBuild">
    </Target>
</Project>
Finally, set the PostBuildEvent of the project to run the project with msbuild (with appropriate parameters):
msbuild.exe /p:Configuration="$(Configuration)" /p:BuiltOutputPath="$(BuiltOuputPath)" /p:ProjectDir="$(ProjectDir)\" /p:BuiltOutputDir="$(ProjectDir)$(Configuration)" $(ProjectDir)\PostBuild.proj"
Now we're ready to roll. The dialog that the shield button will be added to is the "Confirm Installation" dialog in the User Interface editor of the setup project. Let's try to figure out which dialog that is in the table by inspecting the MSI. It would be possible to look at the MSI with Orca, but let's try it a different way: perform a select from the dialog and a Message task to show all the items selected. That is:
 <Target Name="PostBuild">
     < Select MsiFileName="$(BuiltOutputPath)"
            TableName="Dialog"
            Columns="Dialog">
        <Output TaskParameter="Records" ItemName="Dialogs" />
    </Select>
    <Message Text="%(Dialogs.Dialog)" />
</Target>
The output from the build shows the following dialogs are defined in the msi:
     UserExitForm
    FatalErrorForm
    MaintenanceForm
    ResumeForm
    AdminUserExitForm
    AdminFatalErrorForm
    AdminMaintenanceForm
    AdminResumeForm
    FinishedForm
    Cancel
    AdminFinishedForm
    AdminConfirmInstallForm
    AdminWelcomeForm
    AdminFolderForm
    DiskCost
    SelectFolderDialog
    AdminProgressForm
    ProgressForm
    WelcomeForm
    FolderForm
    ConfirmInstallForm
    ErrorDialog
    ConfirmRemoveDialog
    FilesInUse
Its a pretty safe bet that the ConfirmInstallForm is the dialog in question. So now, lets take a look at the buttons on that form:
 <Target Name="PostBuild">
     < Select MsiFileName="(BuiltOutputPath)"
            TableName="Control"
            Columns="Control;Type;Attributes"
            Where="`Dialog_`=ConfirmInstallForm' AND `Type`='PushButton'">
        <Output TaskParameter="Records" ItemName="Controls" /
    </Select>
    <Message Text="%(Controls.Control) %Controls.Type) %(Controls.Attributes)" />
</Target>
Build output shows there are 3 buttons in all:
     CancelButton PushButton 3
    PreviousButton PushButton 3
    NextButton PushButton 3
The NextButton should be the button in question. Adding the shield icon should be a matter of performing a bitwise or operation on the attributes of the NextButton in the ConfirmInstallFormDialog. In other words:
 <Target Name="PostBuild">
     < Select MsiFileName="$(BuiltOutputPath)"
            TableName="Control"
            Columns="Control;Type;Attributes"
            Where="`Dialog_`='ConfirmInstallForm' AND `Control`='NextButton'">
        <Output TaskParameter="Records" ItemName="NextButton" />
    </Select>

    <AssignValue Items="@(NextButton)"
                 Metadata="Attributes"
                 Operator="Or"
                 Value="8388608">
        <Output TaskParameter="ModifiedItems" ItemName="UpdatedNextButton" />
    </AssignValue>

    <ModifyTableData MsiFileName="$(BuiltOutputPath)"
                     TableName="Control"
                     ColumnName="Attributes"
                     Value="%(UpdatedNextButton.Attributes)"
                     Where="`Dialog_`='ConfirmInstallForm' AND `Control`='NextButton'" />
</Target>
The work is done in three distinct steps:
- From the
Controltable, select theControl,Type, andAttributecolumns, where theDialog_andControlcolumns areConfirmInstallFromandNextButtonrespectively - Bitwise Or the
Attributesvalue from the selected data (there should be only one entry) with "8388608" (which is the decimal representation of 0x00800000) - Modify the row the selected row with the new
Attributesvalue (by basically reconstructing the old query)
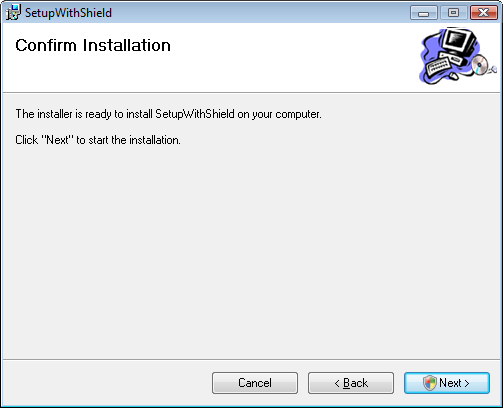
And just to prove this works, here is a screen shot of the install in progress with the shield button in use:

SetupProjects.Tasks-1.0.20723.0-src.zip
Comments
- Anonymous
July 30, 2007
Can the steps from last time be improved? You bet! First off, I absolutely hate that I had to convert