Identity in your own apps with Windows Azure Active Directory
Editor’s note: The following post was written by Office 365 MVP Martina Grom and Client Development MVP Toni Pohl . This is the first of a 4 part series
Part 1: Use authentication from the cloud
No user likes it – but everybody needs it: Security. Some things never change, not even in IT. When using a Line of Business (LOB) application, you still need to authenticate in the same manner as 20 years before. You login into an app with a given username and a password. But what changed are the mechanisms behind the scenes. In former times you could only access your apps within your company network, later with the use of Virtual Private Networks (VPN) from your location into your firm. Today we´re working with identities on a larger level and try to use Authentication Providers we trust or our own Active Directory in the cloud, in some cases in a hybrid scenario. The advantage for the user is that he can access apps and services with one single identity – the one he got from the company and Single Sign On (SSO) scenarios are possible.
When implementing solutions for our customers these are mainly LOB apps. In Microsoft Office 365 we benefit from the usage of Windows Azure Active Directory (WAAD). In case you didn´t know: every Office 365 tenant uses WAAD. So, if you´re already working with Office 365, all Directory Objects are residing in WAAD which regulates the authentication in a central object model in the cloud. We can use apps and code to remote control SaaS. If your company also works with WAAD (or Office 365) you can even use this for the authentication process in your own apps.
This is the part where Development meets Software as a Service. In our line-up this is where we both MVP´s can combine our knowledge to produce solutions with reliable and secure authentication from the cloud. This is part 1 of a 4-part series where we will show the magic of using Windows Azure Active Directory and Office 365 Software as a Service to automate tasks in a user´s enterprise life. In this article we show how to use WAAD as your authorization system in your own website.
Even if you have a hybrid scenario running in your company, it´s the same story. By now there are many thousands of WAAD´s running in Microsoft´s datacenters. The benefit is, enterprise IT doesn´t have to care about security, maintenance, backup and scalability, it´s all done for you by Microsoft – and it´s free, even without an Office 365 subscription you can use WAAD without costs.
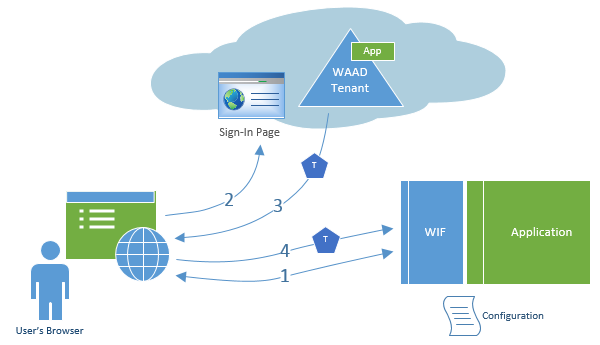
For apps the authorization flows like this: A user requests access from an authority who handles the authentication. The app must be known by the authority. Upon successful authentication, the browser gets redirected back to the web app along with a security token (T in the graphics below) carrying information about the incoming user.
Image source: https://msdn.microsoft.com/en-us/library/windowsazure/dn151790.aspx
So, let´s use this service for our authorization. The goal is to create a new ASP.NET website with functionality to automate Office 365 services: Authentication, SharePoint Online and Exchange Online. The best at the beginning: You don´t have to write any line of code for accomplishing this task. First, let´s start with the prerequisites. You need
- Visual Studio 2013
- A Windows Azure Active Directory (WAAD)
The WAAD can be created in the Windows Azure Portal https://manage.windowsazure.com or in the Office 365 portal https://portal.microsoftonline.com. For implementing the later steps we need an Office 365 tenant, so we recommend creating a new free 30-day subscription like here: https://portal.microsoftonline.com/partner/partnersignup.aspx?type=Trial&id=d4424e90-7069-4148-ad5d-4871a577929f&msppid=575861 . Fill out the form and you get your Office 365 tenant instantly.
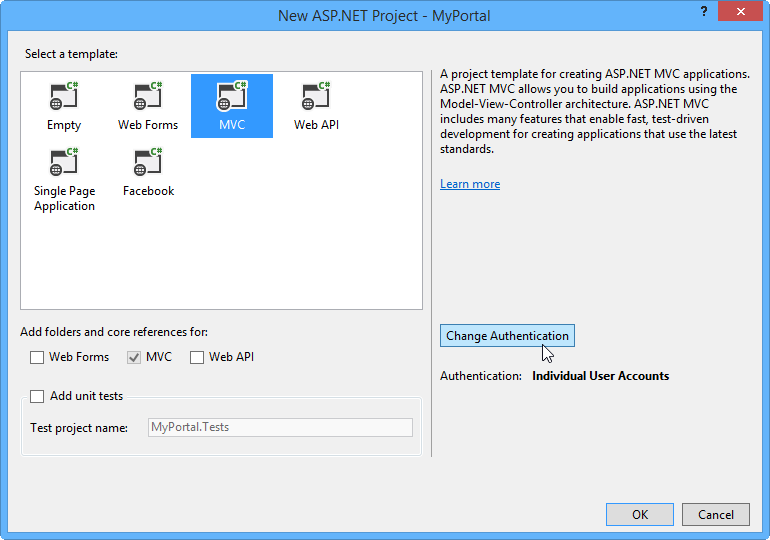
Once you have your administrator-login start Visual Studio 2013. Click File / New / Project. In the New Project dialog select Visual C# / Web and ASP-NET WebApplication, choose your project location and click OK.
Here comes the important part: Choose the MVC template and click Change Authentication on the right side. Now you can use the (new) VS 2013-wizard to connect to a specific domain in WAAD.
Change Authentication has options for several authentication scenarios: No Authentication, Individual User Authentication, Organizational Accounts or Windows Authentication. We want to use authentication against an Office 365 domain, so we mark Organizational Accounts. On the right side we use Cloud – Single Organization and enter our domain. This can be a custom domain (added and verified in the Office 365 portal) or the predefined onmicrosoft.com domain. Access Level defines, if we only need to authenticate with Single Side on, if we want to read AD-objects or if we want to read and write into the Directory. Let´s check the last option for reading and writing.
Below Visual Studio generates an App ID URI for our application. This can be any string to identify our app within the WAAD, but it must be in URL-format, like https://mycompany/myapp1 or similar. We leave the generated name and click OK.
Now you need to login with any admin-account from that domain. In our case we use our admin@mvpdemo2014.onmicrosoft.com-account and our password. After this login VS returns to the new portal site. The authentication is already filled in. Click OK in the dialog and Visual Studio handles all the rest.
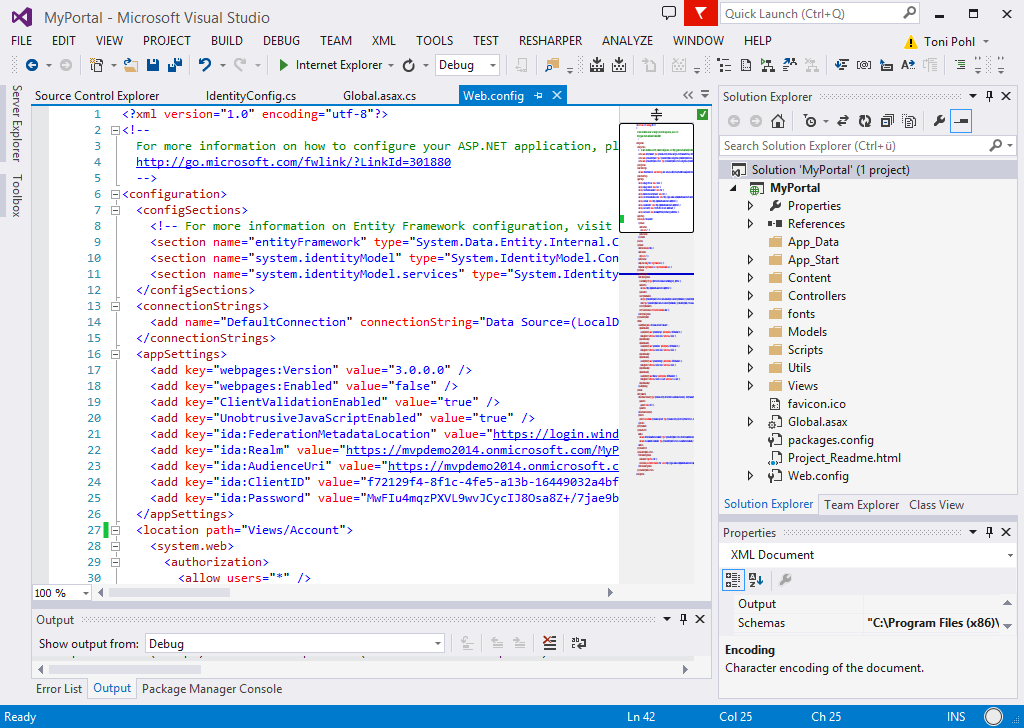
What´s happening behind the scenes is that VS now installs the NuGet package “Active Directory Authentication Library” for the authorization. This package contains the Windows Azure AD Authentication Library for .NET (ADAL). ADAL simplifies the whole Token handling for developers when working against the GraphAPI of WAAD. Windows Azure AD Graph provides programmatic access to Windows Azure Active Directory (AD) through REST API endpoints. The second thing the wizard did was to create a new application in our WAAD, we´ll look at this later. This is how our ASP.NET MVC-solutions looks like in VS 2013:
After VS created the project for us, let´s have a look into web.config. First, we got two new sections: system.identityModel and system.identityModel.services with some data in it. AppSettings have been extended with keys like “ida:FederationMetadataLocation” and so on. The prefix “ida” stands for Identity and Authorization. These values are important for identifiying our app. ida:ClientID holds our application-ID and ida:Password is our secret. With submitting these values we ensure that only our app with the secret can access the WAAD – and no other app with no or wrong secret (don´t give the secret away, anyway, you can recreate a new secret if yours gone public). These settings are stored in the /applications node of the domain in WAAD. ida:AudienceUri and ida:Realm is the Unique ID of our app (in URL-format). ida:FederationMetadataLocation is the address of the XML-document where we get the endpoints for login and logout. If you open the address you see a lot of information for the WS-Federation method. And we have a database connection like …|DataDirectory|\aspnet-MyPortal-<datetime>.mdf… for storing some IDs.
If you open global.asax in Application_Start() some routines are called. The most interesting part is IdentityConfig.ConfigureIdentity(); . If you jump into the definition with F12-key \App_Start\IdentityConfig.cs is opened. Here you can see the usage of the ida* AppSetting-keys. Back in global.asax the procedure void WSFederationAuthenticationModule_RedirectingToIdentityProvider(…) is the part where the app does the redirection to the authentication provider. Because in our web.config we have values that only authenticated users shall get access to our portal with <system.web>, <authorization>, <allow users="*" /> the ASP.NET system sees that authentication is needed and uses the information in our config to redirect to the defined provider – in our case Microsoft WAAD.
Of course all project properties are also set. Our localhost is using SSL on a new port (here 44324). This address is also saved in the WAAD in our application – it´s the return address if the authentication worked.
Again, the nice thing: The wizard made all necessary steps for us and we simply can use the functionality now. So, after looking around in the web app, simply hit F5 to run the app.
After the browser was opened, the redirection takes place and the login webpage of WAAD follows. Depending on the speed you see the opening of https://localhost:44324/ (our app) followed by the URL of the WAAD login-page like https://login.microsoftonline.com/login.srf?wa=wsignin1.0\&wreply=https%3a%2f%2flogin.windows.net%2f... . If the user authenticates correctly with his login and password – followed by the wsfed document URL - the start page of our MVC-app (Views/Home/Index.cshtml) follows. If the login was not correct it simply ends here.
If you protocol the HTTP-traffic with a proxy tool like Fiddler, you see the different URLs and what happens here. Yes, all traffic is running on HTTPS (and some calls on HTTP with port 443 which is the same secure way). Finally we end at https://localhost:44324 with HTTP status code 200 (OK) – our app.
So the login worked out of the box.
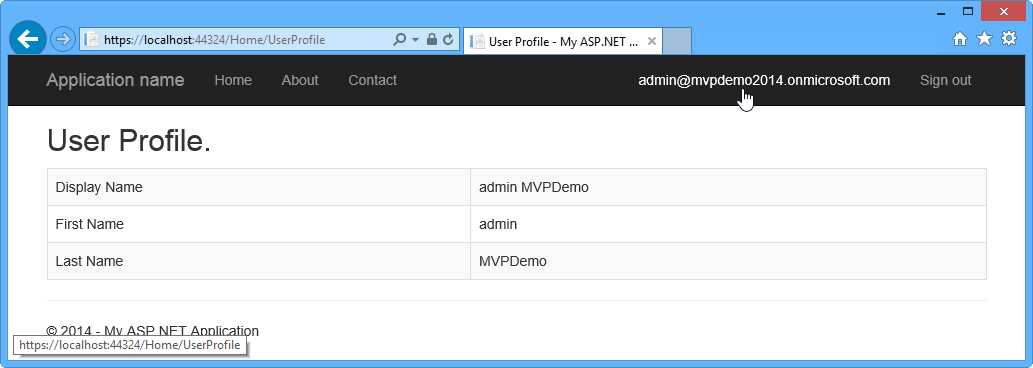
Another interesting part is what happens in the app. Well, it´s a standard app with almost no functions, but you can click on then logged-in user name and – voila: We get data of the user object. The app shows Display name, first and last name.
So, our conclusion for part 1 is that we don´t need to write any code to use WAAD in own web applications. The Visual Studio 2013 team did great work and the wizard and ASP.NET does all the steps for us if we simply provide the information which domain we want to use in our app to protect it with a robust, secure login mechanism.
In part 2 we´ll have a deeper look and see what happened in our new WAAD, what we can do there and how GraphAPI works!
About the authors
Toni Pohl has worked for nearly 20 years as an independent IT expert. Toni began his IT career in the early 1990s as a trainer. After working as a trainer, his emphasis changed to the field of consulting and developing software solutions using database systems. In 1999 Toni Pohl founded atwork information technology group along with Martina Grom. They share the business administration. He is responsible for new business development, technology, and quality assurance. Toni Pohl has been awarded in 2013 by Microsoft with the Most Valuable Professional Award (MVP) for his expertise in Client Development. Toni blogs about new technologies for the atwork-blog, in Microsoft-TechNet-Team-Austria Blog, in codefest.at, the Austrian MSDN Blog and in cloudusergroup and is writing technical articles for various magazines. You can connect with him on Twitter, Facebook, or Linkedin.

Martina Grom works as IT-Consultant & is co-founder and CEO of atwork information technology. atwork is located in Austria/Europe and is specialized in development of Online Solutions. Martina & Toni founded atwork in 1999, and she has worked in IT since 1995. Martina is recognized as an expert in Microsoft Office Online Services solutions and was worldwide one of the first 8 MVP’s awarded in 2011 for her expertise in Office 365. She writes numerous articles and blog posts. Her passion is Online & Social Media, cloud computing and Office 365. Martina consults companies on their way to the cloud. Martina has a master degree in international business administration of University of Vienna, You can connect with her on Twitter, Facebook, Linkedin or join her cloudusergroup.
About MVP Monday
The MVP Monday Series is created by Melissa Travers. In this series we work to provide readers with a guest post from an MVP every Monday. Melissa is a Community Program Manager, formerly known as MVP Lead, for Messaging and Collaboration (Exchange, Lync, Office 365 and SharePoint) and Microsoft Dynamics in the US. She began her career at Microsoft as an Exchange Support Engineer and has been working with the technical community in some capacity for almost a decade. In her spare time she enjoys going to the gym, shopping for handbags, watching period and fantasy dramas, and spending time with her children and miniature Dachshund. Melissa lives in North Carolina and works out of the Microsoft Charlotte office.
Comments
Anonymous
January 20, 2014
Can you use Office 365 Developer account to test this functionality? Thanks.Anonymous
January 25, 2014
Brand building the identity of your brand is in place and you are happy with it. Brand identity your product or event needs an identity does it have one. It is now that the tools you have chosen to employee will be needed the most. What are the tools you can use to perfect your package. Read More: newbase.info/.../22-how-do-you-bring-your-brand-to-life-and-make-it-dance-in-the-limelight.htmlAnonymous
August 24, 2015
Hi,Toni Pohal great job. All those thing you had explained it's fully automated genrated code.I want a Customized way to Login through Azure Active Directory. Please Let Me know.
