Migrating a Storage Pool from Windows Server 8 Beta to Windows Server 2012 RTM
I had a computer running Windows Server 8 Beta with a Storage Pool using the “Parity” resiliency type. I installed Windows Server 2012 RTM “over it” (i.e. not an upgrade) and completely lost access to this Storage Pool when the RTM install completed. So, using a number of MSDN resources and PowerShell commands, I got the Storage Pool back using the following steps:
Reinstalled Windows Server 8 Beta (Build 8250).
Opened PowerShell as Administrator (i.e. elevated).
Executed the following command:
- Get-StoragePool
This showed that I had two Storage Pools available.
FriendlyName OperationalStatus HealthStatus IsPrimordial IsReadOnly
------------ ----------------- ------------ ------------ ----------
RAID OK Healthy False True
Primordial OK Healthy True FalseThe one named “RAID” is the one that I wanted to mount.
I found instructions suggesting that I make it read/write, so I executed the following command:
- Set-StoragePool -FriendlyName RAID -IsReadOnly $false
Executing Get-StoragePool again displayed the following:
FriendlyName OperationalStatus HealthStatus IsPrimordial IsReadOnly
------------ ----------------- ------------ ------------ ----------
RAID OK Healthy False False
Primordial OK Healthy True FalseStorage Pools are mounted as Virtual Disks and need to be referenced by a Virtual Disk Friendly Name, not a Storage Pool Friendly Name. To determine which Virtual Disks were available for mounting and their Friendly Names, I issued the following command:
- Get-VirtualDisk
This showed the Virtual Disk’s name to be “RAID5”:
FriendlyName ResiliencySettingName OperationalStatus HealthStatus IsManualAttach Size
------------ ------------------- ----------------- ------------ -------------- ----
RAID5 Parity Detached Unknown True 1.2 TBThen I issued the following command to mount the Virtual Disk:
- Connect-VirtualDisk -FriendlyName RAID5
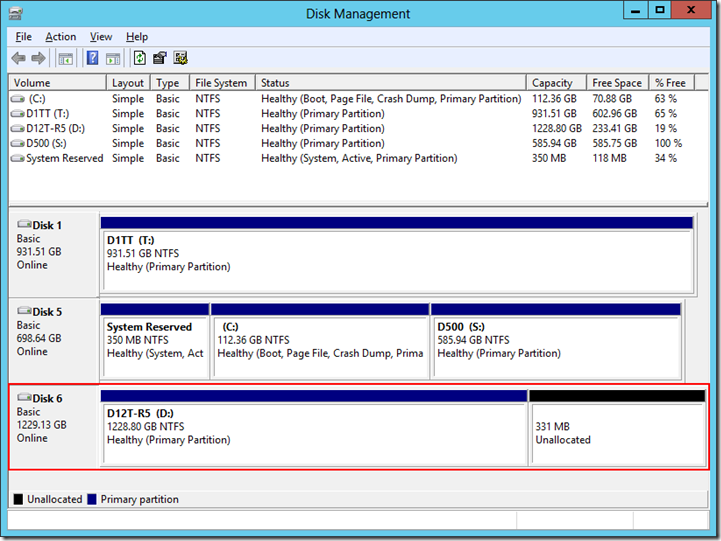
At this point, the disk appeared in “Disk Management” (diskmgmt.msc), but it was offline.
I right-clicked on the area labeled “Disk 6, Basic, … , Offline” and selected “Online”. Then the drive was mounted to the first available drive letter:
Then I went into the D: drive, copied all of the files to another partition, and reinstalled Windows Server 2012 RTM where I could create a new, RTM-compatible Storage Space and copy the data back to it.
Rob
