Private TFS Deployment in Azure
Visual Studio Team Services (VSTS) is a great platform for orchestrating your DevOps. It makes it easy to mix and match the tools you like to use for your CI/CD environment while providing a hosted platform for tying it all together. There are, however, scenarios where the Software as a Service (SaaS) version of VSTS is not the right choice. Specifically, an organization may want to keep their DevOps server private or the organization may be deployed in the Microsoft Azure Government cloud where VSTS is not yet available. In that scenario it makes sense to deploy Team Foundation Server (TFS).
A typical TFS deployment includes the TFS server itself, a backend SQL database, and one or more build agents. Deploying these resources can be a bit complicated and I have found myself having to do this many times for demonstration purposes, so I have written a set of Azure Resource Manager templates that deploy the resources you need to get started.
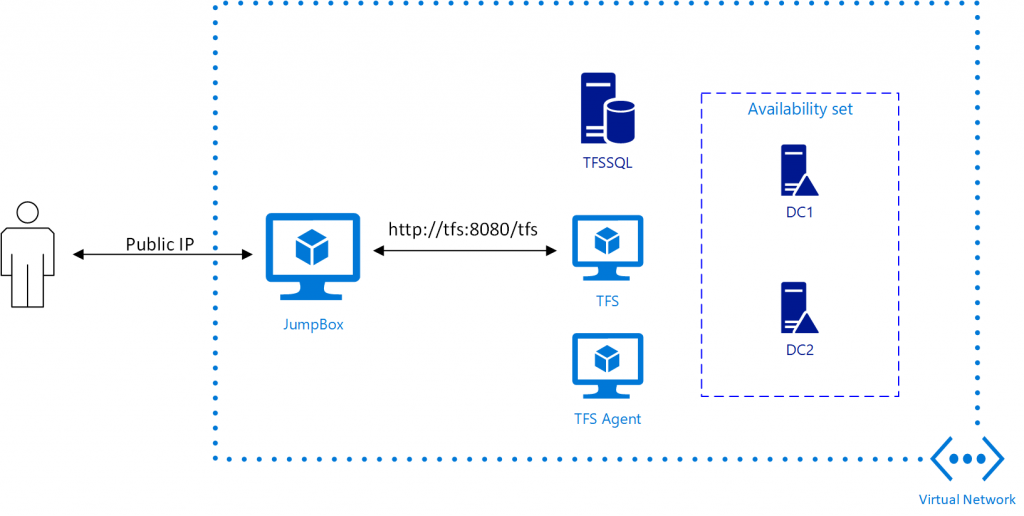
The basic topology looks something like the illustration below
 In a virtual network, it establishes a new domain with two domain controllers and deploys a TFS server, a database, and a TFS agent. To access the virtual network, the pattern includes a jump box; another strategy would be to add a VPN gateway, but for simplicity we are going with the jump box.
You can find the template here https://github.com/hansenms/iac/tree/master/devnet-tfs. This deployment actually consists of two nested deployments that you could choose to deploy individually. The first one, core-network, establishes the virtual network with jump box and domain controllers and the second one, tfs, establishes the DevOps resources.
It takes a while to deploy all the resources. Establishing the domain with associated reboots, etc. takes a while and installing TFS is not swift, so expect the complete deployment to take on the order of an hour. But it should be fully automated and by the end of it, you should be able to log into the jump box and type the URL of the TFS server and start creating projects and setting up build pipelines. The build agent has Visual Studio 2017 installed and you can use that as a development box as well or add another VM into the network to serve as a development workstation. The TFS installation will not be accessible outside the virtual network.
In addition to establishing the DevOps resources, the pattern illustrates a few different things:
- How to establish domain controllers and configure them with Desired State Configuration DSC. There are several other examples online for how to do that, see for instance this one.
- How to join a SQL server VM to a domain and add the domain enterprise administrator as a sysadmin on the database server using DSC. It is mainly done in this script. This script also makes sure the firewall is open for the database.
- How to install TFS using DSC. It is done with this script.
- How to install the VSTS/TFS agent on a node using DSC.
The DSC scripts are downloaded from GitHub.com in zip packages that include the dependencies of the scripts. These zip packages are easily created in Powershell, e.g. for the InstallTFS.ps1 script, it is packaged with the command:
[ps]
PS> Publish-AzureRmVMDscConfiguration .\InstallTFS.ps1 -OutputArchivePath .\InstallTFS.ps1.zip
[/ps]
Please try to deploy it in commercial or Government clouds and let me know if you run into any problems. I have not tried every permutation of cloud and regions and there could be some issues.
Please be aware that running using TFS in production mode generally requires a license and is not free.