Indexing Azure SQL Database with Azure Search
This post will show how to index a table in an Azure SQL Database using Azure Search.
Background
I am always trying to learn more about Azure, about things that are possible. One thing I just learned today that I had to share was the ability to use Azure Search against an Azure SQL Database. The reason you might do this is because you need features like results ranking and relevance to add features to your solution such as autocomplete, suggestions, and relevant links. Instead of you trying to build a bunch of SQL queries to pull that stuff out, Azure Search provides this as a service.
This post will show how Azure Search can provide ranking and relevancy capabilities over your relational SQL data.
Create the Database
My previous post, Adventure Works for Azure SQL Database, discussed how to create the Adventure Works sample database in an Azure SQL Database using the new portal. Rather than rehash the steps, I urge you to go there and see how to create it.
Create the Search Account
Using the new Azure portal, https://portal.azure.com, create a new Search account. Provide a name and location nearest you, and choose a pricing tier. For this demo, I can absolutely take advantage of the Free pricing tier, but if you need dedicated resources and need to scale, then you’ll need to move to the Standard tier.
Create the Data Source
You’ll need to use the REST API to create the data source. You’ll need to provide values for:
- Your Search Service – The name of your Azure Search service
- API Key – The key found in the Azure Search service settings
- Your SQL Database Server – The server name for your Azure SQL Database
- Your User ID: The user ID for the Azure SQL Database
- Your Password: The password for the Azure SQL Database
This template uses a database named “AdventureWorks” and the “SalesLT.Customer” table in the Adventure Works sample database.
Code Snippet
- POST https://<Your Search Service>.search.windows.net/datasources?api-version=2015-02-28
- Content-Type: application/json
- api-key: <Your API Key>
- {
- "name" : "myazuresqldatasource",
- "type" : "azuresql",
- "credentials" : { "connectionString" : "Server=tcp:<Your SQL Database Server>.database.windows.net,1433;Database=AdventureWorks;User ID=<Your User ID>;Password=<Your Password>;Trusted_Connection=False;Encrypt=True;Connection Timeout=30;" },
- "container" : { "name" : "SalesLT.Customer" }
- }
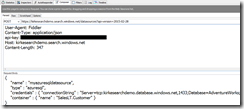
As an example, I used Fiddler to compose a new POST using the values above to my search service named “kirkesearchdemo”.
A successful result returns back HTTP 201 – CREATED.
Create an Azure Search Index
Now that we have the datasource named “myazuresqldatasource”, we can create an index using either the portal or the Create Index API. Since we’re already using Fiddler, let’s use the API to create the index.
Code Snippet
- POST https://<Your Search Service>.search.windows.net/indexes?api-version=2015-02-28
- api-key: <Your API Key>
- Content-Type: application/json
- {
- "name":"customerindex",
- "fields":[
- {"name":"CustomerID","type":"Edm.String","searchable":false,"filterable":false,"retrievable":true,"sortable":false,"facetable":false,"key":true},
- {"name":"NameStyle","type":"Edm.String","searchable":false,"filterable":false,"retrievable":true,"sortable":false,"facetable":false,"key":false},
- {"name":"Title","type":"Edm.String","searchable":true,"filterable":true,"retrievable":true,"sortable":true,"facetable":true,"key":false},
- {"name":"FirstName","type":"Edm.String","searchable":true,"filterable":true,"retrievable":true,"sortable":true,"facetable":true,"key":false},
- {"name":"MiddleName","type":"Edm.String","searchable":true,"filterable":true,"retrievable":true,"sortable":true,"facetable":true,"key":false},
- {"name":"LastName","type":"Edm.String","searchable":true,"filterable":true,"retrievable":true,"sortable":true,"facetable":true,"key":false},
- {"name":"Suffix","type":"Edm.String","searchable":true,"filterable":true,"retrievable":true,"sortable":true,"facetable":true,"key":false},
- {"name":"CompanyName","type":"Edm.String","searchable":true,"filterable":true,"retrievable":true,"sortable":true,"facetable":true,"key":false},
- {"name":"SalesPerson","type":"Edm.String","searchable":true,"filterable":true,"retrievable":true,"sortable":true,"facetable":true,"key":false},
- {"name":"EmailAddress","type":"Edm.String","searchable":true,"filterable":true,"retrievable":true,"sortable":true,"facetable":true,"key":false},
- {"name":"Phone","type":"Edm.String","searchable":true,"filterable":true,"retrievable":true,"sortable":true,"facetable":true,"key":false},
- {"name":"PasswordHash","type":"Edm.String","searchable":false,"filterable":false,"retrievable":false,"sortable":false,"facetable":false,"key":false},
- {"name":"PasswordSalt","type":"Edm.String","searchable":false,"filterable":false,"retrievable":false,"sortable":false,"facetable":false,"key":false},
- {"name":"rowguid","type":"Edm.String","searchable":false,"filterable":false,"retrievable":false,"sortable":false,"facetable":false,"key":false},
- {"name":"ModifiedDate","type":"Edm.String","searchable":false,"filterable":false,"retrievable":true,"sortable":false,"facetable":false,"key":false}
- ]
- }
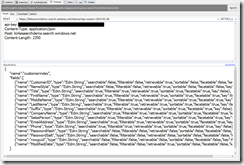
Here is a capture of the command I issued using Fiddler.
A successful result returns back HTTP 201 – CREATED.
Create the Indexer
The final step is to create an indexer that connects the index we just created to the data source we created earlier. Again, we use a REST API.
Code Snippet
- POST https://<Your Search Service>.search.windows.net/indexers?api-version=2015-02-28 HTTP/1.1
- api-key: <Your API Key>
- Content-Type: application/json
- {
- "name" : "myindexer",
- "dataSourceName" : "myazuresqldatasource",
- "targetIndexName" : "customerindex"
- }
And here’s a screen shot to help provide a concrete example.
A successful result returns back HTTP 201 – CREATED.
Testing It Out
To test it out, I first go the new Azure portal, https://portal.azure.com, and refresh the page. I can see that my index is listed and that there are 847 documents
That’s great, because there are exactly 847 rows in the SalesLT.Customer table in my Azure SQL Database.
I created a new .NET 4.5.1 Console application (important, this version is needed for the next step).
I then add the Microsoft.Azure.Search NuGet package. You can search for “Azure Search”, including PreRelease versions.
I created a class, Customer.cs.
Customer.cs
- using Microsoft.Azure.Search.Models;
- using System;
- namespace SearchDemo
- {
- [SerializePropertyNamesAsCamelCase]
- public class Customer
- {
- public string CustomerID { get; set; }
- public string NameStyle { get; set; }
- public string Title { get; set; }
- public string FirstName { get; set; }
- public string MiddleName { get; set; }
- public string LastName { get; set; }
- public string Suffix { get; set; }
- public string CompanyName { get; set; }
- public string SalesPerson { get; set; }
- public string EmailAddress { get; set; }
- public string Phone { get; set; }
- public string ModifiedDate { get; set; }
- public override string ToString()
- {
- return String.Format(
- "Company: {0}, Customer: {1} {2} {3}", CompanyName, FirstName, MiddleName, LastName);
- }
- }
- }
I then implemented the Main method to simply call the Search service and return results.
Program.cs
- using Microsoft.Azure.Search;
- using Microsoft.Azure.Search.Models;
- using System;
- namespace SearchDemo
- {
- class Program
- {
- static void Main(string[] args)
- {
- string searchServiceName = "kirkesearchdemo"; // Put your search service name here.
- string apiKey = "REDACTED";
- SearchServiceClient serviceClient = new SearchServiceClient(searchServiceName, new SearchCredentials(apiKey));
- SearchIndexClient indexClient = serviceClient.Indexes.GetClient("customerindex");
- Console.WriteLine("{0}", "Searching using 'bike store'...\n");
- SearchDocuments(indexClient, searchText: "bike store");
- Console.WriteLine("\n{0}", "Filter for salesperson adventure-works\\pamela0...\n");
- SearchDocuments(indexClient, searchText: "*", filter: "SalesPerson eq 'adventure-works\\pamela0'");
- Console.WriteLine("{0}", "Complete. Press any key to end application...\n");
- Console.ReadKey();
- }
- private static void SearchDocuments(SearchIndexClient indexClient, string searchText, string filter = null)
- {
- // Execute search based on search text and optional filter
- var sp = new SearchParameters();
- if (!String.IsNullOrEmpty(filter))
- {
- sp.Filter = filter;
- }
- DocumentSearchResponse<Customer> response = indexClient.Documents.Search<Customer>(searchText, sp);
- foreach (SearchResult<Customer> result in response)
- {
- Console.WriteLine(result.Document);
- }
- }
- }
- }
I run the program, and see results that are already ranked for me according to relevance, with “A Bike Store” being a more relevant match than “Fifth Bike Store”.
Let’s filter based on SalesPerson=’adventureworks\pamela0’. We receive results, and could then go back to the database to verify that the results are accurate.
Refreshing the Index
A search index is not a live representation of data, it reflects the state when the index was last updated. To demonstrate this, let’s update record 1 in the database, “A Bike Store”, to change the owner’s name to Kirk A Evans.
We then run our application again. Notice that even though we changed the value in the database, it still shows as Orlando N. Gee.
This indexer does not have a schedule, we’ll need to update the index either on a scheduled basis or by some event occurring. For instance, you might do this using a scheduled job, such as a WebJob, or you might want to let Azure Search manage the schedule for you. Another alternative is not to run on a scheduled basis, but to update it yourself when your application writes to the database. As an example, it might also push a message to a queue signaling that a backend process needs to update the index, enabling you to update the index when data is updated.
To update manually or via a scheduled process outside of Azure Search, we need to run the following REST operation:
Run Indexer
- POST https://<Your Search Service>.search.windows.net/indexers/myindexer/run?api-version=2015-02-28 HTTP/1.1
- api-key: <Your API Key>
Once we run the command, we execute our sample again and verify that the name now reflects the update in the database.
You can also let Azure Search manage the schedule for you. The documentation for Connecting Azure SQL Database to Azure Search Using Indexers shows that you can update to run on a schedule using an ISO8601 time duration format. We can update the existing indexer:
Update Indexer with Schedule
- PUT https://<Your Search Service>.search.windows.net/indexers/myindexer?api-version=2015-02-28 HTTP/1.1
- api-key: <Your API Key>
- Content-Type: application/json
- {
- "name" : "myindexer",
- "dataSourceName" : "myazuresqldatasource",
- "targetIndexName" : "customerindex",
- "schedule" : { "interval" : "PT1H", "startTime" : "2015-03-06T00:00:00Z" }
- }
The format “PT1H” indicates that we will recur every 1 hour, and the start time will be March 6th, 2016 UTC time. Here is a screen capture of the request and response in Fiddler.
I can now check the status of the indexer using an HTTP GET.
GET Indexer Status
- GET https://<Your Search Service>.search.windows.net/indexers/myindexer/status?api-version=2015-02-28 HTTP/1.1
- api-key: <Your API Key>
A screen shot of Fiddler shows the request/response pair as an example.
There are additional capabilities that are possible, such as using change tracking. For more information, see the documentation at Connecting Azure SQL Database to Azure Search Using Indexers. I think this is a great opportunity for us application developers to introduce advanced search capabilities into applications with very little work or ongoing maintenance.
For More Information
Connecting Azure SQL Database to Azure Search Using Indexers
Adventure Works for Azure SQL Database
Comments
Anonymous
April 09, 2015
I can't get past the "Create the Indexer" I'm getting a 400 http status codeAnonymous
April 09, 2015
The comment has been removed


