Deploying a script or package to a LINUX host with System Center Configuration Manager 2012 R2
This blog is for those rarely seen or photographed IT professionals; the mythical Windows Admins that do Linux administration or Linux admins that do Windows administration. More importantly, the post is for the System Center Configuration Manager admin that manages LINUX!
Seldom do you come across a data center that is homogeneous (one hardware platform, one OS (Windows, Linux, Mac), one network platform, etc.). I have seen very few and most were small businesses.
Most environments are heterogeneous, in that they run multiple operating systems, a mix of 3rd party vendor and Free Open Source Software (FOSS) tools. Today, I am going to cover leveraging your investment in Microsoft products if you operate and manage a heterogeneous environment.
Microsoft System Center Configuration Manager supports many non-Windows OS. (see https://www.microsoft.com/en-us/download/details.aspx?id=39360 ) In this example, we will focus on CENTOS 6.x.
Installation of the client is straight forward and simple. (see https://technet.microsoft.com/en-us/library/jj573939.aspx ) However, the one item the installation lacks is log maintenance. It does NOT create a logrotate entry. (see https://technet.microsoft.com/en-us/library/hh427342.aspx#BKMK_LogFilesforLnU ) If left unattended (over a long period of time), the SCCM client can run a system out of disk space. Wouldn’t it be great if we could deploy a package to fix that? Wait… we have found our first example package!
Disclaimer: The information provided below is an EXAMPLE using a single method for a single operating system with the expectation that you have a healthy SCCM environment in a supported configuration. It is highly recommended that you test your configurations in a non-production environment, tailoring the configuration to your environment.
To start, we will create two script use for the deployment. In this example I created two files:
- sccm.txt – the basis for the logrotate entry.
- sccm_logrotate.sh – the script that will deploy the logrotate entry.
Why sccm.txt you ask? Many legacy components in the Windows platform rely on the file extension to determine what a file is and how to handle it. Linux systems for use an array of tests to determine a file type. It is best to deploy files with a temporary extension through SCCM and then rename them, removing the extensions once they are on the LINUX platform.
You can create the two entries using an editor in LINUX or Windows (personal choice).
**WARNING** Use a Windows based editor that saves the file in UNIX format with an encoding of UTF-8 without Byte Order Marks. By default, most Windows file editors add carriage returns AND line feeds to scripts (CRLF) as well as encodes the files in Unicode. If you choose to edit the files in Windows, see another post ( Editing / Converting LINUX scripts from a Windows System ) to ensure they are formatted correctly for LINUX.
Preparing the Script Files
1. Create a file called sccm.txt
 /var/opt/microsoft/*.log {
     weekly
     missingok
     notifempty
     rotate 2
     compress
     delaycompress
     copytruncate
}
The sccm logrotate configuration file defines the steps required to properly manage the SCCM client log file. The key directive in the configuration file is copytruncate. It truncates the original log file in place after creating a copy, instead of moving the old log file and optionally creating a new one. Other methods that rename the log file will not work. The SCCM client retain a lock on the renamed file and will continue writing (appending) to the previous log file until the service is restarted. Copytruncate addresses this without need to restart the client.
2. Create a new file called sccm_logrotate.sh
#!/bin/sh
 if [ ! -d /var/log/microsoft/packagelog ]
  then
    mkdir -p /var/log/microsoft/packagelog/
fi
LOG=/var/log/microsoft/packagelog/sccm_logrotate_package.log
touch $LOG
 if [ -d /etc/logrotate.d/ ];
then
    cp sccm.txt /etc/logrotate.d/ 2>&1 >> $LOG
    mv /etc/logrotate.d/sccm.txt /etc/logrotate.d/sccm 2>&1 >> $LOG
    chmod 644 /etc/logrotate.d/sccm 2>&1 >> $LOG
    chown root.root /etc/logrotate.d/sccm 2>&1 >> $LOG
    echo "Created the /etc/logrotate.d/ configuration entry." 2>&1 >> $LOG
else
   echo "Directory /etc/logrotate.d/ does not exist.  Determine the logrotate method and adjust accordingly"  2>&1 >> $LOG
fi
This script just facilitates dropping the configuration file into the /etc/logrotate.d directory.
Manually Test
Copy the scripts over to a test machine. (Don’t forget chmod +x sccm_logrotate.sh) Ensure the SCCM client is installed on the test machine. Now, manually run the sccm_logrotate.sh script to confirm that it successfully runs and that the logrotate configuration file is copied.
To manually run the logrotation, execute the command logrotate -vf /etc/logrotate.d/sccm Confirm that the log files in /var/opt/microsoft/ have rotated.
If the scripts do not work manually, it will not improve through a deployment tool or with age.
Create a Package Once your scripts are tested, create a SCCM package (see https://technet.microsoft.com/en-us/library/gg682112.aspx ). SCCM supports only package deployment to UNIX / LINUX systems. Applications are a Windows specific concept and are not support on non-windows platforms. (see Deploying Software to Linux and UNIX Servers in Configuration Manager https://technet.microsoft.com/en-us/library/jj573943.aspx )
- Place your scripts in your SCCM package source share folder. (\\servername\sharename\path) Example \\fileserver\packagesource$\Microsoft\SystemCenter\ConfigManager\Linux\logrotate
- Start the Create Package Wizard. Fill out the fields with the appropriate values and select the package source folder where you stored your shell scripts.
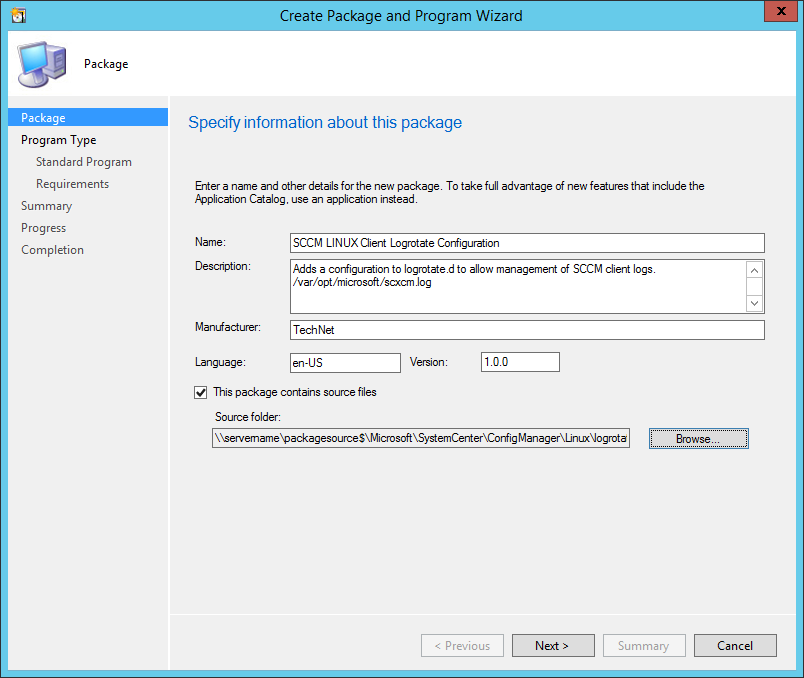
- On the Program Type page, select “Standard program”.
- In the program command line, define the shell you intend to use and the script specified in your package. Example: /bin/sh ./sccm_logrotate.sh Set the program to run “normal”. The ”Program can run” value must be set to “Whether or not a user is logged on”. SCCM client execution does not support the user context.
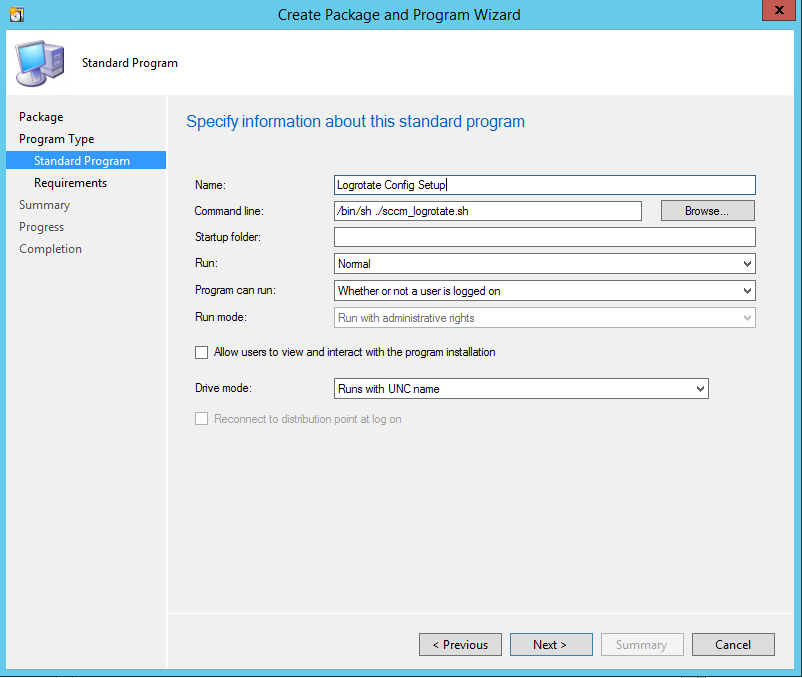
- On the Requirements page, select the appropriate values for your environment. The Platform requirements can be set to either “This program can be run on any platform” or a platform specific setting. It is recommended that you either filter at the collection level and or by the package requirements. In this example, the program is set to run only on RHEL and CentOS 6.
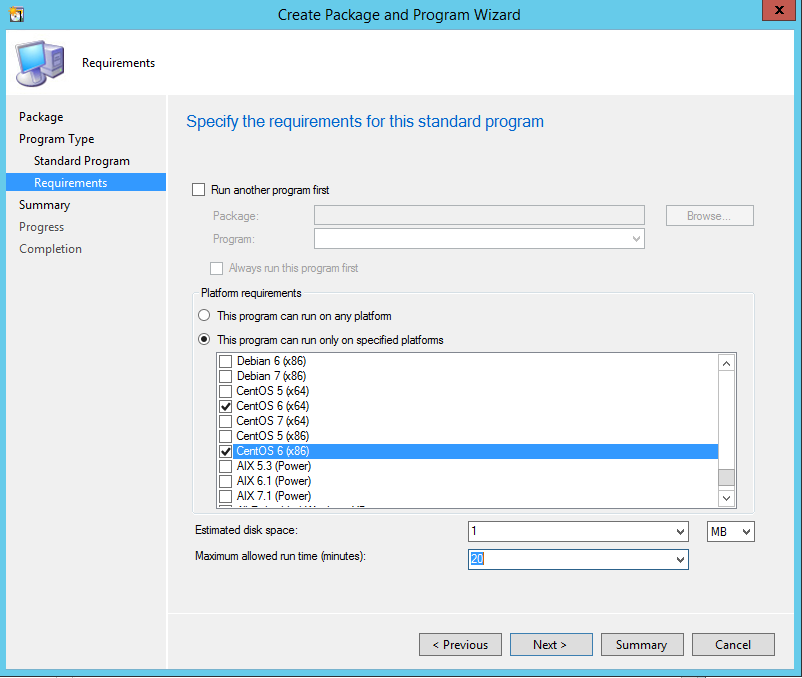
- Complete the wizard screens (next… next… close).
Distribute the Package
Ensure that you distribute the package to all the required DPs. (https://technet.microsoft.com/en-us/library/gg682083.aspx)
Deploy the Package
- Utilize an existing collection that contains the target LINUX machines or or create a new collection that will contain LINUX cliented systems.
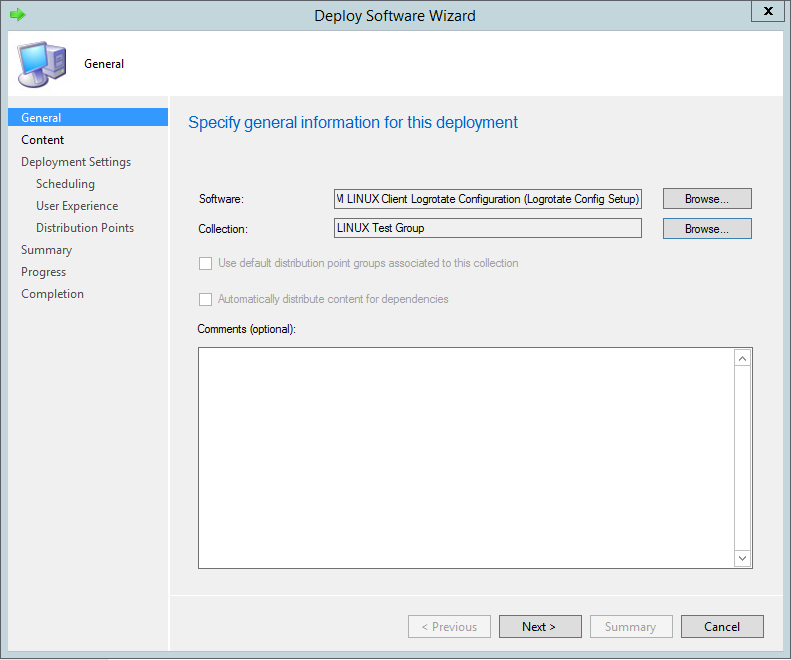
- Select Next, on the “Specify the content destination” page.
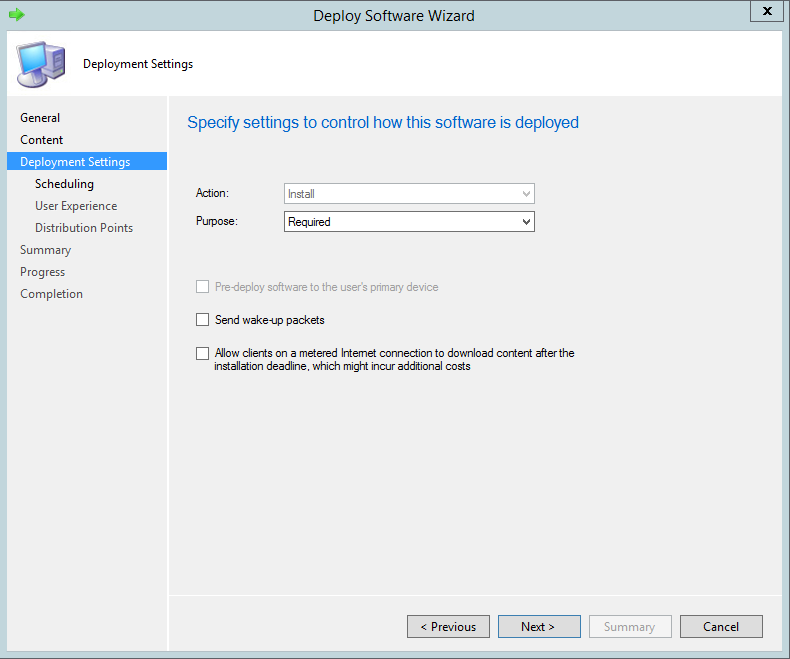
- On the “Specify settings to control how this software is deployed”, ensure that the “Purpose:” is set to “Required”.
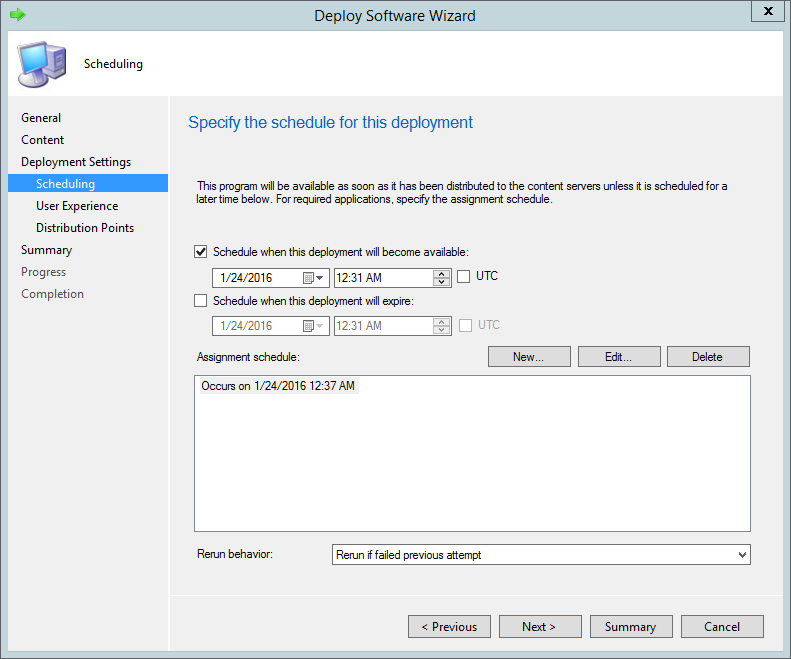
- On the Scheduling page, select “Schedule when this deployment will become available:” and choose the default date. For the “Assignment schedule”, select “New…”, utilizing the default date or choose “Assign immediately after this event” --> “As soon as possible”, The values “log on and “log off” are not supported in LINUX deployments.
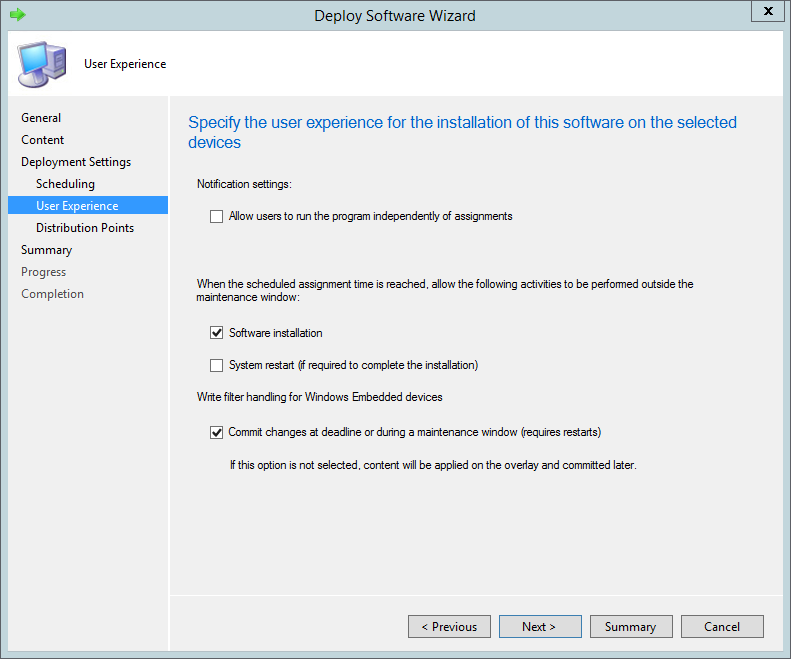
- Click “Next >” on the User Experience page.
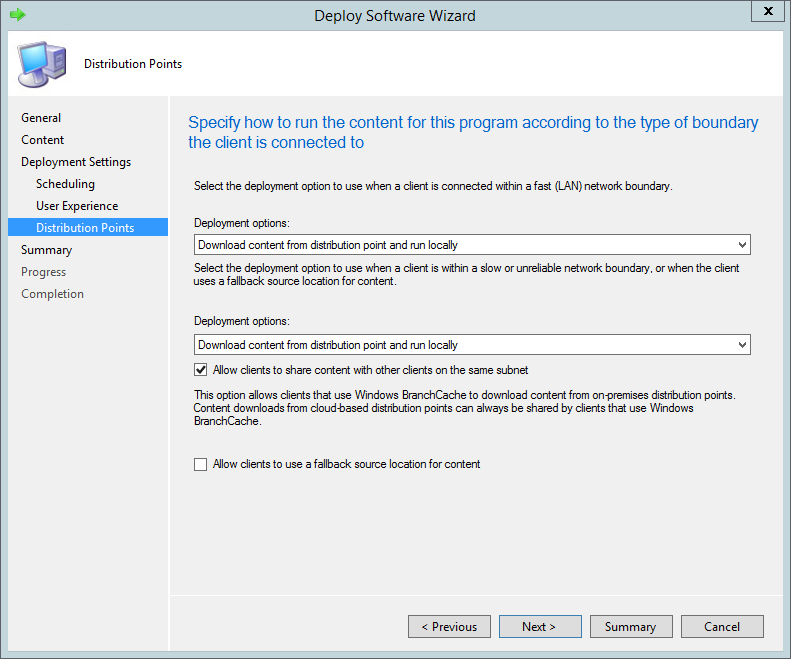
- On the “Distribution Points” page, ensure the “Deployment options” are set to “Download content from distribution point and run locally”. Deselect the option to “Allow clients to share content”. Linux clients do not support branch cache. Click Next >
- On the Summary page, click Next>
- Click Close.
- (OPTIONAL) Open the properties page of the package.
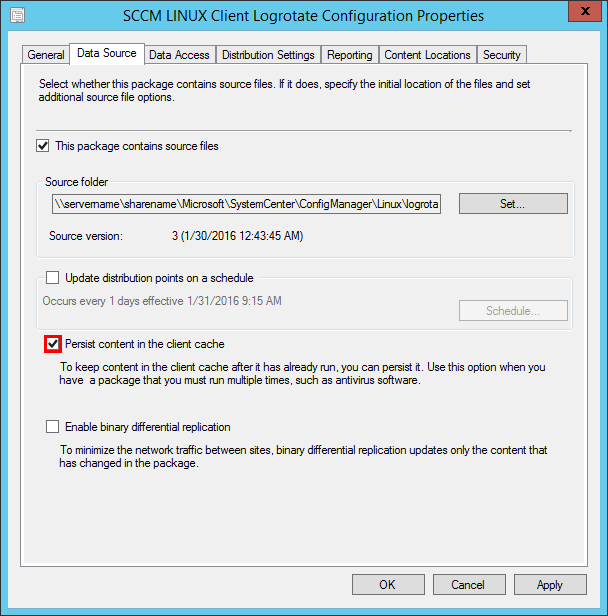
- (OPTIONAL) Select the Data Source Page. Check the box for Persist content in the client cache. This option will allow you to confirm that your package is downloaded to the client and will allow you to do further troubleshooting if needed.
Monitoring Deployment
Remember, similar to Windows deployments, LINUX deployments are not instantaneous. LINUX clients are VERY similar to Windows clients and process policy, content and installations in very much the same way.
If you are very impatient, you can force the client to pull policy. From the LINUX client, execute:
[root@usmdua8038 ~]# /opt/microsoft/configmgr/bin/ccmexec -rs policy
In real time you can watch the logs:
[root@usmdua8038 ~]# tail -f /var/opt/microsoft/scxcm.log
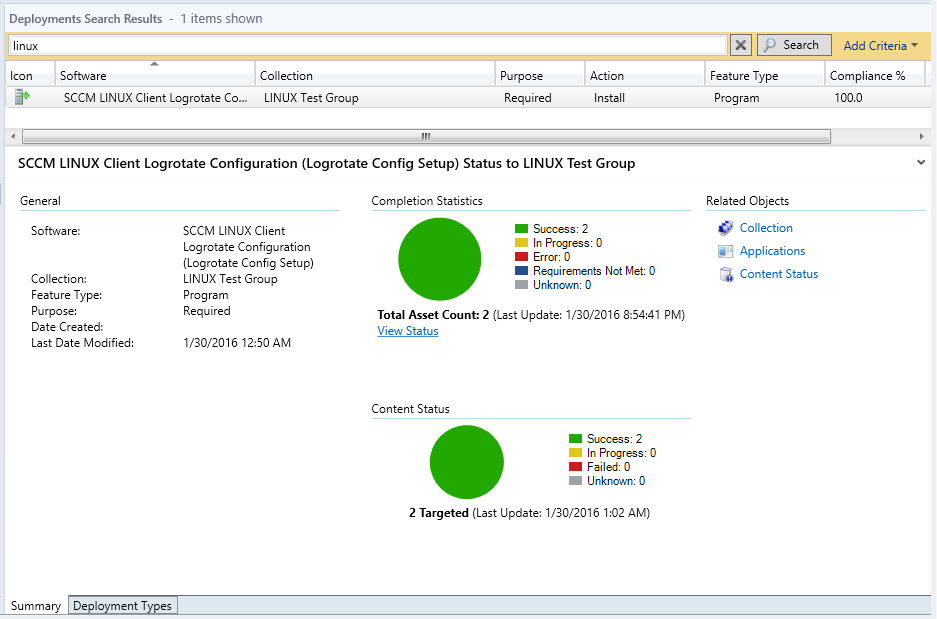
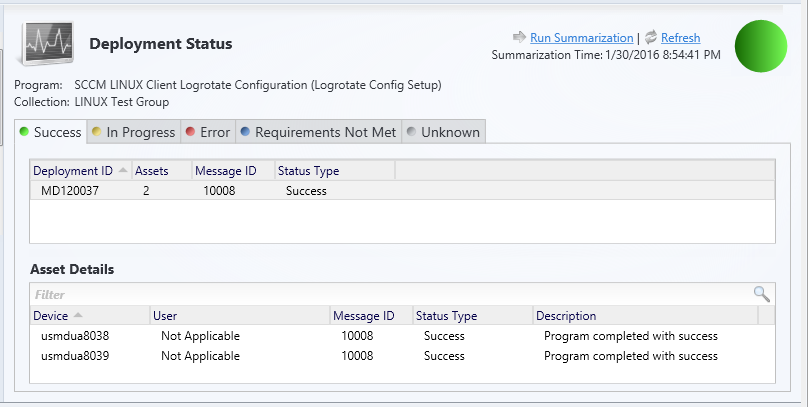
From the SCCM console, look under Monitoring --> Deployments and filter by the Package name or a keyword from the package.
Troubleshooting Deployment
If your first deployment does not go as expected, the logs available to you are pretty extensive. You should also visit https://social.technet.microsoft.com/wiki/contents/articles/28548.unix-and-linux-clients-for-system-center-2012-r2-configuration-manager-common-error-wiki.aspx
On the server side, did you approve your LINUX client? By default, only domain joined Windows clients are automatically approved. Select the client agent and approve it or change the approval policy. (see https://technet.microsoft.com/en-us/library/bb633214.aspx)
On the client side, the log scxcm.log is the most useful. The default path to the /var/opt/microsoft/scxcm.log (see https://technet.microsoft.com/en-us/library/hh427342.aspx )
The configuration file for the logs is /opt/microsoft/configmgr/etc/scxcm.conf it supports the log settings of: ERROR,WARNING INFO and TRACE.
To change the log level, edit /opt/microsoft/configmgr/etc/scxcm.conf and change each instance of the tag MODULE to the desired log level.
Set the log level to TRACE. Ensure that you ONLY use TRACE during troubleshooting. The trace log is very verbose and can fill up a small disk quickly if you are not paying attention.
It is recommended that you delete the deployment after changing the logging level and recreate the deployment. This will give you a trace log of the entire transaction from start to failure.
Confirm the configuration of your Distribution Points and Management Points. LINUX clients support both HTTP and HTTPS. However unlike Windows clients that can be auto-issued certificates, the LINUX clients will need to have the client side authentication certificates installed manually. For simple testing, I recommend utilizing HTTP MPs.
Confirm that you can communicate to each MP. From the LINUX client, execute:
wget https://<mpserverfqdn>/SMS_MP/.sms_aut?mplist
From each MP in the list, confirm that you can connect to its certificate
wget https://<mpserverfqdn>/SMS_MP/.sms_aut?mpcert
Confirm the package is available from your Distribution Point.
wget https://<mpserverfqdn>/SMS_DP_SMSPKG$/<packageid.version>/sccm_logrotate.sh
If you performed the optional step of setting the package to persist in client cache, look to see if the client downloaded the files into the SCCM client cache located at:
/opt/microsoft/configmgr/.cache/<packageid.version>/
A trace log can become very large. You can GREP (or EGREP) for several key words to quickly or CAT the file with LESS allowing you to search for key words.
You can always search on the package ID and advertisement ID. Here are some key words to look for in a successful deployment:
For further deployment troubleshooting, consult other TechNet articles like https://technet.microsoft.com/en-us/library/bb693982.aspx While most refer to Windows clients, many of the same issues occur with the LINUX client.
WMI Filter Issues
For WMI filter related issues, leverage the LINUX client omicli tool. Similar to WMI, OMI queries a similar structure. For example,
/opt/microsoft/omi/bin/omicli wql root/cimv2 "SELECT * FROM SCXCM_OperatingSystem WHERE Version like '6.%' AND OSType=36 AND Caption like '%CentOS%'"
The client has a mapping table that maps the WIN32_ classes to the client SCXCM_ classes. This allows the console queries to work cross platform.
Hopefully this demonstration provides you some visibility into System Center Configuration Manager as an “Enterprise Management Tool”.
Test Environment
The components were used to build out this scenario:
- Windows Server 2012 R2
- System Center Configuration Manager 2012 R2 CU2
- CentOS 6.7
- SCCM LINUX Agent Edition 5.0.7958.1024
Comments
- Anonymous
April 06, 2016
Thanks, it helped a lot !! - Anonymous
November 02, 2016
Can this be applied to Apple MacBook..?RTPStatus=EnabledClientVer=4.5.22.0AVSigsVer=10886 (20141216)AVSigsDate=2016-11-02T09:22:21AntivirusAntispywareModVer=1446 (20141208)SystemState=Maximum protectionAutomaticUpdateSignature=EnabledStartupScanAfterLogon=EnabledStartupScanAfterUpdate=EnabledRTPEventMask=open:create:execRTPAdvHeuristic=DisabledRTPAdvHeuristic=DisabledExec=DisabledRTPAdvHeuristicCreate=EnabledRTPStatistics=Infected:0|Cleaned:0|Deleted:0ScanStatistics=Infected:0|Cleaned:0|Deleted:0- Anonymous
November 03, 2016
Hussain, unfortunately I do not have experience with Mac clients. I would recommend you check out How to Create and Deploy Applications for Mac Computers in Configuration Manager https://technet.microsoft.com/en-us/library/jj687950.aspx
- Anonymous


