Setting up CORS request with Windows Integrated Authentication and ASP.net CORE
Some time ago, I worked on an issue, where a website needed to execute a CORS (Cross Origins Resource Sharing) request to a second website which was protected by Windows Integrated authentication. Since the setup does have a few hidden caveats, and is detailed only in part in various forum posts, I will like to give a detailed walk through of how such a setup would have to be configured.
Through this tutorial, we will look at:
- building a simple ASP.net Core 2 Razor Pages application that will be using JQuery to perform JavaScript Post requests to a backend HTTP service with which it will be exchanging JSON data.
- at creating the sample HTTP service (using ASP.net Core 2 WebAPI) and exploring how we can bind to JSON objects and send back JSON.
- finally, once we have explored the front-end and back-end code, we will be looking at how to configure both of these sites to work with IIS as a reverse proxy server, and implement Windows Integrated Authentication, as would be the case for many such setups running in corporate intranets.
The configuration of IIS for this scenario to work is the trickiest bit since it relies on some subtleties that I have not been able to find very much documentation on – hence this article series.
For the rest of the article, I will be looking at explaining what the end result should look like and how the flow of control should be between components.
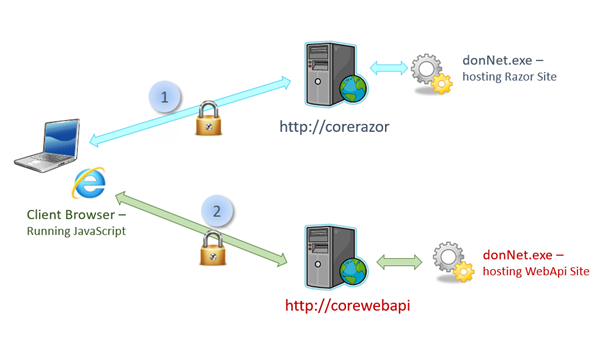
The initial diagram – CORS tutorial
For the demo project, I will create a ASP.net Core Razor Pages site, with one page that will be our HTML front end site. This website, to implement its functionality, will require to make JavaScript POST calls to a backend ASP.net Core WebAPI controller, in order to send and retrieve data. Both the Razor Pages site and the WebAPI site are hosted using IIS as a reverse proxy and Kestrel as a server.

The Razor Pages website sits behind an IIS webserver that is configured to listen to requests with a host header of CoreRazor. The WebAPI site sits behind an IIS server that is configured to listen for traffic with a host header of CoreWebApi.
The browser will load the HTML page generated by the Razor Pages application (from https://corerazor) – in step 1. It will then execute JavaScript on the client to make XHttpRequests to the WebAPI site (https://corewebapi) sending and receiving JSON objects – in step 2.
Both these sites are using Windows Integrated Authentication to authenticate incoming requests and make sure only authorized users can access the content.
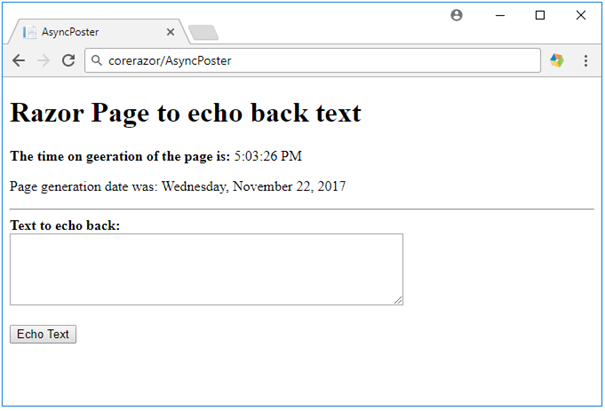
The front end website (ASP.net Core Razor Pages) looks like the below:

When executed, the AsyncPoster Razor Page, will print out the date and time it was created on, using the server's time, since this piece of the code is run inside the dotnet.exe process running on the server called CoreRazor.
It also displays a text area control that allows a user to input some text, and then send the text to a backend HTTP service, implemented as a WebAPI controller in ASP.net Core 2. This is done by pressing the 'Echo Text' button that will trigger some JQuery script to create a POST request to the CoreWebAPI server and send a JSON object along, containing the text entered in the text area.
Once the request reaches the CoreWebAPI site, it will be processed by the POST method of a WebAPI controller called EchoText. All this controller will do, is that it will capture the text that has been sent in, add the 'Echo back: ' prefix and send the text back to the page as a JSON object.
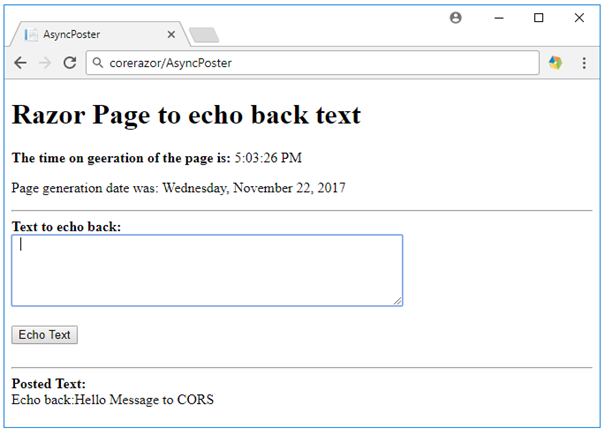
On the page, the JQuery script that has executed the POST request will capture the response from the WebAPI controller, and display the text that has been returned inside a div element on the page. It will also clear the text area so the user can type in more text.
Here is what the page looks like when some text has been entered, sent for processing and displayed back:

Proceed to the next article in the series ->
By Paul Cociuba https://linqto.me/about/pcociuba