Creating workshop machines on Azure
During Directions US and Directions EMEA, we had to spin up approx. 2000 Azure VMs for our hands on labs.
All of these machines was deployed individually from PowerShell (multiple simultaneous jobs, but still one job=one VM) running on my Developer Machine in Lyngby. The scripts used to create these VMs has been shared with a number of partners with the same need.
The scripts were using an ARM (Azure Resource Management) template, much like the one you probably know from https://aka.ms/navdeveloperpreview, but I never shared the scripts on my blog because I knew there was a better way. ARM has the ability to loop creation of resources, so it must be possible to create a template, which can spin up multiple VMs, and indeed it is.
https://aka.ms/getnavworkshopvms
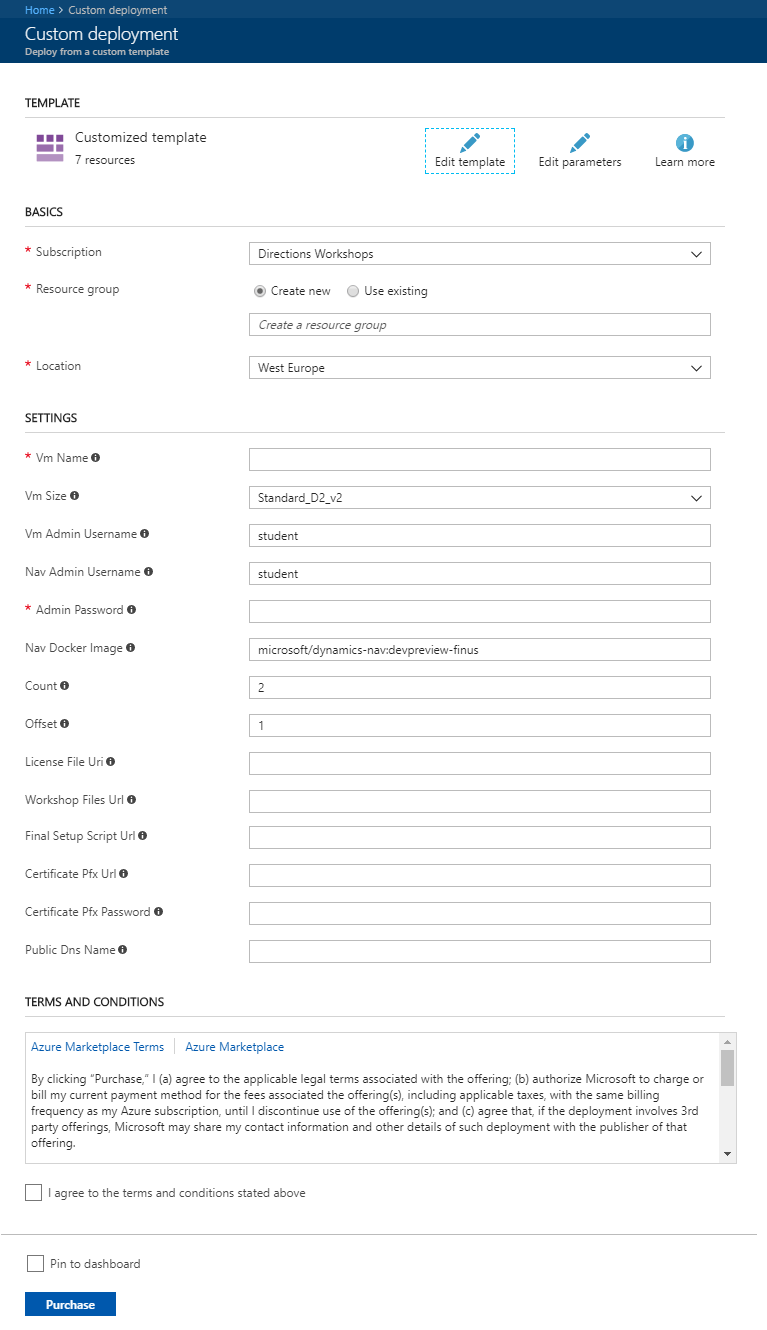
If you navigate to https://aka.ms/getnavworkshopvms you will be asked to login to your Azure Subscription (much like https://aka.ms/getnav, explained in this blog post). You will be met by a template, which looks slightly different from the other templates:

Let me explain the fields in this template
First, the mandatory fields:
- Resource group is the resource group, which will contain all workshop VMs. The ARM template will create a number of resources in this group and deleting the resource group after usage will remove everything used for this deployment:
- 1 Storage account
- 1 Virtual Network
- 1 Network Security group
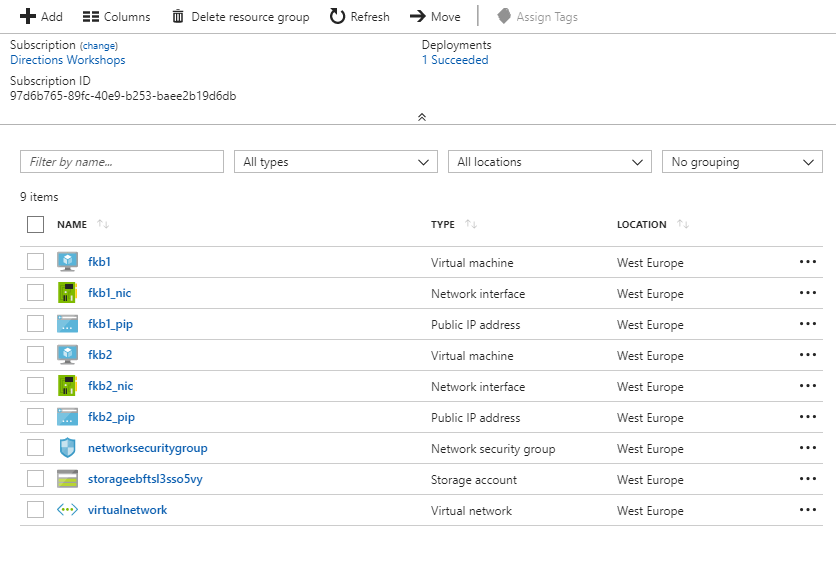
- x Virtual Machines, which each has a network interface and a public IP address.
- Location is the datacenter in which your Virtual Machines should be created.
- vm Name all VMs created in the deployment will get a name starting with this name, followed by a VM number
- VM Admin Username is the username which you can use to connect to the VM with remote desktop.
- Nav Admin Username is the username created as a super user in NAV.
- adminPassword is the password used as administrator password for VM, NAV and SQL.
- Nav Docker Image is the name of the docker image you want to use for the workshops
- registryUsername is the docker login username for a private registry (or leave blank if using the public docker hub)
- registryPassword is the docker login password for a private registry (or leave blank if using the public docker hub)
- Count is the number of workshops VMs you want to create
- Offset is the offset of the VM numbers. If vm Name is test, Count is two, and Offset is 10, you will get two VMs with the names test10 and test11.
Then the optional fields:
- License File Uri is where you can provide a secure URL to the license file you want to use for the workshop machines.
- Workshop Files Url is where you can provide a Url to a .zip file, which will be downloaded and extracted in c:\workshopfiles on each VM
- Final Setup Script Url is where you can provide a Url to a PowerShell script, which can perform final Setup. An example would be https://raw.githubusercontent.com/Microsoft/nav-arm-templates/master/SetupWorkshop.ps1 which installs PDF reader and Visual Studio.
- Certificate Pfx Url is where you can provide a secure Url to a Certificate Pfx file if you want to use a trusted certificate. If you do not specify a trusted certificate, the workshop VM will be secured with a self-signed certificate, which you can download and install following the instructions on the landing page.
- Certificate Pfx Password is where you provide the password for the Certificate Pfx file provided above
- Public Dns Name is where you specify the CNAME record pointing to your VM. Insert a # in the DNS name, where you want to insert the VM number (f.ex. ws#.navdemo.net would give ws10.navdemo.net to test10, and ws11.navdemo.net to test11 - note that you need to create the CNAME records manually).
Note: You will have to have sufficient quota for creating the workshop machines in the location you are creating them. Navigate to usage & quotes under your subscription to validate. Typically a subscription has 100 standard D family cores, 350 network interfaces and 60 public IP addresses, meaning that without requesting a quota increase, you can spin up 50 workshop machines in a subscription (50 * D2 = 100 cores). Quota increase is requested in the Azure Portal and can take anywhere between a few minutes to a few days.
Important Note: Currently (November 2017) I do NOT recommend you to use a trusted certificate when running workshops. Reason for this is, that the Web Client uses STS (Strict Transport Security), which forces all subsequent requests made to the DNS name to become https. This in effect means, that you cannot access the landing page once you have accessed the Web Client (unless you access the landing page by the IP address). I will update this blog post once there is a solution to this problem.
Azure deployment succeeded
Like with the other Azure Templates for generating VMs, Azure Deployment will say succeeded when the Azure part of the deployment is done:

This means that you shortly after can connect to the landing page of the VMs (click the Virtual Machine and get the URL) and follow the progress of the individual VMs. You probably don't want to do that though, you probably just want to wait ~1 hour and then test whether all the VMs have been deployed successfully (PowerShell script follows:-))
Azure deployment failed
If you provision 100 Azure Workshop VMs, some will probably fail - and if just one fails, Azure will mark the deployment as failed.
Don't panic - majority of your VMs are probably fine and you shouldn't remove the resource group and redeploy just because Azure indicated failure, just always deploy a few extra spare ones and then shut down the failed or the extra VMs individually if you like.
Whether you are provisioning 10 or 100 VMs, it takes approx 1 hour since everything is running simultaneously.
Run this powershell piece to test whether your workshop VMs are ready to use:
 $vmname = "fkb"
$domain = "westeurope.cloudapp.azure.com"
$offset = 1
$count = 2

$good = 0
$bad = 0
$offset..($offset+$count-1) | % {
  $status = ""
  try {
    $status = (New-Object System.Net.WebClient).DownloadString("https://$vmname$_.$domain/status.aspx")
  } catch { }
  if ($status.Contains('Ready for connections!') -and $status.Contains('Desktop setup complete!')) {
    $good++
  } else {
    $bad++
    Write-Host "$_ failed"
  }
}
Write-Host "Succeeded: $good"
Write-Host "Failed: $bad"
As you probably can read, the script will inspect the status.aspx page to see whether the Desktop setup and the Container setup both completed successfully.
Enjoy
Freddy Kristiansen
Technical Evangelist