Manage Web.config Values between Environments in Release Management and TFS
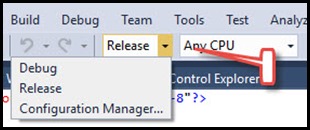
When a Visual Studio project is created, it will provide the Debug and Release build configurations by default. The build configuration maps to the Web.config in the project and allows you to change database connection string, or appSettings value when the application is published.
This setup allows you to define the variables for the application in the Debug, or default web.config file and change them for the release build and publish.
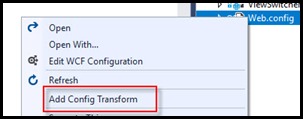
If there is only one web.config file in the project, right click on the web.config file and select Add Config Transform.
This will add a Debug and Release web.config file
Prepare Web.config for Release Build
One of the number one application performance killers is deploying a debug build into the production environment (more info here) and one the items I check for when conducting an IIS Health check for customers. The debug build configuration will not change debug=true to false and you are running a debug build in production. Go check the production IIS servers and change the debug value to false for ALL applications right now.
Since a Release build is created for the production environment, it is best to use the Web.Release.config file to change the values for each environment. Meaning, the root Web.config will contain the values for everyday development needs and allow the developer to run the application locally. The Web.Release.config file will remove these values and replace them with place holder values that are replaced by Release Management as the application is deployed into the environment.
Step 1: Add Values to Web.config
Add the database connection string and appSetting values to the root web.config
These values are used by developer to develop locally and use the development database
Step 2: Add Transform Values
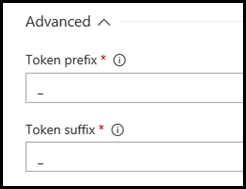
Add transforms to the Web.Release.config file and in the value key, change the actual value to the name of the variable with the prefix of _ and suffix of _ so the value is _Environment_ . The Release Management (RM) task uses the underscore character to find the variable to change. There are other prefix and suffix that can be used, such as # and this is defined in the RM task.
See the Log Folder Location is in the value key is _Log Folder Location_ for the transform.
Step 3: - Create Build
This task completes the compilation process of the application and points to the solution file in TFS and outputs the _PublishedWebSite folder and uses the web.config transform feature to create a release build.
In the Visual Studio Build task add the following MSBuild arguments:
/p:OutDir=$(Build.ArtifactStagingDirectory) /p:DeployOnBuild=true /p:UseWPP_CopyWebApplication=true /p:PipelineDependsOnBuild=false
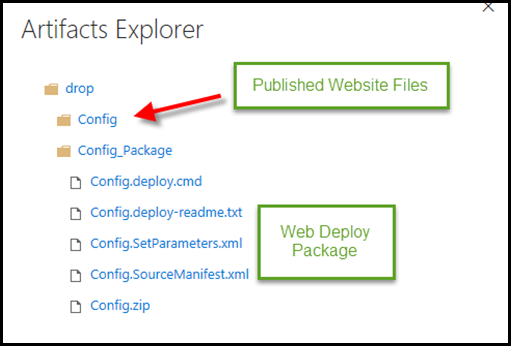
The MSBuild arguments will create two folders in the build and publish process. The arguments actually publish the compiled application to the $(ArtifactStagingDirectory) (S folder in the build agent), transforms the web.config file to match the Release Build Configuration and creates the Web Deploy package folder and _PublishedWebsites folder.
The $(BuildConfiguration) has the value Release by default and this notifies the build process to transform to the Release web.config
This is the result of the build in the $(ArtifactStagingDirectory)
In the Publish Artifact task, change the path to publish to the _PublishedWebsites folder
$(build.artifactstagingdirectory)\_PublishedWebsites
These folders are copied to the drop location and can now be referenced in the Release
Step 4: Create Release
After the build successfully completes, create a release in Release Management and define the variables for each environment to replace the values in the web.config for the release environment.
These screenshots are from TFS 2018.1 and the variable section for the release is very different from TFS 2017.
Using the Replace Token extension by Guillaume Rouchan and any of the replace token extensions will work in this scenario.
The release is following these steps:
-Download source artifacts for the latest build to the release server (where the agent is installed running the release)
-Find and replace the values in the web.config file using the Replace Token task on the release server
-Copy the files in the from Config folder to the IIS server
-Execute a Web Deploy script on the IIS server to update the web site
Here are the Release tasks:
Environment Variables:
In the Variables tab for the release for the Environment, define the variables to replace in the web.config file. The scope for this example is set to the Dev environment. If the values are to change for the next environment, such as UAT, another set of variables are created with values for UAT.
These variables map to the ones defined in the Release.Web.config file and the Replace Token task will identify all values matching the _Value_ definition.
For instance, the Release Token task looks for the Environment value in the web.config and changes the value from _Environment_ to DEV
Configure Replace Token Task:
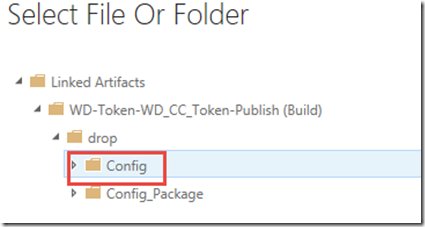
Select the folder in the Drop folder where the build artifacts are stored:
Keep the default of the *.config to search and replace tokens
If you have values in the web.config that use a different prefix or suffix, make the changes in the task in the Advanced section
The web.config file has been updated to reflect the values for the environment and can now be used to copy to the IIS servers and update the website.
Contact me if you want more info on the other tasks to deploy to the IIS server.
Comments
- Anonymous
September 18, 2018
This could be highly interesting, but I really cannot understand the language used to write this article. Please, have it translated in english!
![clip_image001[7] clip_image001[7]](https://msdntnarchive.z22.web.core.windows.net/media/2018/03/clip_image0017_thumb1.png)
![clip_image001[9] clip_image001[9]](https://msdntnarchive.z22.web.core.windows.net/media/2018/03/clip_image0019_thumb1.png)

![clip_image001[11] clip_image001[11]](https://msdntnarchive.z22.web.core.windows.net/media/2018/03/clip_image00111_thumb1.png)
![clip_image002[5] clip_image002[5]](https://msdntnarchive.z22.web.core.windows.net/media/2018/03/clip_image0025_thumb1.png)

![clip_image001[13] clip_image001[13]](https://msdntnarchive.z22.web.core.windows.net/media/2018/03/clip_image00113_thumb1.png)
![clip_image001[15] clip_image001[15]](https://msdntnarchive.z22.web.core.windows.net/media/2018/03/clip_image00115_thumb.png)
![clip_image002[9] clip_image002[9]](https://msdntnarchive.z22.web.core.windows.net/media/2018/03/clip_image0029_thumb.png)
![clip_image003[6] clip_image003[6]](https://msdntnarchive.z22.web.core.windows.net/media/2018/03/clip_image0036_thumb.png)

![clip_image001[17] clip_image001[17]](https://msdntnarchive.z22.web.core.windows.net/media/2018/03/clip_image00117_thumb.png)