Tutorial Series: using WinJS & WinRT to build a fun HTML5 Camera Application for Windows 8 (1/4)
Using HTML5, JavaScript & CSS3, we’re going to build a fun HTML5 camera application for Windows 8 and its Modern UI. You will learn how to use WinRT to access to the camera and the file system to take some pictures & videos. We will then work a bit on the layout with CSS3 grid & flexbox and provide some visual feedback to the user via CSS3 animations. I will also show you how to use WinJS and its FlipView control via a templating rendering JS function to embed the whole experience. At last, we will see how to manipulate the images taken with the camera to apply some filters effects via the canvas element or directly thanks to a C++ WinRT component.
At the end of this 4 tutorials, you will have built this fun application:
Download Video: MP4, WebM, HTML5 Video Player by VideoJS
In this first tutorial, we will be concentrated on initializing the camera, displaying the live preview into a video tag & writing a picture inside the My Pictures special folder. It’s part of this series:
1 – Accessing to the Camera stream and writing it on disk
2 – Working on the layout, adding video recording support and providing feedback to the user with CSS3 animations
3 – Using the FlipView to navigate through the live preview and the recorded files
4 – Manipulating the image to add some effects via the canvas tag with EaselJS or WebWorkers and via GPU Shaders with a WinRT component
Pre-requisites: to follow these tutorials, you need first to:
1 – Download/buy & install Windows 8 RTM on your machine: https://msdn.microsoft.com/en-US/windows/apps/br229516.aspx
2 – Download & install the free edition of Visual Studio 2012 Express RTM for Windows 8: https://msdn.microsoft.com/en-US/windows/apps/br229516.aspx or use the higher versions.
It’s better also if you are already aware of WinJS and some basic concepts of a Modern UI application. For that, you could start by reading my 2 other tutorials:
- Windows 8 HTML5 WinRT App: How to create a small RSS reader in 30min (part 1/2)
- Windows 8 HTML5 WinRT App: How to create a small RSS reader in 30min (part 2/2)
They will help you to understand basic concepts in less than an hour. You’ll be able to download the final solution matching this first tutorial at the end of this article.
Step 1: displaying the stream from the camera
Let’s do those tutorials completely from scratch.
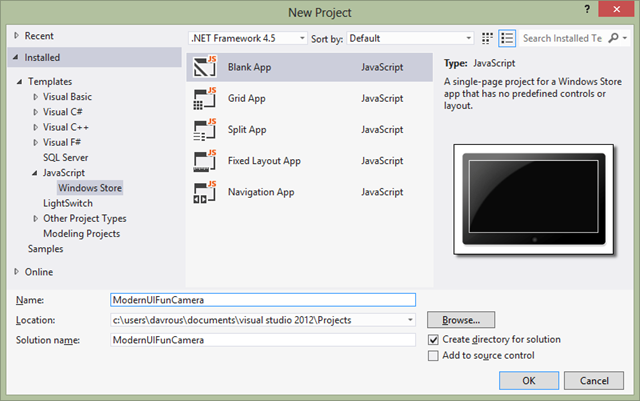
Inside Visual Studio 2012, create a blank application via New Project –> JavaScript –> Windows Store –> Blank App and name it “ModernUIFunCamera” :
We now need a container to display the live stream of the camera.
As we’re using HTML5, we will naturally use the HTML5 video tag for that. Open the default.html file and replace the default:
<p>Content goes here</p>
by this:
 <div id="application">
    <video id="live-preview"></video>
</div>
And we’re done for now on the HTML part. Switch to the JavaScript world by opening the default.js file available in the js folder.
Add all these variables declarations:
 // Using
var Capture = Windows.Media.Capture;
var Storage = Windows.Storage;

// Globals
var mediaCapture;
var recording = false;
var recordedFile;
var livePreview;
var pics;
var videos;
var flipView;
var imageProcessor;
var screensList;
just after:
var activation = Windows.ApplicationModel.Activation;
We will use them during the 4 tutorials. Ok, now that we’ve got all variables to work with, let’s retrieve the video tag and start the camera.
This is done by these 2 functions:
 function init() {
    livePreview = document.getElementById("live-preview");
    startCamera();
}

function startCamera() {
    mediaCapture = new Capture.MediaCapture();
    mediaCapture.initializeAsync().then(function () {
        livePreview.src = URL.createObjectURL(mediaCapture);
        livePreview.play();
    });
}
From JavaScript, we’re calling the WinRT APIs to access to the camera via the Windows.Media.Capture namespace. It’s important to know that every WinRT APIs that possibly takes longer than 50ms to execute are asynchronous by default in Windows 8. It helps us to guarantee having fast & fluid applications. The UI thread is then not blocked to preserve the user’s experience. But this doesn’t mean that the code become more complex to write in counterpart. Thanks to the usage of the promise pattern (implemented via the .then() function), the code remains clear and easy to write & maintain. To have more details about that, please read Asynchronous programming in JavaScript from our MSDN documentation.
The startCamera() function is then instantiating the WinRT MediaCapture object. This is exactly the same object you would use if you were a C++ or C# developers. We’re then initializing the device associated to the camera in an asynchronous way via the initializeAsync() function. The callback is done via the promise containing an anonymous function taking the stream output by the device. It then pushes it into the source property of the HTML5 video tag via the usage of the createObjectURL function. Finally, we just need to call the play function to be able to see the live video stream inside our HTML5 application.
Ok, let’s now call this code, just after the processAll command has finished its job, by using this line of code:
args.setPromise(WinJS.UI.processAll().then(init));
And we should be fine, I guess. Let’s check that by running the application with F5!
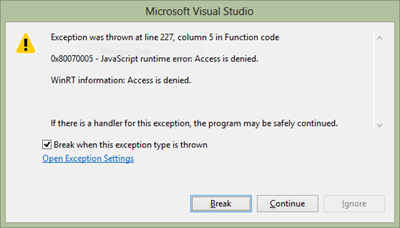
Boom. You should be quickly stopped by this 0x80070005 exception:
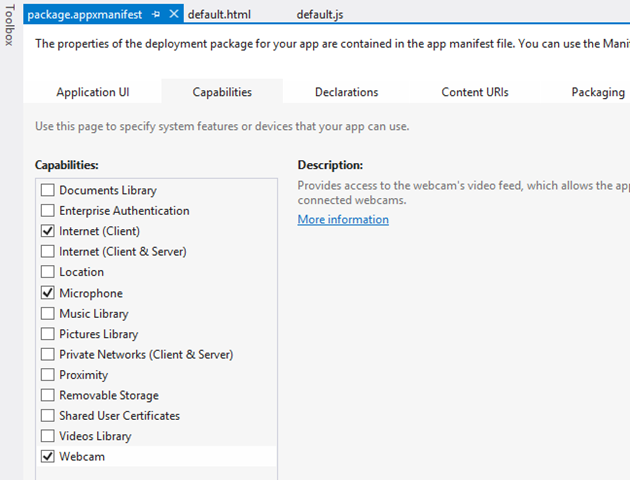
The famous “access is denied” exception which is completely normal at this stage. Indeed, you can’t access to the user’s webcam without its explicit authorization. For that, you need to pass through a broker and you need first to declare that you want to access to the webcam & microphone devices. To do that, open the package manifest by double clicking on the package.appxmanifest file and go into the Capabilities tab. Enable both Microphone & Webcam capabilities:
If you want to know more about those capabilities, please read: App capability declarations from our MSDN Documentation.
Now if you run the app, the user (well you) will be prompted by Windows 8 in this way:
The good news is that the user always stays in control. Press “Allow” and you should now see this kind of result:
With probably your face displayed instead of mine. ![]()
Note: the user can later change this permission by opening the charms bar and the permissions flyout available in the settings charm.
Ok, our code works fine but wouldn’t be better in the video was displayed fullscreen and centered whatever the resolution of the user’s machine will be?
For that let’s use a bit of CSS3. Open the default.css file available in the css directory and insert this piece of CSS:
 body {
    width: 100%;
    height: 100%;
}

#application
{
    width: 100%;
    height: 100%;
    display: -ms-grid;
    -ms-grid-columns: 1fr;
    -ms-grid-rows: 1fr;
}
The video will be displayed in fullscreen and centered thanks to the usage of the awesome CSS Grid Layout specification. If you simply want to discover the CSS3 Grid specification, feel free to play with this IE Test Drive demo: Hands On: CSS3 Grid Layout inside IE10.
Step 2: capturing a picture and writing it on the disk
We’re living inside a sandbox when writing a Modern UI application. This means that we can’t write anywhere we want for obvious security reasons. Still, we have a dedicated storage area for our app where we can write without asking explicit permission to the system before. It’s made of 3 different kinds of folders: local, temporary & roaming. You’ll find more about that here: Accessing app data with the Windows Runtime.
In my case, I would rather prefer to write the files directly inside the Windows Pictures & Videos special folders.
Note: you will find all the types of data storage available for Windows 8 apps inside this article: App data
Accessing to these Windows 8 known folders requires you to go through the broker and then need to be declared inside the application manifest.
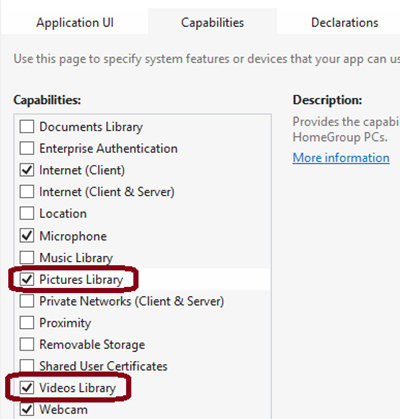
Open the manifest with the designer tool and add the 2 pictures & videos library capabilities:
Now, let’s create a folder into the “Picture Library” by inserting this code:
 var picturesLib = Storage.KnownFolders.picturesLibrary;
picturesLib.createFolderAsync("ModernUI Fun Camera", Storage.CreationCollisionOption.openIfExists)
  .then(function (folder) {
    pics = folder;
});
into the onactivated handler function just before this line of code:
args.setPromise(WinJS.UI.processAll().then(init));
The code should be self explicit. It uses the Windows.Storage.KnownFolders static class to access to the picturesLibrary. Then, we’re creating the folder named “ModernUI Fun Camera” inside it or we’re getting it if it already exists thanks to the openIfExists flags of the CreationCollisionOption enumeration. The result of this async operation is stored into the pics variable.
Ok, the next step is now to capture an image when the user will tap or click on the video and write the stream into the freshly created folder into the picture library.
We will use this function for that:
 function takePhoto() {
    pics.createFileAsync("photo.jpg", Storage.CreationCollisionOption.generateUniqueName)
      .then(function (file) {
        var photoProperties = Windows.Media.MediaProperties.ImageEncodingProperties.createJpeg();

        mediaCapture.capturePhotoToStorageFileAsync(photoProperties, file).then(function () {
            console.log("Image saved on disk.");
        });
    });
}
We naturally start by creating a new file that will be named photo (X).jpg where X will be an incrementing number handled by the system to avoid names collision. Once we’ve done that, we need to chose how to encode our image, its final height & width, etc. This is handled by the ImageEncodingProperties class. In our case, we will write Jpeg files and we will use the default values for the remaining properties.
Final step is now to ask to the camera device to generate a snapshot. To do that and to write the output directly into our file, we’re using the capturePhotoToStorageFileAsync function passing our photo properties and our file handler.
For the moment, we’re only displaying a log message in the final promise.
Associate this takePhoto() function to the click event of the video element in the init() function:
livePreview.addEventListener("click", takePhoto);
Press F5 and click or touch the live stream.
Inside Visual Studio, if you have the JavaScript console opened, you should see this output:
If you’re looking for this window, while debugging with VS, go to the DEBUG menu –> Windows –> JavaScript Console.
And if you’re opening your Windows File Explorer in your Pictures library, you should now have a directory named “ModernUI Fun Camera” with a photo.jpg file into it:
Step 3: using some nice assets for the splash screen & the tiles
To make our little ModernUI Fun Camera application more attractive & serious, let’s use some cool assets. They have been done by the great Michel Rousseau, our lovely UX/Designer evangelist in France. Yes, you will need these cool guys if you want to build great Windows 8 apps.
To help you for these tutorials, you can download his assets here: ModernUI Fun Camera Assets ZIP archive
Unzip the downloaded ZIP archive and drag’n’drop all the images in Visual Studio 2012 into the images folder. Overwrite the existing files if you’re prompted for.
Open the application manifest wizard and fill the various fields to match your new assets in the “Application UI” tab. You will have to fill for instance the “Wide logo” part, change the “Small logo” one. Change the “Show name” combo box to the “No Logos” value.
At last, set this “Background color” field to the #EE8100 value (which is the orange tone chosen by my friend Michel).
Note: If you’re looking for more detailed information about the Splash Screen, please read our MSDN Documentation: Guidelines and checklist for splash screens as I’ll be very light in this tutorial about that.
Now that you’ve used all the needed assets, you should have a nice tile on your start screen:
You will even have the possibility to display this wide tile if you want:
And last but not least, the splash screen will now be much more attractive than the default square provided with the new default project template.
Step 4: handling the camera lifecycle properly
You have probably started to play with your new little camera application. And maybe have you noticed a little problem while using it? If not, try the following actions:
1 – launch the application (from the start screenor from Visual Studio)
2 – check that your webcam has been properly initialized and that you can see the live stream in the app
3 – switch to another app. You’ll then almost immediately see that the camera will be shut down. This makes sense as the system probably doesn’t want to spend unnecessary resources with the camera while you’re doing something else.
4 – switch back to the app to resume it, you’ll see that the live stream will be frozen. The app may looks hung but it’s not really the case. You just need to restart the camera in the proper state.
Note: this is not linked to the suspended state of the app. Even if you’re switching back to the app in less than 5 seconds avoiding the suspending state, you will see this behavior.
To fix that, we need to monitor a specific event that will notify us that the camera has changed its state because we’ve lost the main focus. And believe me or not but the most reliable way to know that is to monitor the soundlevelchanged event.
Not convinced? So, let’s try it. Add this registration code into the onactivated application handler:
Windows.Media.MediaControl.addEventListener("soundlevelchanged", soundLevelChangedHandler);
And add this handler function:
 function soundLevelChangedHandler() {
    if (Windows.Media.MediaControl.soundLevel === Windows.Media.SoundLevel.muted) {
        console.log("Camera is being cut because of a switching action");
    }
    else {
        startCamera();
        console.log("Restarting the camera for live preview");
    }
}
You can now check it has resolved the issue by launching the application from Visual Studio. When you’re switching back to the app, the camera is restarted properly. And you will also see the 2 logging inserted in the JavaScript console.
Please note that there is also a higher level object named CaptureCameraUI that could also match most of your usage cases. For the purposes of my tutorials, I needed a more low level API to customize myself the layout and the UI. But you should have a look to this great API via the tutorial of my colleague Dave: Accessing the Camera in a Windows 8 Metro Style App using HTML and JavaScript for instance.
Ok, that’s all for this first tutorial. If you’ve managed to follow all the steps properly, you should obtain the same Visual Studio solution as this one: download the ModernUIFunCamera Tutorial 1 solution .
See you in the second tutorial where we will learn how to record videos, work a bit on the layout with the usage of the CSS Flexbox specification and how to add nice feedback animation to the user with CSS3 animations. So, continue the series here: Working on the layout, adding video recording support and providing feedback to the user with CSS3 animations
David
Comments
Anonymous
October 30, 2012
Excellent article thank you!Anonymous
January 01, 2013
very good article.....cheersAnonymous
March 25, 2013
Thnx this is very useful !!!Anonymous
July 21, 2013
Saved my few days with this. Thanks so much!Anonymous
July 24, 2013
Excellent article, thanks....Anonymous
July 25, 2013
goodAnonymous
January 09, 2014
it's possible to add the photo / video created in this way to the HTML-formular, without the user has to select the file from your local disk? I mean like in the native client on the mobile devices?Anonymous
October 21, 2014
Hi, this is the only working WinJS+Camera tutorial around the web for taking a single shot, including official code samples! Compliments! Anyway, I've tried this in an universal app and... On Windows Store App: I get a deprecation warning with Windows.Media.MediaControl.soundLevel On windows phone 8.1 App: the camera never gets released causing the phone (yes, the phone, not the app) to become unstable: no other apps can access the camera, nor this one if it gets killed by the user. I tried with various event handlers but none of the events (beforeunload, checkpoint, etc...) seem to be fired when the user clicks the back or the windows button, so I my mediaCapture.close never gets called. Any hints? Any tutorial for WinJS+Universal App+Camera that WORKS? It's a bit frustrating...Anonymous
March 02, 2015
Hi there, I just wanted to enquire about whether a C# version of this tutorial is available and where I might find it please? I'm still quite new to software development and I have to develop a similar app in chapter 2 of the Advanced Windows Store Apps Development using Csharp manual. The thing is, I encountered the same problem of having the camera stream freeze when navigating away from the app, which in this HTML version is solved by the soundLevelChanged event handler. I don't know whether the event is applicable in C# too, or how I would even go about implementing it, so any help will be highly appreciated. Thanks :)Anonymous
April 07, 2015
Please can you paste all the content in the "default.js" used in the tutorials above. Am getting errors and i dont know the errors are from.Anonymous
June 28, 2015
Thanks dude, very helpful for my QRCode Detector, was looking at how to implement XAML Capture in javascriptAnonymous
June 29, 2015
Its terrific :)Anonymous
September 10, 2015
Awesome! Just one question, how can i set the image size(e.g: 800x600) when saving the file?
