Calculating the domain and populating user attributes across multiple MIM implementations.
OVERVIEW:
Enterprise environments often contain multiple independent MIM installations that serve as a development, staging, and production environments. Ideally, code should be written and tested in the Development environment and transferred to staging for validation then transferred to production with no environmental modifications being required.
I often run across Synchronization or Attribute Flow Rules that contain the domain name “hard coded” in the content of these rule’s logic. Below is one method for replacing these “hard coded” domain names by dynamically populating user attributes with the appropriate domain associated to the environment the workflow is executing within (re. development, staging, or production).
A single workflow can be migrated from development to staging to production without modification.
SOFTWARE REQUIREMENTS:
This solution uses the Microsoft Identity Manager Portal and MIMWAL workflow components. To install the MIM WAL, please refer to the following document(s).
EXAMPLE ASSUMPTIONS:
Each environment (Re. development, staging, and production) has a distinctly different domain name. In this case the domains are as follow:
Development TestContoso.com
Staging StageContoso.com
Production Contoso.com
USER ATTRIBUTES:
Our example will calculate the domain and populate the following attributes of the user:
Domain (ex. mydomain.com)
userPrincipalName (ex. user.name@mydomain.com)
Email (ex. user.name@mydomain.com)
CREATE THE WORKFLOW:
The following example workflow will calculate the domain, regardless of the environment (re. Test, Staging, Production) and eliminating the need for modification during code promotion.
Launch the MIM Portal with Admin Rights.
Select Workflows
Select New
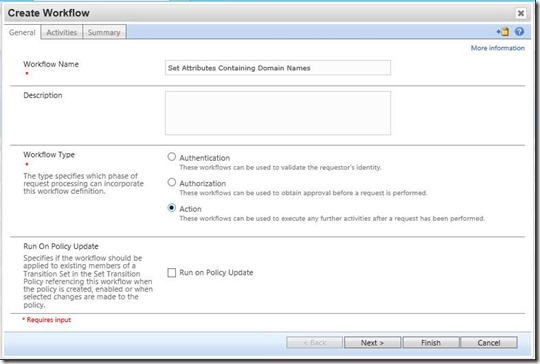
Enter the workflow name (ex. Set Attributes Containing Domain Names)
Select Action as the Workflow Type.
Select Next
CREATE WORKFLOW ACTIVITY #1
Select Add Activity
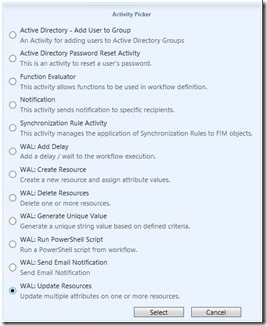
Select WAL: Update Resource as the Activity
Press the Select button.
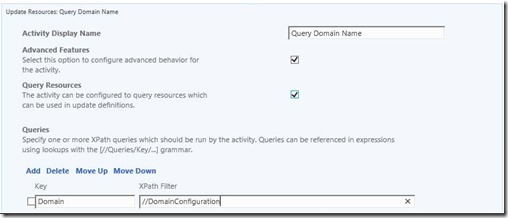
In the Activity Display Name enter “Query Domain Name”
Place a checkmark in the Advance Features checkbox.
Place a checkmark in the Query Resources checkbox.
In the Queries Section enter Domain as the Key
In the Queries Section enter //DomainConfiguration as the XPath Filter
Next, assign the value returned from the Query to a Workflow Data Variable called Domain.
In the Updates section, enter [//Queries/Domain/DisplayName] as the Value Expression
In the Updates section, enter [//WorkflowData/Domain] as the Target.
Select Save to save the first activity of the Workflow.
Note: Attribute names variables, Key, XPathFilter, Value Expression, and Target values are case sensitive.
CREATE WORKFLOW ACTIVITY #2:
Select Add Activity
Select WAL: Update Resource as the Activity
Press the Select button.
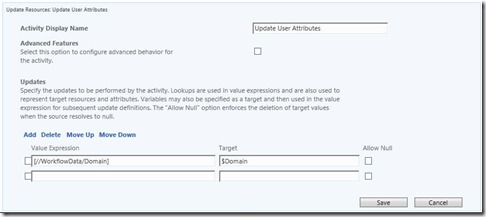
Enter the Activity Display Name (ex. Update User Attributes)
Next, we will Read the WorkflowData/Domain attribute into an Activity variable.
Under Updates, enter [//WorkflowData/Domain] as the Value Expression
Under Updates, enter $Domain as the Target
Select Add to add another row to the Updates section.
Continue to Add rows and enter the following additional Value Expressions and Targets:
Description |
Value Expression |
Target |
Set the lower case of the user accountName to the Account variable. |
LowerCase([//Target/accountName]) |
$Account |
Set the Domain name variable to lowercase. |
LowerCase($Domain) |
$Domain |
Set the Email variable by concatenating values. |
Concatenate($Account,”@”,$Domain,”.com”) |
|
Set the UPN variable userPrincipalName by concatenating values. |
Concatenate($Account,”@”,$Domain,”.com”) |
$UPN |
Set the Domain attribute in the user record to the value of the Domain variable. |
$Domain |
[//Target/Domain] |
Set the mail attribute in the user record to the value of the Email variable. |
[//Target/mail] |
|
Set the userPrincipalName attribute in the user record to the value of the UPN variable. |
$UPN |
[//Target/userPrincipalName] |
NOTE: All MIMWAL Functions, including LowerCase and Concatenate used in tis example, can be referenced at the following location:
https://github.com/Microsoft/MIMWAL/wiki/Functions
Once completed, the second activity of the workflow will appear as follows:
Select the Save Button to save the second activity.
Select OK and Submit to save the Workflow.
CREATE A SET
Next, create a set of user objects that do not have a value for one or all of the attributes needing to be populated (re. Domain, mail, or userPrincipalName).
Select Sets, New
In the Display Name enter a name for the set (Ex. ~Users requiring Domain mail or userPrincipalName values)
Select Next
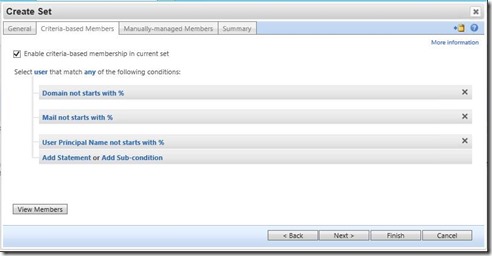
Check Enable criteria-based membership in current set.
Change all resources to user
Change all to any
Select Add Statement
Select Click to Select Attribute and choose the Domain attribute
Select is then from the drop down menu select not starts with
Select click to select value, enter %
Note: % is a wild card value meaning having any value, excludes nulls.
Repeat the above steps for the Mail and User Principal Name attributes. This should result in the following:
Select the View Members button to test the set.
Select Finish, Submit to save the Set.
CREATE A MANAGEMENT POLICY RULE:
Finally, create a Management Policy Rule (MPR) that applies the Workflow to the set of users.
Select Management Policy Rules, New
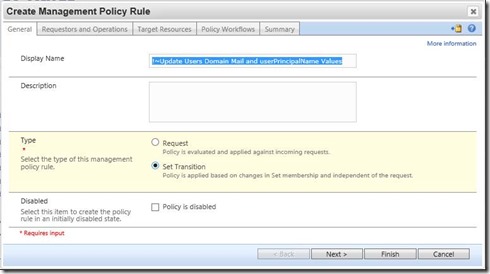
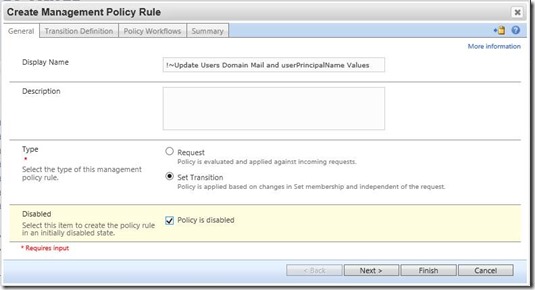
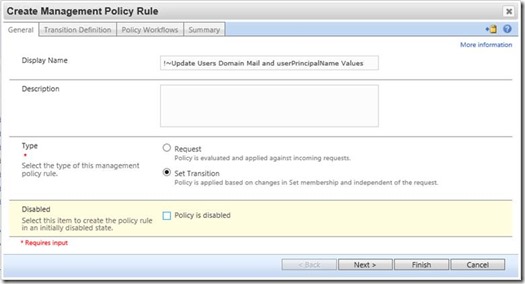
In the Display Name enter the name of the MPR (ex. !~Update Users Domain Mail and userPrincipalName Values)
In the Type section select Set Transition
Select Next
On the Transition Definition Tab in the Transition Set section select the stacked paper icon.
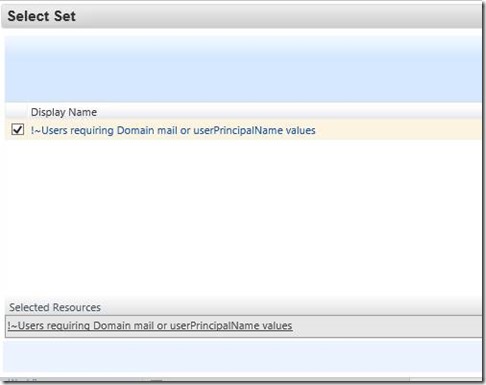
Choose the set that was created above (Ex. ~Users requiring Domain mail or userPrincipalName values) by placing a checkmark in the box next to the name.
Select Ok
In the Transition Type section retain the default setting of Transition In
Select Next
In the same manner select the workflow created above (Re. Set Attributes Containing Domain Names)
Select Finish and Submit to save.
COMPLETED:
At this point, all new users entering the set for the first time will have the Workflow executed and the Domain, Mail and User Principal Name attributes populated from the formula in the workflow.
The attribute results for each of our domains (Re. Development, Staging, and Production) from the assumptions made in this example:
ATTRIBUTE |
DEVELOPMENT DOMAIN |
STAGING DOMAIN |
PRODUCTION DOMAIN |
Domain |
testcontoso |
stagecontoso |
contoso |
user.name@testcontoso.com |
user.name@stagecontoso.com |
user.name@contoso.com |
|
userPrincipalName |
ADDITIONAL NOTES:
In the event the workflow is updated with additional logic, and/or you simply want to re-run the workflow against all members of the set, the following steps can be taken.
WARNING: Depending upon how many members are in the set, this could take some time to complete and could impact performance.
Open the Management Policy Rule and check Policy is Disabled.
Select Finish and Submit to save.
Open the Workflow and check Run on Policy Update
Select OK and Submit.
Open the Management Policy Rule and remove the check from Policy is Disabled.
Select Finish and Submit. This will cause the workflow to immediately start processing against all members of the set.
Note: All create, and update actions performed above are recorded as transactions in the Search Requests view of the portal. Additionally, any workflow executions against users and their status is also recorded in the Search Request view.

![clip_image004[1] clip_image004[1]](https://msdntnarchive.z22.web.core.windows.net/media/2018/05/clip_image0041_thumb.jpg)

