Turn your WordPress site into a Windows 8 app without any coding. Really?
IdeaPress claims you can create a Windows 8 app from your WordPress.com or WordPress.org site without any coding! They are right!
As Windows 8 matures, more tools and templates are appearing to help developers and non-developers create Windows 8 apps. Today I decided to test one of those tools: IdeaPress. I’ll be testing it by creating an app from my personal WordPress.com site. If I get a chance I’ll try to do another blog with a self hosted WordPress.org site to see how that works.
The tool: IdeaPress
- The promise: “Transform your WordPress site into a Windows 8 App in minutes.”
- The reality: gotta say, pretty impressed, it’s not 5 minutes, but I was submitting to the store within two hours from when I started.
Note: For a limited time in Canada one of Microsoft’s partners, IdeaNotion, is offering 200 people a $50 Visa Gift card as a reimbursement for your Windows Store Developer Account when you publish an app using the IdeaPress tool. Email mwnwcan@microsoft.com with your blog URL to secure your Visa gift card.
What you will need to use this tool
- A WordPress.com site and your WordPress login information
- A collection of images to personalize your app
- A name and description for your app
- A page on your WordPress blog where you can post a privacy policy (sample text for a privacy policy is provided by the tool)
- A Windows 8 developer account (so you can publish the app)
- A WordPress.com Account whose username and password you are willing to share with the Store Certification testing team (you can give them your account information if you want, or create a test account on WordPress if you prefer)
How does it work?
- Go to Ideapress and select Login to create an account. I used my Live account, but you can use other accounts such as Facebook as well. After you create the account you will receive an email with a link to activate your account and reset your password.

- After you have logged in, select Start New App

- Next you will go through a series of pages to enter the details for your app. The first page is Settings where you enter the URL of your WordPress site.

- WordPress.com won’t allow the app to post comments to your site without permission. So when you enter a URL for a WordPress.com site IdeaPress gives you instructions to log in to the Developer WordPress site with your WordPress account and follow the instructions provided to generate a Client ID and Client Secret which you use to complete the fields on the Settings Page. The instructions are pretty clear, I didn’t have any trouble following the steps. NOTE: Make a note of the app name you enter in WordPress you will need it again shortly.

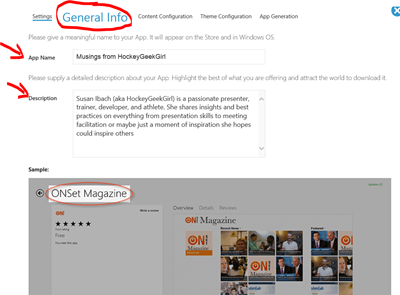
- Once you have specified the Client ID and Client Secret from your WordPress account you can go to the General Info tab and enter an App Name and App description. The app name should be the same app name you entered when you just entered in WordPress. The description should describe the content of your blog so that someone who is browsing your app in the Windows Store understands the type of content you provide and can decide if they want to download it.

- Now continue to the Content Configuration Tab. On this tab choose which pages from your WordPress blog you want included in the app. Note: My WordPress site is made up of a blog page where you can view my posts and a variety of HTML pages. IdeaPress was unable to incorporate a couple of my HTML pages into the app. When I tried to select those pages I either received an error message at the bottom of the screen, or the application would spin for a while and then return with some of the pages deselected (the ones it could not include).

- After you select the pages without receiving any error messages, continue to the Theme Configuration tab. Now, you can have some fun playing around with the look and feel of your app. Note: You even get a live preview as you make changes so you can see how the finished app will appear to the user.
You can choose
- Layout of your content
- Images to display: Background image, title image (if you prefer an image such as a logo instead of text for a title on the main page), a default image to display for content read from your blog that is not already associated with an image.
- Colors for headers, titles, background
- Logos for your tiles
- Images and color to display on the Splash screen that appears to the user when your app launches
Note: IdeaPress tells you what image sizes are required for each logo or page. I used Paint to resize my images, you can also use free tools such as Paint.NET to resize images .
Note: Even though I uploaded the images for my tile and splash screen I got an error saying I hadn’t uploaded any images. As soon as I uploaded a Default Article Image (under Layout and Theme) the error message went away, so I think Default Article image is mandatory and you just get a misleading error message when you don’t provide all the mandatory images.
8. When you have a look and feel that you like, go to the App Generation tab.
On the App Generation tab you get to choose whether to Generate a Visual Studio Solution or an App Package.
- Generate Visual Studio Solution – if you choose this option, you will get a package which contains a .jsproj file you can open in Visual Studio (install Visual Studio Express on your PC by downloading and installing the Windows 8 SDK). The advantage to this option is you can see the code, make changes to the code if you want to, get screenshots from the simulator, and build the app package to submit to the store yourself.
- Generate App Package - if you select this option, you will have to provide your Windows Store account information. IdeaPress will used this information to create and send you an app package. The advantage to getting the app package from IdeaPress is you can submit that package to the store directly without Visual Studio. NOTE: You will need a snap shot of your app when you publish it to the store, so you might want to go to the theme configuration tab and take a screen shot.
Regardless which option you choose you will require a Privacy link.
Your app will connect to the internet to access your blog content. The Windows Store requires any app that connects to the internet to have a privacy policy. The easies way to handle this is to add an extra page to your WordPress blog, the IdeaPress team provides an example privacy policy so you can get an idea of what information to include on the privacy policy page. Enter the URL of your privacy policy page here, and make a note of it, because when you submit your app to the store you will again be asked for the URL of the privacy policy.

Finally you can check the box that says you have read and agreed to the terms and conditions and choose Submit. IdeaPress will email you a link to your solution or package and you can start the process of submitting it to the store! No coding required!
So there you have it, if you have a WordPress.com blog site you can build and publish a Windows 8 app without writing any code!
NOTE: My first two attempts to publish to the store failed certification, thought I would share with you why I failed certification and how I fixed it. The first time it was rejected because they did not feel I had selected a suitable category. So i changed the category to Lifestyle since my personal blog covers a fairly broad range of topics. The second time I failed because to post a comment on a post you need to log in with a WordPress account. I did not mention that in my app description, and I failed to provide an account the store certification team could use to test that feature in the Notes to testers section. Once I made those corrections my app passed certification and is now published to the store.
Comments
Anonymous
April 19, 2013
Love the article Susan!Anonymous
April 19, 2013
@Harris - Thanks, Sometimes you just have to try things out yourself to see exactly how well they work!Anonymous
April 19, 2013
Thanks, this is a great article. I have just generated an app and publishing to the store now. Just want to point out for developers, you can further customize it by using the solution. They have a good documentation how to change the options and how to edit the CSS github.com/.../README.mdAnonymous
April 19, 2013
Great post, Susan! Thanks!!Anonymous
April 22, 2013
FYI - My app was rejected the first time I submitted because they said it was in the wrong category of the store. So do think carefully about the category you choose to have your app listed in as well as your app description. Those can affect whether you are published. Just made some changes and about to resubmit now.Anonymous
April 22, 2013
So what? Why would I need this?Anonymous
April 23, 2013
@Georgi - it comes down to the entire argument of do you want apps, web sites, or both. At least this provides the ability to do both without a lot of effort for those who choose that option.Anonymous
April 23, 2013
Hi Susan, "To post a comment on a post you need to log in with a WordPress account." Once I click on comment button, I do not get wordpress login like you mentioned. do you know how I can solve the problem?Anonymous
April 23, 2013
The comment has been removedAnonymous
April 25, 2013
Hi Susan, Thanks a lot. That fixed the issue. But while displaying comments it shows - error "an active access token must be used to comment". Are you aware of this error? can u please help?Anonymous
April 25, 2013
@Ankita - I don't get that error message in my app. I know the app you create in Wordpress affects the ability to post comments, is it possible your app name doesn't match or the client id you entered was wrong or something like that? Feel free to email me a screenshot, and we'll figure it out.